• August 2025 Turning Challenge: Wooden Version of Non-Wood Item! (click here for details)
  • Congratulations to David Croxton for "XOXOXO" being selected as Turning of the Week for August 11, 2025 (click here for details)
  • Welcome new registering member. Your username must be your real First and Last name (for example: John Doe). "Screen names" and "handles" are not allowed and your registration will be deleted if you don't use your real name. Also, do not use all caps nor all lower case.

I cuda bin ah doctah

Joined
Apr 11, 2014
Messages
462
Likes
470
Location
Dallas, TX
Dear Fellow Turning Junkies - let me know if you want to borrow my needle.
I found the lower viscosity Aero-Marine #300 will easily go through a #22 and, with some pressure, a #25 needle. These can be easily had at you local pharmacy - you'll get those "knowing smiles" when you tell them your shooting epoxy into your turnings.
To my thinking, a patched worm hole or crack, when filled with a almost matching filler, screams, "defect". Use a super dark brown or even black and it becomes interesting.


smHalf Shot.jpg
 
I get plastic syringes from my Vet. They have a larger opening in the plastic needle and it's easy to get West System epoxy through them.
 
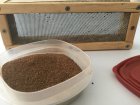
image.jpg I take small chunks of bark or waste wood and put it in my old oster blender to create Sawdust smoothies. I then strain the dust with a filter made from course drywall sanding paper. Combine(outside your blender) with epoxy, varnish, glue or your favorite flavor medium. I like the injection applicator idea.
 
I use System-3 pigments which are formulated to be compatible with cycloaliphatic epoxy. John Spitter's comment on "artist earth pigments" is intriguing - be fun to investigate that.
For what it's worth, Aero Marine 300/21 and West G-Flex are both cycloaliphatic and, therefore, compatible which puts three things in the arsenal:
1) Low viscosity 300/21 which shoot in a #22 or even a #25
2) The same 300/21 thickened with colloidal-silica - the dye seems to permeate he colloidal-silica better than the other thickeners I've tried.
3) WEST G-Flex: It's the thickest and most difficult epoxy on the planet. But for structural fixes, it's great stuff. Plus, unlike most other epoxys with 70-degree cure temp, G-Flex will cure in 40-degree

I tint them all with System-3 and have had no problem applying them on top of each other in uncured state.
Good News/Bad News: Good: 30-minute+ working time Bad: Best to allow 12 to 24 hours before turning or sanding.
 
View attachment 26762 I take small chunks of bark or waste wood and put it in my old oster blender to create Sawdust smoothies. I then strain the dust with a filter made from course drywall sanding paper. Combine(outside your blender) with epoxy, varnish, glue or your favorite flavor medium. I like the injection applicator idea.

Interesting idea, Dennis.......:)

I had a blender I gave to the 2nd hand store......shuda kept it. :(

There are always shavings of the bowl I'm working on......That would be a logical source of filler for the epoxy. So, tell me......how fine does the blender make wood shavings? Is it a fine powder?

Of course, sanding dust would work, too......but not as easily collected. By the time I decide to use an epoxy filler, the sanding dust isn't as readily available.

Thx

-----odie-----
It really chops it up with a mixture of sizes. That’s why I use the strainer to sift out the bigger particles. You can actually re-strain to yield and collect finer particles through a finer drywall sandpaper mesh. The blender’s glass container wall will be coated with the ultra fine dust which can be collected. The advantage of this process is you can make as much as you need at a consistent particle size. See the picture above.

I got the idea because I turned a burl and was wondering how to fill the voids. A friend said use coffee grinds. So I ground some coffee and tried it. It didn’t match. Then I got the idea to grind some of the burl’s bark in the coffee grinder. It worked but I quickly destroyed the grinder! I figured the blender would work because it does an excellent job on ice. A word of caution: ice is about 1.5 inch cubes. Use small pieces of bark/wood .5inch cubes. The Smaller the better and pulse rather than running the blender constant. Do not allow a heat build up inside the blender container. It’s possible that it could catch fire if you run the blender a long time. I empty the blender into the strainer often and reblended the bigger particles.
 
Last edited:
It really chops it up with a mixture of sizes. That’s why I use the strainer to sift out the bigger particles. You can actually re-strain to yield and collect finer particles through a finer drywall sandpaper mesh. The blender’s glass container wall will be coated with the ultra fine dust which can be collected. The advantage of this process is you can make as much as you need at a consistent particle size. See the picture above.

I got the idea because I turned a burl and was wondering how to fill the voids. A friend said use coffee grinds. So I ground some coffee and tried it. It didn’t match. Then I got the idea to grind some of the burl’s bark in the coffee grinder. It worked but I quickly destroyed the grinder! I figured the blender would work because it does an excellent job on ice. A word of caution: ice is about 1.5 inch cubes. Use small pieces of bark/wood .5inch cubes. The Smaller the better and pulse rather than running the blender constant. Do not allow a heat build up inside the blender container. It’s possible that it could catch fire if you run the blender a long time. I empty the blender into the strainer often and reblended the bigger particles.


That's it! :D

This sounds like the perfect solution for me. Don't know why I've never heard of this before, but now I've got to try this out for myself. Matter of fact, I've got bowls in the shop right now that can use some help with small voids.

thanks

-----odie-----
 
Dear Fellow Turning Junkies - let me know if you want to borrow my needle.
I found the lower viscosity Aero-Marine #300 will easily go through a #22 and, with some pressure, a #25 needle. These can be easily had at you local pharmacy - you'll get those "knowing smiles" when you tell them your shooting epoxy into your turnings.
To my thinking, a patched worm hole or crack, when filled with a almost matching filler, screams, "defect". Use a super dark brown or even black and it becomes interesting.

I have a bunch of glass syringes and 30 gauge needles .... how much force would you estimate would be needed to push epoxy through those needles. So, do you tell your pharmacist that you have some crack that you're shooting up? :D When using Inlace I don't put a needle on the syringe. It's hard enough just getting it through the hole in the syringe.

I agree with your thoughts on trying to make a patch blend in with the color of the surrounding wood. Solid black or sometimes just plain clear are what I use.
 
Of course, sanding dust would work, too......but not as easily collected. By the time I decide to use an epoxy filler, the sanding dust isn't as readily available.
Whenever I need matching dust (or contrasting) I use the bandsaw. I use an index card or postcard (or other heavy paper) and make a temporary zero clearance cut in the paper. Take your wood species and then make numerous small kerfs in the wood. The bandsaw table will soon be covered with dust ... continue until you have more than you will need. Gather/scrape it up with the edge of the same card. I have a 6 tpi blade but any blade will work. Try it - you might like it.
 
Try it - you might like it.

I will, thanks for the tip........so many good ideas here......and, this one sounds like it oughta work too.:D

-----odie-----
 
if I'm using wood shavings for filler I will use a battery powered coffee grinder. You get a mixture of stuff but you use a strainer to get the finer material sperated.
 
I have a bunch of glass syringes and 30 gauge needles .... how much force would you estimate would be needed to push epoxy through those needles. So, do you tell your pharmacist that you have some crack that you're shooting up? :D When using Inlace I don't put a needle on the syringe. It's hard enough just getting it through the hole in the syringe.

I agree with your thoughts on trying to make a patch blend in with the color of the surrounding wood. Solid black or sometimes just plain clear are what I use.

Bill,
The smallest I've used with any success in #25 - to my thinking you would have to thin to shoot thru anything finer.
Even with the #25, it takes a lot of pressure with the low-viscosity 300/21 from Aero Marine - I always use a syringe with the female thread that allows the needle to be screwed in. When I need a higher flow-rate, I use a #22. The #22 diameter is .028" which still allows you to shoot under bark and into small cracks.
 
I was actually joking about trying to force epoxy or any other resin through a 30 ga needle.

Thanks for the information about the large needles that you use. Do you use glass syringes? I've found that some plastic syringes and plungers are softened by various resins and it's a race to see if I can get the resin out of the syringe before it gums up.
 
Negatory on the expensive glass stuff. If I remember correctly, I pay $0.25-ea for plastic syringes with #22 needles at a local pharmacy - less at a feed store. And I'll use one syringe/needle maybe 15, even 20-times. After shooting, I'll dip into acetone, draw in, shoot out - maybe four or five times. The most important thing is to blow out the needle and to store the syringe with the plunger removed. Never had a problem with the acetone attacking the cheap plastic syringe.
The great advantage of Aero Marine 300/21 is that you have 20-minutes or better working time. I can mix about 10-grams (about 0.5" in a mouthwash cup), shoot up once or twice then mix a heaping teaspoon of colloidal silica and trowel/poke-brush the rest.
Of course the disadvantage is the long cure time - needs to cure overnight.
 
Back
Top