• July 2025 Turning Challenge: Turn a Multi-axis Weed Pot! (click here for details)
  • Congratulations to James Seyfried for "NE Red Oak II" being selected as Turning of the Week for July 21, 2025 (click here for details)
  • Welcome new registering member. Your username must be your real First and Last name (for example: John Doe). "Screen names" and "handles" are not allowed and your registration will be deleted if you don't use your real name. Also, do not use all caps nor all lower case.

Idea for a hollowing system...

Joined
Dec 5, 2015
Messages
1,004
Likes
503
Location
Seattle, WA
Idea for a hollowing system.

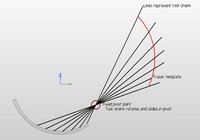
First turn the outside of your hollow form. Use a flexible spline to copy the outside curve on to paper. Offset that curve by the desired wall thickness. Your tool would have a cutter on one end and a pin protruding down to follow the tracer template. For example, maybe your tool shank is ten inches from cutter to pin. Draw a 10 inch line from points on inside curve of the hollow form through the pivot point. The location of the tracer pin establishes a point on the tracer template. Continue with a series of points inside your form to get a series of points to draw the template curve through those points. Cut the tracer curve template out of thin wood or whatever.

Once everything is mounted on your lathe with a drilled starting hole in your piece begin hollowing with your tool. The hollowing is complete when the pin is held tightly against the template contour to give the exact interior contour.

At least that's the theory. Comments? There'll be some details to be worked out about the location of the fixed pivot, etc.

It might seem that laying out the template contour would take quite a bit of time. Might not be as long a time as setting up conventional hollowing systems. This could be less expensive than other systems.

hollowing smallest.JPG
 
I'm having trouble visualizing this.
Let me see if I can explain....

In the drawing the tool shank is represented by a line, there's only one tool, although I drew several to show different angular positions of the tool in the fixed position pivot point. You would hold the tool at the far right end The tool shaft where you hold would be much longer than shown for leverage and control. The tool has a pin protruding down that acts as a stop when it hits the template so the tool doesn't gouge in while roughing. When the pin is in contact with the template the tool can't accidently advance into the work. After roughing, by traversing the template with the pin in contact with the template the inner hollow profile will be cut with the contour you want.

I would use an insert cutter with a small nose radius like the OT folks use to get a fine finish.
 
Your tool would have a cutter on one end and a pin protruding down to follow the tracer template.

What you described could keep the cutter tracking where the inside wall should be.

I may be missing something. But it sound like the pin has to be where the wood is,
When you are hollowing there is wood all around the cutter.
How does the pin track where the cutter is?

Wood moves as it is hollowed so the template may not match later in the process

The video systems already show you where to stop. Take a minute to set up
 
How does the pin track where the cutter is?
The pin is on the other end of the bar with the cutter. Because of the bar (cutter) being restricted by the pin hitting the template the cutter can't go where you don't want it.

As time permits I plan on mocking this up so it'll be more obvious how it should work. But, like a good many things issues may come up.
 
I think I understand the concept - similar to a copy/duplicator lathe. If one planned to do a production run of copies, it might be worthwhile. As mentioned walls can move a bit during hollowing, there are ways to limit that.

For 1-off hf’s I dont think its worthwhile. The camera systems work very well and only take a minute to hook up. With a large opening, ~2” or bigger, its not difficult to smooth out the interior. Small openings I dont worry about a nice id.
 
The pivot-pin part of your approach will work assuming a live human being is holding the tool and reacting to the variables - I've used a pivot pin for over 15-years - wouldn't make a hollowing-cut without one.
I interpret the template as an attempt to contain/overcome those same variables - to quote Lucy: "You're a brave man Charlie Brown."
Looking forward to knowing how your idea progresses.
 
Sounds like a fix for something that isn't a problem. But I'm sure many good ideas have started that way. Me I'll stick with the laser dot, with that dot I can get as thin as the wood will allow with no screen, no wires and now no follower pin :). Keep at it Doug you never know.
 
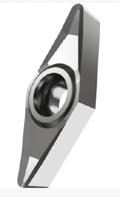
The motivation for this method is to use the type insert shown. Razor sharp, high positive cutting edge, small nose radius, low cutting force for no tearouts.

insert.JPG
Same tool principle as OT tools where no sanding is done or needed. No problems cutting against the grain, difficult wood, knots, hard wood, etc. These inserts are too aggresive for hand guided cutting and near impossible to hand guide a smooth contour given the tool's small nose radius. Their aggresiveness is why NONE of the carbide insert tools on the market are offered with these inserts. The inserts are used in CNC spindle turning lathes where a single pass with and against the grain produces parts only needing flap sanding.

The pin on template concept should be foolproof, preventing accidently cutting the wall too thin or going through the wall. The method is as old as the hills and well accepted in non-automated turning.

Hollowing rigs seem to be fairly expensive, this design might be less expensive to build.
 
One thing never mentioned about aggressive cutters used for hollowing, is the high effort needed to get the curls out. You'll need wires or other devices to dig and pull them out of the hole. You have to stop more often to dig them out. Pack it too tight and you can spend 5 minutes removing the curls and maybe even stick the hollowing tool in the vessel. Small scraper tips make tiny bits of wood, but they blow out with compressed air.
 
Can you explain how the positive rake cutter is restricted so it doesn't dig in?
On the finish cut the cutter will be restricted by the pin following the template preventing it from digging in. Digging in could be a problem while hand controlling the cutter during roughing, if so depth of cut could be limited by a method of incrementally moving the pivot point and template assembly.

My plan is to build a prototype mounted on a metal lathe to test the concept. With that lathe pivot/template adjustments will be easy, left-right, in-out.

There'll be issues to work out, it's far from rocket science though.

As mentioned previously using the insert is a major improvement over other cutter styles. Not needing to frequently sharpen the cutter is a big one.
 
What are OT tools?

Hunter offers cupped carbide tools/cutters, not to be used “flute up”. I have one for my Jamieson rig, cutter mounted at ~45 deg.

It would require multiple templates for 1 piece - the id geometry changes significantly as the piece is hollowed.

Plan for this idea to be used as a way to finish the last part of wall t, more of it as the dia grows. Use a less aggressive cutter to hog out mat’l and get close, then use a template and other cutter to finish it off.
 
It would require multiple templates for 1 piece - the id geometry changes significantly as the piece is hollowed.
No, the template should only come into play for the final pass. The roughing would be done free hand with the template only preventing an unwanted deep gouge into the wall. I did mention that the tool might be too aggressive for free hand roughing though.

As to geometry changing, that's something I hadn't given consideration to. Would that be an issue with a laser pointer to? If one side of the form distorted outward and possibly the other side distorted inward with the work spinning the laser would sense the outer most curve wouldn't it? You might end up with thicker and thinner walls that you'd prefer. Or am I missing something about how the laser guided systems function?

I should have mentioned I'm not interested in large hollow forms like a basketball size with a small hole. More like bowls with a utility function with an undercut around the rim, in other words the opening is smaller than the bowl's major diameter.

At the Portland symposium before the most recent one a well known turner displayed a large round hollow form with the small top hole. I asked if I could pick it up. Yes, but be careful. So I braced myself with both hands ready to pick up what I thought was going to be reasonably heavy. It was so light I almost through it up into the air. A little panic from the display people. I put it down immediately. That made an impression on me, mostly what is the purpose of the hollowing because it certainly isn't apparent to anyone who doesn't have the opportunity to pick it up? Is it only to prevent cracking?
 
Last edited:
The main purpose of the hollowing system according to Randy Privett was to make it easier to hollow a piece. What has transpired is that it makes it easier to make really thin hollow forms easily. When I had that conversation with Randy I happened to touch his hollowing system display (the Monster Articulating System) and after just moving it around and in my minds eye perceiving what it could do I bought one. I have bought or tried almost every hollowing system made. I have stuck with 3. Both the Monster articulated and the Monster captured system, the third is Alan Trout's Pro Rail Hollowing System. I use all 3 with the laser dot. My hollowing consists of 3 tool changes: the initial straight tool, the curved tool for under the curve at the top and back to the straight to finish. That is 3 laser settings, that is all I ever do. I tried the video and I still had to make the same 3 settings with video when changing the tools. The difference being with the laser I don't have wires and a video screen to worry about. I look at the piece when hollowing not a screen. That laser dot is very accurate for me and I can go thin. Now what Doug says above (As to geometry changing, that's something I hadn't given consideration to. Would that be an issue with a laser pointer to? If one side of the form distorted outward and possibly the other side distorted inward with the work spinning the laser would sense the outer most curve wouldn't it? You might end up with thicker and thinner walls that you'd prefer. Or am I missing something about how the laser guided systems function?) That does happen as I've said before the thin walls may very well get as thin as the wood allows. The laser cannot sense this and your ear may help. I have a small hollow form that that is exactly what happened. If you measured in four 90° sections you would get 2 where there is .040 thickness and 2 90° sections where the thickness is about .009 with just the tiniest pinhole to let you know something was up and if I remember correctly that piece was cherry. I'd be very interested to see Doug's idea come to fruition and maybe 15 years ago I would have bought it.
 
Digging in could be a problem while hand controlling the cutter during roughing, if so depth of cut could be limited by a method of incrementally moving the pivot point and template assembly.
No, the template should only come into play for the final pass.
I was responding to your 1st statement.

As to wall movement - laser nor camera system can “correct” for it. Both will “see” the outer most area - its like an interrupted cut. That situation requires operator management - check with calipers.

Your concept may have merit for large opening pieces for some. For me, urns about the only projects I do with significant depth and large opening, and I use the hollowing system/camera. I dont have to make a template. I have some scraper tips to smooth things out. For undercut rim bowls a bowl gouge and a nrs get it done.

Purpose of hollowing - yes, to prevent cracking as well as speed the drying process (less t dries faster). Thin walls do both of those things as well as show off tool handling skills. Depending on thickness and wood type, sometimes a light inside can glow through the wood to demonstrate t of the piece.
 
Back
Top