• Beware of Counterfeit Woodturning Tools (click here for details)
  • Johnathan Silwones is starting a new AAW chapter, Southern Alleghenies Woodturners, in Johnstown, PA. (click here for details)
  • Congratulations to Keven Jesequel for "Big Leaf Maple" being selected as Turning of the Week for April 15, 2024 (click here for details)
  • Welcome new registering member. Your username must be your real First and Last name (for example: John Doe). "Screen names" and "handles" are not allowed and your registration will be deleted if you don't use your real name. Also, do not use all caps nor all lower case.

I'll be doing some teaching - any advice?

Joined
Jun 4, 2021
Messages
3
Likes
63
Location
Hudson, MA
Website
www.instagram.com
I've been asked to do some teaching - basic bowl making - for a local "maker" space. They have 2 Jet lathes (14/40) with most of the trimmings. That means I'll have 2 students. The students will have done some spindle turning and some familiarity with the lathes.

I don't have a lot of time with the students but here's what I'm thinking
I will make the blanks for the students - 6" x 2" cherry or similar.
I'll probably teach them face-plate mounting (I don't think the shop has the worm screws)

I will also create props from each of the major stages to show the students where they are going
Blank,
Blank with tenon,
bowl outside shaped,
bowl inside shaped
bowl without tenon.
Then I'll supervise them as they turn their bowls

I'll sharpen the bowl gouges (I'm going to make laminated instructions on how to sharpen the bowl gouges for the shop so the gouges stay reasonably consistent - they already have the OneWay system)

The lathes are a bit tall (even for me, I'm 5' 7"). Does anyone recommend risers for short students?

Thanks in advance for your insights.

Mark
 
Joined
May 4, 2010
Messages
2,446
Likes
1,872
Location
Bozeman, MT
Sounds like a pretty good plan, to me. At our high school shop, we have 2 risers of slightly different height, as we have students as young as 14 who are still growing, and some petite female students. And one of our students was 6'5" and still growing! The students are often reluctant to use the risers, but it really makes a difference in the ease of turning. We made them about 2'X3' to allow for shifting feet without going off the riser.

The other thing I'd be sure to cover is grain orientation. If they've done spindles, you'll need to explain why the grain orientation is different with face work and why the use of the tools is different. "Downhill" is not the same.

Just in case you've never used the Jet 14" lathes before--they have Reeves drives for their variable speed and you have to change speed while the lathe is running. That means, if you load up some wood and turn it on, it may be going dangerously fast for the piece you've mounted. Everybody needs to learn to turn the lathe on, turn the speed all the way down (the minimum is like 250 to 400 range), turn off the lathe, and THEN mount the wood.
 
Joined
Jun 4, 2021
Messages
3
Likes
63
Location
Hudson, MA
Website
www.instagram.com
Sounds like a pretty good plan, to me. At our high school shop, we have 2 risers of slightly different height, as we have students as young as 14 who are still growing, and some petite female students. And one of our students was 6'5" and still growing! The students are often reluctant to use the risers, but it really makes a difference in the ease of turning. We made them about 2'X3' to allow for shifting feet without going off the riser.

The other thing I'd be sure to cover is grain orientation. If they've done spindles, you'll need to explain why the grain orientation is different with face work and why the use of the tools is different. "Downhill" is not the same.

Just in case you've never used the Jet 14" lathes before--they have Reeves drives for their variable speed and you have to change speed while the lathe is running. That means, if you load up some wood and turn it on, it may be going dangerously fast for the piece you've mounted. Everybody needs to learn to turn the lathe on, turn the speed all the way down (the minimum is like 250 to 400 range), turn off the lathe, and THEN mount the wood.
Thank you. I did not know about the Reeves drive. Great bit of info. I turn on a PM3520 (and before that a non reeves Jet).....So I've never experienced that technology.
 
Joined
Jan 22, 2009
Messages
444
Likes
680
Location
Crossville, TN
What Dean said, in addition they should learn to *always* turn the speed down before shutting off the lathe. A habit I engrained when I had a Jet 1440; otherwise you might find yourself with a freshly mounted large chunk on a lathe you just removed a spindle from and the speed is still high.
 
Joined
Apr 20, 2006
Messages
1,273
Likes
1,004
Location
Erie, PA
My students whether they are 8 or 80 the first things I have them turn are a pen and a bottle stopper. Gives them some confidence with little chance of anything out of the ordinary happening. Tool control, body movement, sanding and finishing all in the first lesson and instant gratification (which is the reason my flat woodworking area became a wood storage area :)).
 
Joined
Feb 6, 2010
Messages
2,976
Likes
1,939
Location
Brandon, MS
I had a Jet 1442 and the speed can be changed when off if the spindle is well lubricated. This must be done regularly or as was stated the lathe has to be on to change speed. It is best practice to drop the speed down when stopping the lathe.

I also like your plan and I am sure you plan to but demo each step an then let them do it . This can be accomplished by using an extra chuck for the demo cut.
 

hockenbery

Forum MVP
Beta Tester
TOTW Team
Joined
Apr 27, 2004
Messages
8,629
Likes
4,970
Location
Lakeland, Florida
Website
www.hockenberywoodturning.com
remember everything is new to them so I try not tell them anything they don’t need to know right Now.
don’t Fill up the short term memory locations with other ways to do it or trivia about wood.

I teach the side ground gouge I do the sharpening for the first bowl
before every class I check all the lathes, speed setting, on/off, tailstock lock and operation.
I use 3 tools bowl gouge, spindle gouge (tenons, beads in longer classes), round nose scraper. in long classes a 1/4 inch bowl gouge.

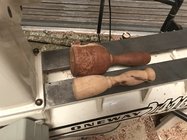
the first thing I do with beginning bowl students is turn a carving mallet.
this is an item they can use. guaranteed success - impossible to make one that won’t work
gets them using either hand forward. They learn to nibble away the square edge to get a surface for the bevel to ride on. this gets them to some level of comfort with the bowl and spindle gouge.

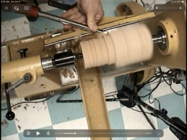
the start with a 4x4 or 3x3 square. I have them mark one face with lines space at 1/2 intervals using a sharpie.
the lines are easy to see with the lathe running.
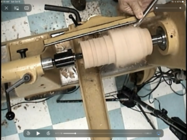
with The flute at 9 o clock line the bevel up with the left line push the tool in works 1/2 way down
switch to the rightb side flute at 3 o’clock .
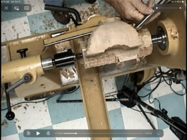
I have them smooth the cylinder with pull cuts. Use the handle area to learn/practice beads with a 1/2” or 3/8“ spindle gouge. rough shape the handle with the bowl gouge. Ad a bead an finish turn with the spindle gouge.

Carving mallet.201ED890-099D-49A2-B001-B46BB64FD5EC.jpeg

these photos are from a napkin ring demo. Did not draw the lines.

461A9A83-DCA7-4152-8668-97EE1BC8A432.png05C85487-049A-4095-808C-E8D9E090683B.png
how it relates to the bowl I made some roughing cu5s on a bowl an cut the sides of for a visual aid.

the left side cylinder cuts are those used on the outside of the bowl6B322D66-44D7-4E2A-8B6D-5D31D2EDC314.png
the fights side cuts are those used to hollow the bowlFA5B7339-B168-4C86-8D76-76ECEFB19F58.png
 
Last edited:
Back
Top