• We just finished moving the forums to a new hosting server. It looks like everything is functioning correctly but if you find a problem please report it in the Forum Technical Support Forum (click here) or email us at forum_moderator AT aawforum.org. Thanks!
  • Beware of Counterfeit Woodturning Tools (click here for details)
  • Johnathan Silwones is starting a new AAW chapter, Southern Alleghenies Woodturners, in Johnstown, PA. (click here for details)
  • Congratulations to Dave Roberts for "2 Hats" being selected as Turning of the Week for April 22, 2024 (click here for details)
  • Welcome new registering member. Your username must be your real First and Last name (for example: John Doe). "Screen names" and "handles" are not allowed and your registration will be deleted if you don't use your real name. Also, do not use all caps nor all lower case.

Inspection table

odie

TOTW Team
Joined
Dec 22, 2006
Messages
7,116
Likes
9,818
Location
Panning for Montana gold, with Betsy, the mule!
I recently uploaded a photo of a Padauk bowl in the member's gallery......and, after I'd seen the blow-up photo, I was horrified to see some concentric lines in the flashpoint where there is direct reflection of light to the lens of the camera:
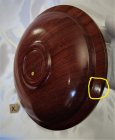
1593 padauk (20)_LI.jpg
The odd thing, is these 600gt concentric sanding lines are not visible to me, UNTIL AFTER the Danish oil is applied and cured. Also, with finished bowls, these sanding lines aren't visible under normal room lighting, so I'm not too concerned about this particular bowl......but, I rely on my photos to sell my bowls online......Sooooo, this is entirely unacceptable.

These 600gt sanding lines are easily removed with 0000 steel wool after the Danish Oil is cured, but not so easily eliminated after the Beall 3-step buffing process.

I decided I needed a way to reproduce intense reflections, so that I can inspect for these concentric lines, and deal with them, AFTER the Danish Oil is applied, and PRIOR to the time I buff and wax. The solution, as it turned out, is to build an "inspection table" that mounted between the bedways of my lathe.
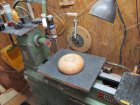
IMG_5130.JPG
This is the perfect place for inspection and a little hand application of 0000 steel wool, because I have many sources of bright light at this location......incandescent, LED, and fluorescent.

Probably a few turners noticed the concentric lines, and I was wondering if anyone would point this out to me, but nobody did. Maybe that's a sense of consideration, or nobody really noticed this......? :rolleyes:

Anyway.......one more problem solved. (I will not allow myself to accept flaws in my work.....they MUST be dealt with, and conquered! ;))

Have a good day gentlemen! :D

-----odie-----
 
Joined
Jan 7, 2012
Messages
271
Likes
2,539
Location
Davison, Michigan
Website
jpseyfried.com
I thought scratches or sanding lines showed up best with a single light source as you see the shadows in the valleys. For me it is dyed pieces that are the most problematic, because dye can be removed touching up the flaw. So after wiping off the piece with mineral spirits and before applying dye, I walk out of the shop, then inspect it in sun light. Or if that is impractical I use the brightest single source light I have and turn off other lights.
 
Joined
Jul 26, 2016
Messages
2,326
Likes
1,105
Location
Nebraska
The average person will never see the lines unless they are displaying the piece under museum or art gallery quality lighting. You would need to look pretty hard to see those lines as most peoples vision tend to ignore subtle flaws and lines on a large piece of the same color. A younger set of eyes will be able to see small flaws more readily compared to the vision of most of us wood turners that have been doing this for decades. Certain types of lighting can assist with inspecting a piece for fine details during the finishing process, lighting that is used in general shop area will not provide the illumination needed to identify small flaws like that. Wetting the freshly sanded piece will usually bring out small flaws that can not be seen on a dry piece. You could use natural sun light to expose small flaws on a work piece but many times the bright light will close your iris down and reduce the vision potential of your eyes. Good inspection lighting needs to illuminate the item and shield the eyes from the glare of the lighting you are using so that the eye is comfortable and allows the iris to open up and see more detail in the work piece.
 
Joined
Jul 26, 2019
Messages
27
Likes
95
Location
Raleigh, NC
Website
www.vanduynwoodwork.com
This is one of the reasons that I build up and break down my finishes. Additionally I don't take any power sanding or lathe sanding beyond 180 on the lathe for sculptural pieces and 220 for bowls. Hand sanding and the building of finishes with multiple coats takes care of the still machined look.

JVD
www.vanduynwoodwork.com
 

odie

TOTW Team
Joined
Dec 22, 2006
Messages
7,116
Likes
9,818
Location
Panning for Montana gold, with Betsy, the mule!
Certain types of lighting can assist with inspecting a piece for fine details during the finishing process, lighting that is used in general shop area will not provide the illumination needed to identify small flaws like that. Wetting the freshly sanded piece will usually bring out small flaws that can not be seen on a dry piece. You could use natural sun light to expose small flaws on a work piece but many times the bright light will close your iris down and reduce the vision potential of your eyes. Good inspection lighting needs to illuminate the item and shield the eyes from the glare of the lighting you are using so that the eye is comfortable and allows the iris to open up and see more detail in the work piece.

Good informaton.....thanks, Mike :D

I thought scratches or sanding lines showed up best with a single light source as you see the shadows in the valleys. For me it is dyed pieces that are the most problematic, because dye can be removed touching up the flaw. So after wiping off the piece with mineral spirits and before applying dye, I walk out of the shop, then inspect it in sun light. Or if that is impractical I use the brightest single source light I have and turn off other lights.

James......you are a turner whom I've come to have great respect for your skills in turning. With yours and Mike's posts, I am going to do some further checking on how well my lathe lighting works......and, will take the advice to use some direct sunlight for inspection purposes, as well. I have used the "inspection table" for those bowls I have in progress, and so far, it seems to be working well to identify these minor flaws. Perhaps, the different sources of light is helping in that effort.....(incandescent, florescent, and LED). I do intend to experiment, using a single source of light with other lights off, too.

Thank you gentlemen.......I'm working on it! :D

-----odie-----
 

hockenbery

Forum MVP
Beta Tester
TOTW Team
Joined
Apr 27, 2004
Messages
8,637
Likes
4,976
Location
Lakeland, Florida
Website
www.hockenberywoodturning.com
As above Finishing the finish is an important step.

Before applying the finish:
With rare exceptions, I sand hollow forms and NE bowls totally off the lathe, to 320.
I generally use 3” Velcro discs sanding with the grain. Any sanding scratches at 220 are lost in the grain of most domestic woods. ( some tropical shave so little grain that higher grits are needed, some ebony shows sanding scratches to 600)
Twice turned bowls I sand to 220 on the lathe then 320 off

Cutting back the finish
Most commonly I sand the first finish coat with 400
Subsequent finish coats with 0000 scotch brute.

Then the final finish coat may get the Tripoli, White diamond, canuba from the Beall buffing.
 
Last edited:

Dennis J Gooding

Beta Tester
Beta Tester
Joined
Apr 10, 2010
Messages
827
Likes
747
Location
Grants Pass, Oregon
I agree with others that the faults (features?) are trivial. You might want to consider an alternative approach: Photograph your glossy work for posting using highly diffuse light, e.g., a light tent. To that you can add a controlled amount of spot light if you like to produce soft highlights. John Lucas can probably make further suggestions.
 

john lucas

AAW Forum Expert
Joined
Apr 26, 2004
Messages
8,337
Likes
3,595
Location
Cookeville, TN
It looks to me like it's possibly just application marks from the finish not necessarily sanding marks on the piece. How are you applying the finish.
 

Bill Boehme

Administrator
Staff member
Beta Tester
TOTW Team
Joined
Jan 27, 2005
Messages
12,898
Likes
5,187
Location
Dalworthington Gardens, TX
Website
pbase.com
I thought scratches or sanding lines showed up best with a single light source as you see the shadows in the valleys. For me it is dyed pieces that are the most problematic, because dye can be removed touching up the flaw. So after wiping off the piece with mineral spirits and before applying dye, I walk out of the shop, then inspect it in sun light. Or if that is impractical I use the brightest single source light I have and turn off other lights.

I agree that a single point light source works better to reveal scratch marks. A glossier finish will reveal fine scratch marks that otherwise won't be seen. Finishing the finish is necessary to level out fine scratch marks. Like Jason, I hand sand the finer grits.

Odie, I think that the brighter light is good, but because it is basically diffuse lighting that it won't be as effective as a very bright single point source such as direct sunlight.
 

odie

TOTW Team
Joined
Dec 22, 2006
Messages
7,116
Likes
9,818
Location
Panning for Montana gold, with Betsy, the mule!
It looks to me like it's possibly just application marks from the finish not necessarily sanding marks on the piece. How are you applying the finish.

Hello John......the DO is applied by hand. It's on the lathe, but power off, and not spinning. It's definitely sanding marks left from the 600gt paper........

-----odie-----
 

odie

TOTW Team
Joined
Dec 22, 2006
Messages
7,116
Likes
9,818
Location
Panning for Montana gold, with Betsy, the mule!
I agree that a single point light source works better to reveal scratch marks. A glossier finish will reveal fine scratch marks that otherwise won't be seen. Finishing the finish is necessary to level out fine scratch marks. Like Jason, I hand sand the finer grits.

Odie, I think that the brighter light is good, but because it is basically diffuse lighting that it won't be as effective as a very bright single point source such as direct sunlight.

Hi Bill.......so far, the current method, using the new table and multiple lamps has been great for detecting the minor concentric marks left by the 600gt paper. However, as discussed earlier, I'll be trying the single point light source to see if it works better......

-----odie-----
 

Emiliano Achaval

Administrator
Staff member
Beta Tester
TOTW Team
Joined
Dec 14, 2015
Messages
3,316
Likes
4,267
Location
Maui, Hawaii
Website
hawaiiankoaturner.com
I recently uploaded a photo of a Padauk bowl in the member's gallery......and, after I'd seen the blow-up photo, I was horrified to see some concentric lines in the flashpoint where there is direct reflection of light to the lens of the camera:
View attachment 30246
The odd thing, is these 600gt concentric sanding lines are not visible to me, UNTIL AFTER the Danish oil is applied and cured. Also, with finished bowls, these sanding lines aren't visible under normal room lighting, so I'm not too concerned about this particular bowl......but, I rely on my photos to sell my bowls online......Sooooo, this is entirely unacceptable.

These 600gt sanding lines are easily removed with 0000 steel wool after the Danish Oil is cured, but not so easily eliminated after the Beall 3-step buffing process.

I decided I needed a way to reproduce intense reflections, so that I can inspect for these concentric lines, and deal with them, AFTER the Danish Oil is applied, and PRIOR to the time I buff and wax. The solution, as it turned out, is to build an "inspection table" that mounted between the bedways of my lathe.
View attachment 30247
This is the perfect place for inspection and a little hand application of 0000 steel wool, because I have many sources of bright light at this location......incandescent, LED, and fluorescent.

Probably a few turners noticed the concentric lines, and I was wondering if anyone would point this out to me, but nobody did. Maybe that's a sense of consideration, or nobody really noticed this......? :rolleyes:

Anyway.......one more problem solved. (I will not allow myself to accept flaws in my work.....they MUST be dealt with, and conquered! ;)
Have a good day gentlemen! :D

-----odie-----
While we are at it, LOL, I see a line to the left of where you marked it, there is a shiny spot, a light reflection there, I see a line. )I saw your bowl the first day, did not notice the lines. Odie, I can not tell you how many times I have done this, finding scratches after applying the finish. I still do it after 2 plus decades of doing it, lol Next time, call your friendly non-woodturner neighbor and ask him what he thinks about the finish, I guarantee you he won't see the scratches, LOL I have seen lines like that done by too much carnauba wax in the Beall process too. Best for me is to take the piece out in the bright sun, right outside my double garage door, which is always open, the sun reveals everything... On another note, we have a club member that brought over several pieces for me to critique, over a period of a few months. Lots of very easy to see scratches all over. He could not see them! A visit to the Costco optical department solved part of the problem. The other half, we ordered 2 light from Ken Rizza, when he had a 2 for 1 deal. His work is much better now. Seeing well does wonder for us woodturners. My new camera takes a whopping 46.5 megapixels pictures, you can see specks of dust not visible to the human eye, darn digital pictures....
 

Emiliano Achaval

Administrator
Staff member
Beta Tester
TOTW Team
Joined
Dec 14, 2015
Messages
3,316
Likes
4,267
Location
Maui, Hawaii
Website
hawaiiankoaturner.com
As above Finishing the finish is an important step.

Before applying the finish:
With rare exceptions, I sand hollow forms and NE bowls totally off the lathe, to 320.
I generally use 3” Velcro discs sanding with the grain. Any sanding scratches at 220 are lost in the grain of most domestic woods. ( some tropical shave so little grain that higher grits are needed, some ebony shows sanding scratches to 600)
Twice turned bowls I sand to 220 on the lathe then 320 off

Cutting back the finish
Most commonly I sand the first finish coat with 400
Subsequent finish coats with 0000 scotch brute.

Then the final finish coat may get the Tripoli, White diamond, canuba from the Beall buffing.
Al, when you sand off the lathe, how do you do it, or what do you use? Aloha from Maui
 

Bill Boehme

Administrator
Staff member
Beta Tester
TOTW Team
Joined
Jan 27, 2005
Messages
12,898
Likes
5,187
Location
Dalworthington Gardens, TX
Website
pbase.com
Al, when you sand off the lathe, how do you do it, or what do you use? Aloha from Maui

I can't speak for Al, but for me sanding off the lathe means strictly hand sanding ... usually in a pseudo random pattern over large curved areas and being careful not to soften crisp corners.

I am very picky about high gloss finishes ... not just tiny scratches, but even worse are wavy surfaces that are usually the result of over sanding with coarser grits causing softer wood to be sanded down more than harder areas.
 

hockenbery

Forum MVP
Beta Tester
TOTW Team
Joined
Apr 27, 2004
Messages
8,637
Likes
4,976
Location
Lakeland, Florida
Website
www.hockenberywoodturning.com
Al, when you sand off the lathe, how do you do it, or what do you use? Aloha from Maui
I start with an angle drill and 2 or 3” Velcro pads. I keep the edge of the disc going with the grain.
I keep drill on fairly low speed. Also always keep the disc moving lightly over the surface to keep the curves smooth.

It really helps to get a good tool surface.

Last bare wood sanding I will use 320 by hand with the grain.

For me Size often dictates the starting grit more than any other variable.
3” pendant or ornament discs I just hit with 320.
10” NE bowl I can usually do the whole surface with 220
15” NE bowl I will usually have spots that need 180

I try to sand the 1/2” to 1/4” near the rim only with 320 on all NE bowls.

On any size NE bowl if I had a bad day where I left a transition line when hollowing that will need 120 to Blend in the line into the curve. Doesn’t happen often but If I cut the wall too thin, I have to leave a transition line to avoid making the wall even thinner. Also sometimes I can get a transition line on just one side if sidewalls moved unevenly when tension wood is removed.
 
Last edited:

odie

TOTW Team
Joined
Dec 22, 2006
Messages
7,116
Likes
9,818
Location
Panning for Montana gold, with Betsy, the mule!
On any size NE bowl if I had a bad day where I left a transition line when hollowing that will need 120 to Blend in the line into the curve. Doesn’t happen often but If I cut the wall too thin, I have to leave a transition line to avoid making the wall even thinner. Also sometimes I can get a transition line on just one side if sidewalls moved unevenly when tension wood is removed.

Greetings, Al.....:D

For quite a long time there, I was specializing in thin wall bowls.......but, have come to the realization that thin wall is a skill appreciated by other turners, but have no/little appreciation by those who are "non-turners".....those mainly who purchase our wares. These days, nearly all my bowls have thicker walls, with an occasional thin wall in the mix.......:)

I suppose this brings on the perceptions we have with "light and delicate", as opposed to "substantial and durable"......

-----odie-----
 
Joined
Feb 6, 2010
Messages
2,979
Likes
1,955
Location
Brandon, MS
Like Emiliano I see lots more scratches since I have one of Ken's lights, cataracts off and a 5000 k light over the lathe. But there is more . I just finished a project to turn 16 offering plates for my church . They decided on an oil stain and to me it shows scratches worse than dyes. Plus the shape was very hard to get scratches out of in concave areas. Most of the scratches I could still not see until the stain dried and then sand and restain .I was glad to do this but hope I never have to put oil stain on a turning again.IMG_3463.JPG
 

hockenbery

Forum MVP
Beta Tester
TOTW Team
Joined
Apr 27, 2004
Messages
8,637
Likes
4,976
Location
Lakeland, Florida
Website
www.hockenberywoodturning.com
Greetings, Al.....:D

For quite a long time there, I was specializing in thin wall bowls.......but, have come to the realization that thin wall is a skill appreciated by other turners, but have no/little appreciation by those who are "non-turners".....those mainly who purchase our wares. These days, nearly all my bowls have thicker walls, with an occasional thin wall in the mix.......:)

I suppose this brings on the perceptions we have with "light and delicate", as opposed to "substantial and durable"......

-----odie-----
I strive for even walls in most bowl designs may a little thinner toward the bottom.

Bowls with walls that get thinner toward the bottom look and feel good
Bowls with walls thicker toward the bottom tend to look bad and feel heavy

All the NE bowls and hollow forms I do - I try for even walls. Most NE bowls I do I want to be functional so I remove the bark which is more work and I leave the walls 3/16 which gives a durable feel but not clunky.
At 15” I might go to fat 1/4” thickness.
While not light or delicate I think they have a good feel when held.
 
Joined
Jul 26, 2016
Messages
2,326
Likes
1,105
Location
Nebraska
When checking for scratches while the piece is still on the lathe, you can miss some of them when the light being used is coming from one direction or you have a good amount of light coming from multiple sources. When the work piece is off the lathe you can rotate it at different angles which will highlight subtle flaws and scratches. Dry carbon powder will readily adhere to scratches, small flaws and tear-out on wood pieces, afterwards you can spend more time trying to get all the carbon from the work piece. ;)
 
Joined
Jun 29, 2017
Messages
799
Likes
563
Location
Jasper, Alabama
Hi Odie..... I didn't notice the concentric sanding lines til you pointed them out. The inspection table with a good light is an excellent idea.... When I use to sell pens on Etsy I made a inspection table fitted with bright lighting and use of a strong magnification magnifier. With bowls, it is a whole different ballgame! :eek: I've had to go back and drop down a few grits and start over "many times"! I'm very critical of myself on form and finish....but hey, I'm still learning! :D
 

Emiliano Achaval

Administrator
Staff member
Beta Tester
TOTW Team
Joined
Dec 14, 2015
Messages
3,316
Likes
4,267
Location
Maui, Hawaii
Website
hawaiiankoaturner.com
I start with an angle drill and 2 or 3” Velcro pads. I keep the edge of the disc going with the grain.
I keep drill on fairly low speed. Also always keep the disc moving lightly over the surface to keep the curves smooth.

It really helps to get a good tool surface.

Last bare wood sanding I will use 320 by hand with the grain.

For me Size often dictates the starting grit more than any other variable.
3” pendant or ornament discs I just hit with 320.
10” NE bowl I can usually do the whole surface with 220
15” NE bowl I will usually have spots that need 180

I try to sand the 1/2” to 1/4” near the rim only with 320 on all NE bowls.

On any size NE bowl if I had a bad day where I left a transition line when hollowing that will need 120 to Blend in the line into the curve. Doesn’t happen often but If I cut the wall too thin, I have to leave a transition line to avoid making the wall even thinner. Also sometimes I can get a transition line on just one side if sidewalls moved unevenly when tension wood is removed.
Thank you Al. I'm always trying to do things better and learn. Sanding is one of the hardest things to do just right. I used to think was the easy boring part, but to do it perfectly takes skill and know. Aloha.
 

odie

TOTW Team
Joined
Dec 22, 2006
Messages
7,116
Likes
9,818
Location
Panning for Montana gold, with Betsy, the mule!
When checking for scratches while the piece is still on the lathe, you can miss some of them when the light being used is coming from one direction or you have a good amount of light coming from multiple sources. When the work piece is off the lathe you can rotate it at different angles which will highlight subtle flaws and scratches. Dry carbon powder will readily adhere to scratches, small flaws and tear-out on wood pieces, afterwards you can spend more time trying to get all the carbon from the work piece. ;)

Exactly right, Mike! :D

These very fine concentric sanding lines are easy to eliminate with 0000 steel wool......but, the main problem is seeing the little buggers! For my own processes, I use the lathe to power the steel wool, just after the Danish oil is cured.....and, prior to removing it from the faceplate. I had been leaving it at that.....and, for the most part, this was good enough for nearly all bowls. As others have pointed out, almost nobody but YOURSELF will notice them at all. :p

Since making this "inspection table", I'm noticing that when the bowl is easily rotated by hand, with multiple angles to the light, it's much easier to detect the fine sanding lines, and eliminate them quickly. This new "discovery" is akin to having a "revelation"!......and, I'm enjoying this immensely. :)

-----odie-----
 
Last edited:

john lucas

AAW Forum Expert
Joined
Apr 26, 2004
Messages
8,337
Likes
3,595
Location
Cookeville, TN
Im.convinced that sunlight causes scratches because I know they are all gone after my very careful sanding and inspection in the shop. Just points out the necessity of a point source as your inspection light. I find a good LED flashlight that is small but bright. It's easy to move around because you need to change direction of the light to really see imperfection.
 

odie

TOTW Team
Joined
Dec 22, 2006
Messages
7,116
Likes
9,818
Location
Panning for Montana gold, with Betsy, the mule!
Im.convinced that sunlight causes scratches because I know they are all gone after my very careful sanding and inspection in the shop. Just points out the necessity of a point source as your inspection light. I find a good LED flashlight that is small but bright. It's easy to move around because you need to change direction of the light to really see imperfection.

Great idea, John......I'll try using a flashlight, as well! :D

Thanks! :)

-----odie-----
 

odie

TOTW Team
Joined
Dec 22, 2006
Messages
7,116
Likes
9,818
Location
Panning for Montana gold, with Betsy, the mule!
OK, gentlemen......I've done some experimenting with a single light source, LED flashlight, and multiple light sources......and, I'd like to say that one method is superior to the others, but it didn't appear that way to me. All of these light sources worked about equally as well with a bowl that I could see some faint concentric lines left from the 600gt sandpaper. One way, or another, I'll probably be able to use all of these light source methods with the new inspection table......which is working out very well. Sure glad I made this table up for this particular purpose.;)

Gives me a great feeling to know that I've solved a problem that I was previously unaware of....until recently! :D It's still possible that I won't be able to get rid of every single one of these concentric lines.....but, from now on, there will be much less of them.

It's my opinion that whether or not, a prospective buyer is consciously aware of these concentric lines.......it will play on their psyche at a subconscious level, nevertheless......and, will degrade their opinion on the level of craftsmanship they are seeing. This is exactly why I feel compelled to eliminate as much of this "flaw", as possible. It's true that many turners here didn't notice them, but some of you probably did at a given subconscious level......:rolleyes:

Thank you all for the help and support.....:)

-----odie-----

.
 
Last edited:
Joined
Jul 26, 2016
Messages
2,326
Likes
1,105
Location
Nebraska
Odie,
If you have concentric lines on your bowls after sanding, are you stopping the lathe with each grit of sand paper and sanding across the surface of the bowl between centers to reduce the amount of concentric lines that can be created from sanding while the lathe is running? All it takes is one small piece of grit of a larger size to cut a concentric line while using a finer sand paper with the lathe running. If you have any hard knots of wood on the work piece a small particle can break loose from the knot and cause scratching in the softer wood. Final sanding should always be done with clean fresh sandpaper, a used piece of sandpaper can have other grits contaminating the finer grit of the sandpaper you are trying to reuse. Using air to blow off the work piece each time you sand can remove all grit particles from the work piece, if you use a towel they can easily be contaminated with larger grits floating in the air while using heavier grit sandpaper earlier in the finishing process.
 
Joined
Feb 6, 2010
Messages
2,979
Likes
1,955
Location
Brandon, MS
Mike that is some interesting tips. Thanks for that.

Odie, Another thing to consider is the intensity or color temperature of the light source you use. In theory at least that should make some difference in what you will be able to see. Not sure what intensity is best.
 
Joined
Jul 26, 2016
Messages
2,326
Likes
1,105
Location
Nebraska
I have recently began doing all of my sanding at night and store my projects in a lead shielded box during the day after reading this article.:D

Solar energetic particles (SEP) are high-energy particles coming from the Sun. ... They consist of protons, electrons and HZE ions with energy ranging from a few tens of keV to many GeV (the fastest particles can approach the speed of light, as in a "ground-level event").
 
Back
Top