• July 2025 Turning Challenge: Turn a Multi-axis Weed Pot! (click here for details)
  • Congratulations to James Seyfried for "NE Red Oak II" being selected as Turning of the Week for July 21, 2025 (click here for details)
  • Welcome new registering member. Your username must be your real First and Last name (for example: John Doe). "Screen names" and "handles" are not allowed and your registration will be deleted if you don't use your real name. Also, do not use all caps nor all lower case.

My first bowl in 15-years - what do I do now?

Joined
Apr 11, 2014
Messages
462
Likes
470
Location
Dallas, TX
As I'm not a "bowl guy", I'm a bit uncertain how to go about completing the attached - it started as a hollow-form but had rot areas in the top.
I don't think the filament tape will suffice - while it might contain a break-up, don't think it will prevent it.
My thinking is to cut a 2" wide 18mm baltic-birch collar and use G-Flex epoxy to glue it maybe 2" behind the rim - to cut the collar off, insert the disc from the baltic-birch, use filament tape on the rim, and hope for the best.
I think this one is worth salvaging - the next cuts should reveal the deep reds and blacks of mesquite.
Like Nik Wallenda said: "it's that next step..."
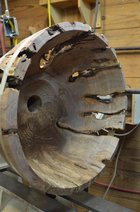
smsmDSC_2228.jpg
 
I am sure your not a resin guy but if it were me and the wood is super dry I would fill the voids with dyed resin. Just foil tape the inside and outside of the voids. Then fill each chamber with slow cure resin to limit air bubbles. Any voids that don't reach the rim just leave a little gap at the high point to get the resin in.
 
John - I'd use the disk inside to stabilize while finishing the outside form - hot glue would hold it in just fine and easier to release. Keep the filiment tape on as long as possible, moving it lower when fished below just to keep the flying bits to a minimum. With the outside form complete and sanded, remove the disk and attach a collar (maybe two) to stabilize the outside while hollowing to your fished wall thickness. Then assess if you need anything to span the spaces like strategic dutchmen/pewas.
I'm not a fan of epoxy fills to the extent this would require, but that's a personal preference for wood over plastic.
That's got the makings of a really pretty finished piece. Just wear your ppe.
 
If you made a donut style "cap" (ring with a groove) that could glue over the top rim you would be able to access inside and outside except for the inch or so the cap covered. Then maybe some banding to carefully turn it away and finish the rim.?? Never done one like this so just thinking if was on my lathe where would I start.

Most folks would make their first bowl in 15 years a simple dog food dish ;)
 
Last edited:
My thinking is to cut a 2" wide 18mm baltic-birch collar and use G-Flex epoxy to glue it maybe 2" behind the rim

I think attaching the ring with hot melt would work nicely.

You might consider adding a rim
That would add a lot of stability and I think aesthetics

Probably need the glued on ring to cut the joint for attaching a rim
 
Epoxy resin...maybe.
 
Well, I am not sure what I would do. It looks like the bowl rim is thinner on the far side than on the near side. Can't tell if that is an illusion or not. Power sand with your spindle lock to remove tool marks. I would consider it an 'art' piece, so not for daily use, though the resin could make it a utility bowl. Looks like there is a drilled hole just off center in the bowl. That could be plugged.

robo hippy
 
Don't have any advice to give on holding it together, but I am in the "I really want to see this when you successfully finish turning it" group. That has the makings of a sweet piece, if you are able to hold it together.
 
John, I had a similar piece (though much smaller at 10") come apart on me recently. While the filament tape did contain it, I think what caused the failure was the fact that wings (solid bits) were of different masses and therefore the centrifugal force pushed the larger ones out and caused the filament tape to push the smaller ones in. The overall circumference remained the same but I think the piece went oval as I hollowed it out. I thought about using some stiff wire but your idea of ring has much more merit. I'll try that next time.
 
Considering the size of projects you make, John, I'm thinking the metal strap with cam closure from my dust collector might be just the ticket.

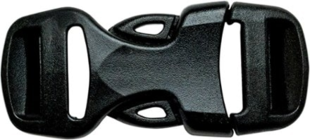
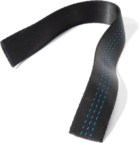
More seriously, a nylon webbing strap might work. It would be a somewhat conforming belt. How to connect it to itself would be another problem to solve. Since a metal ratchet wouldn't be a good idea, maybe a double D ring or plastic/nylon connector would do it. A snap connector like this would allow you to pull on the strap end and snug it tight. A safety pin could attach the loose end to the strap to keep it from flapping. The webbing is commonly 1" wide, but can be had both narrower and wider.
1666573905603.png1666574093072.png
 
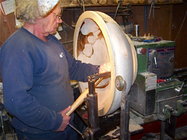
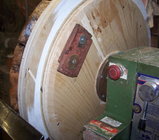
I turned a 30" root burl and glued plywood to the top after I turned the outside, cut through it to make it a ring.

After the inside was done I glued a disk onto the top of the ring so that I could remove the disk I had on the bottom (did not trust the bottom to hold the off balance bowl), after that I did cut the disk off and cleaned the edge up.

glued on plywood to hold the rim.jpg balanced plywood glued on.jpg bottom finish turned.jpg plywood removed.jpg
 
As I'm not a "bowl guy", I'm a bit uncertain how to go about completing the attached - it started as a hollow-form but had rot areas in the top.
I don't think the filament tape will suffice - while it might contain a break-up, don't think it will prevent it.
My thinking is to cut a 2" wide 18mm baltic-birch collar and use G-Flex epoxy to glue it maybe 2" behind the rim - to cut the collar off, insert the disc from the baltic-birch, use filament tape on the rim, and hope for the best.
I think this one is worth salvaging - the next cuts should reveal the deep reds and blacks of mesquite.
Like Nik Wallenda said: "it's that next step..."

View attachment 47459

Even if the filament tape were to hold it together, the tape wouldn't provide sufficient suppression of radial flexing of those long fingers. I had a piece of live oak root ball that looked somewhat similar. I shaped some pieces of wood for the inside and glued them in place with epoxy while I turned the outside. Next, I filled the gaps with resin and then turned away the interior patches. I like Al's idea of a collar and hot melt glue and think that is a better approach than what I did.
 
Hi John, I've read lots of great ideas for trying to stabilize your piece. Use all of them...that piece looks really dangerous - belts, suspenders, tape, whatever it takes to keep your pants up! :)
First and foremost be safe!
You are dealing with probably the toughest of situations to turn safely.
First, you are in an end grain situation, so you can't use a bevel supported cut with a bowl gouge. Your cuts should come from the inside to the rim to keep from tearing out the grain and stressing the wood.
Second, although Mesquite is a very stable wood, the pith is still in the piece which is going to cause the piece to crack as the wood shrinks around that pith while it dries.
Third, I can see numerous cracks and "punky" wood in your photo.
So that being said, after you chose your method/methods for stabilizing the piece, I would consider turning this piece like a hollow form with a captured hollowing system. Which will also keep you out of the line of fire if something does happen. Small cuts, small stages starting at the rim and working towards the bottom....You've already cut away all of the support for the outer rim of the bowl, which will start to flex and could break off.
And DON'T go back!
If you try to turn something like this in the future leave the bulk of the wood in the bottom of the vessel for support, and turn in stages. Much safer..... I have a number of YouTube videos that show my techniques for doing thin walled vessels with natural voids.
Good Luck,
Lyle
 
Guys,
Thanks for the suggestions - my thinking is the wood-rim wins out.
Will probably do stave-ring with 1.5" square poplar held together with biscuits and attached with G-Flex epoxy.
Assuming the above works, next step is finishing - my thinking is my finish would look between marginal and crappy on a bowl - then again, this is really not a "bowl" - this is a hollow-form without a top...right?
Will send pics.

Thanks again,
John
 
I may be late, but instead of strapping tape think about the plastic moving wrap. You can even wrap it while turning if you can slow the lathe down enough. Best wishes.
 
While I've used "pallet wrap" for years, it's been mostly to keep the moisture in the wood while hollowing. And you're correct: easy to wrap with the lathe on it's slowest speed.
But to keep it rigid I will use the stave-ring on the rim - can't stand even a tiny flex.
 
Wow. I'm frequently impressed with the turnings, but this is a scary, dangerous challenge. Lyle's suggestion to use a captured hollowform system to keep the turner out of the line of fire is great.

Have fun. Stay safe.

Larry
 
Back
Top