-
December 2025 Turning Challenge: Single Tree! (click here for details) -
Congratulations to Bob Henrickson, People's Choice in the November 2025 Turning Challenge (click here for details) -
Congratulations to Guillaume Fontaine for "Old Tea Pot" being selected as Turning of the Week for December 15, 2025 (click here for details) -
Welcome new registering member. Your username must be your real First and Last name (for example: John Doe). "Screen names" and "handles" are not allowed and your registration will be deleted if you don't use your real name. Also, do not use all caps nor all lower case.
You are using an out of date browser. It may not display this or other websites correctly.
You should upgrade or use an alternative browser.
You should upgrade or use an alternative browser.
Need help with wood processing
- Thread starter Phil Hamel
- Start date
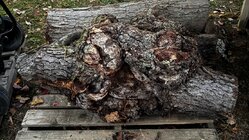
Leave it in as large a chunk as you can handle. Do not process or cut into the burl until you are going to turn it. Store it big. Cut the size blank you want to use soon after cutting and leave the rest as big as possible. The cut surface will start to dry and crack, so dont cut til needed. The trunk ends also give the storage time because that will crack and can be wasted away. do not cut the log parts off the burl.
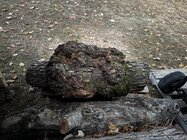
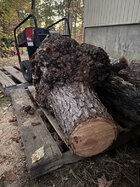
Seal the cut ends right away, and any further end grain cuts as you dice up the burl. Plan on having numerous bark inclusions and voids in your finished pieces (not necessarily but likely). Study it from various angles as a diamond cutter would before committing. I can envision 2-4 good-sized bowls/ globular hollow forms /vases on either side of the central lengthwise depression. You might start by removing the back side of the log down to the pith, whether with a single slabbing cut or a v cut to see how deep the burl figure is on that aspect. If you think of the overall burl as a set of lobes that may help you plan your cuts.
I believe that would be more accurately called a canker, not a burl. It will be fine if you like a lot of voids in the turning. If you don't like lots of voids, it will have to be used in small pieces. There will be no consensus on how to "cut it up". That's one of the skills acquired with experience and what you like to turn. Personally I wouldn't expect to get any clear blanks over a 4" cube.
A solid burl can be imagined like cauliflower, growing out from a point, spreading in a cone, and finally flaring out and perhaps encompassing the tree. Those are mostly predictable, and a matter of deciding what shapes you want.
This piece isn't a solid burl and thus all bets are off. You have some central damage/rot and won't know much until you get cutting. Often pieces like this don't yield much relative to the overall size. They can be a fun puzzle, but In most cases I've found that being aggressive and 'getting to the point' gives the same result. Much depends on how tolerant of voids and punk you are.
My basic approach is to make useful looking chunks and get them between centers to visualize properly.
It helps to have x-ray vision. I haven’t gotten mine to work yet.
Mostly pieces like that are “examine”, “guess”, “cut”, repeat. I’m usually happy ending up with a bunch of smaller pieces. I seal each one and dry before turning.
JKJ
Mostly pieces like that are “examine”, “guess”, “cut”, repeat. I’m usually happy ending up with a bunch of smaller pieces. I seal each one and dry before turning.
JKJ


