• We just finished moving the forums to a new hosting server. It looks like everything is functioning correctly but if you find a problem please report it in the Forum Technical Support Forum (click here) or email us at forum_moderator AT aawforum.org. Thanks!
  • Beware of Counterfeit Woodturning Tools (click here for details)
  • Johnathan Silwones is starting a new AAW chapter, Southern Alleghenies Woodturners, in Johnstown, PA. (click here for details)
  • Congratulations to Dave Roberts for "2 Hats" being selected as Turning of the Week for April 22, 2024 (click here for details)
  • Welcome new registering member. Your username must be your real First and Last name (for example: John Doe). "Screen names" and "handles" are not allowed and your registration will be deleted if you don't use your real name. Also, do not use all caps nor all lower case.

New Frugal vacuum system up and running

Joined
Dec 29, 2022
Messages
835
Likes
814
Location
West Central, IL
And another lesson learned...... No matter how bad you want to stick your hand in front of the vacuum chuck just to see how strong it is...... Resist that urge! I didn't have the bearings sealed in yet so it wasn't at maximum but first thought was obviously OUCH! second thought was Wow! where's that bleeder release valve at and I hope I can reach it. (Lathe not running of course)

I tested it with a pretty gnarly piece of cherry I have laying around that has cracks and even some glitter glued on it and it held it no problem. I've since epoxied in the bearings so it can only get better. I was using the foam thing called an angel wing that the oddnot guy puts out. Tomorrow will be the real test.

At first I was going to put the pump on the other side of a wall but I was talked out of that and I'm glad. It's really quiet and handy where I have it sitting on top of a wheeled cabinet thing right next to my headstock.
 

hockenbery

Forum MVP
Beta Tester
TOTW Team
Joined
Apr 27, 2004
Messages
8,638
Likes
4,977
Location
Lakeland, Florida
Website
www.hockenberywoodturning.com
No matter how bad you want to stick your hand in front of the vacuum chuck just to see how strong it is...

I tested my new system with a 5 gallon bucket. The kind a 300 pound man can stand on.
Put it on a foam covered plywood disc. Had it on the lathe was pulling close to 28.
Turned my back on it and boom! It imploded. A startling but impressive lesson on the power of vacuum.
 

hockenbery

Forum MVP
Beta Tester
TOTW Team
Joined
Apr 27, 2004
Messages
8,638
Likes
4,977
Location
Lakeland, Florida
Website
www.hockenberywoodturning.com
And if you do the math you'll quickly understand why...
It’s enough to know the whole world was trying to push that bucket through the lathe spindle hole.
I’ve since learned the proper vacuum for me is one that pulls the object a 1/16 inch from the tailstock center.
Pressure that is Strong enough to hold weak enough not to crack the object.
 
Joined
Dec 29, 2022
Messages
835
Likes
814
Location
West Central, IL
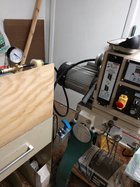
I was asked about my vacuum system so I'll go into more detail with some pictures. It's a pretty standard vacuum system for those that have one.

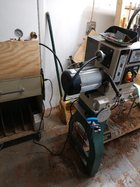
I'm using a "Frugal" vacuum pump from Bob Leonard http://www.frugalvacuumchuck.com/home.html
I've never used one before and he talked me out of putting it on the other side of a wall which I'm glad he did because this is super quiet. If I had went with an air compressor pump I definitely wouldn't have liked it compared to this. My air compressor is noisy enough when I use an air sander.

I wanted it close to the headstock on my lathe so I placed it on top of a roll around metal cabinet. (my sister worked in a hospital for 47 years) donated from them in the past. The pump itself is mounted to a board and has rubber feet to lessen the vibration more.
The pump is plugged into an outlet strip which is used to turn the pump on/off. At the moment I have mounted magnets that hold it on the side of the cabinet with a long enough cord that I can roll it out of the way if needed or if it has to be moved even further I can unplug it from the 4 foot power strip (harbor freight) that is mounted across the backside of my lathe under the angle iron painted silver. Eventually I would like to replace the magnet mounted outlet strip with one of the remote controlled outlets like I use for my dust collector. amazon https://www.amazon.com/gp/product/B07WX2NBWR/ref=ppx_yo_dt_b_asin_title_o02_s00?ie=UTF8&psc=1

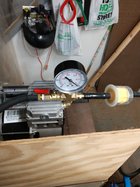
I did add another filter to the bleeder valve side just because it seems to make sense even though I was told not needed. (rebel here) And I did mount a thin piece of plywood in front of the pump to deflect chips because no matter what they seem to go everywhere.

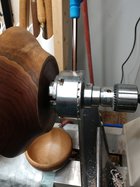
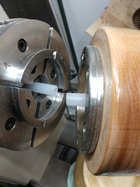
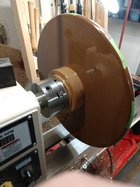
I use an axminster chuck which I try to leave on the lathe as much as possible. No real reason but it's just one less step to do.

To use the vacuum, the black rubber hose which is 3/8 ID and always connected to the pump has a 3/8 OD polyethylene tube in the end of it that goes through the spindle and is then pushed into the stub of polyethylene tube of 3/8 ID which is connected to the bearing in the middle of my homemade chucks. Everything is just a press in fit, no clamps are needed.
The axminster chuck did cause me some worry mainly because I overthink things but it is a tight fit through the center of the chuck but with some wiggling I am able to get the smaller tube plugged into the larger tube on the back and with a little more wiggling I am able to mount the vacuum chuck cup onto the axminster chuck. I haven't used it much yet, (5 bowls removing the tenons/mortise and sanding) but I haven't discerned any wear on the polyethylene tubing yet and I'm sure it has to be rubbing somewhere.

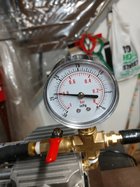
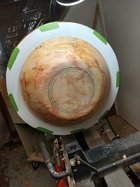
Picture showing inches of mercury will be of the system running holding the mulberry bowl. The vacuum chuck itself was built with Bob Leonards instructions but I used the axminster faceplate ring instead of a tenon cut into the wood. I don't have to be as careful when installing the vacuum chuck this way. With a tenon he recommended marking it and installing in the same orientation every time.

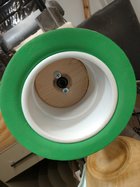
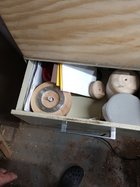
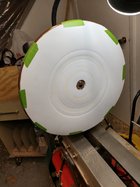
The vacuum chuck is made from a sch40 3 inch coupler and the larger one in the drawer might be a 4 inch but it's been a month so I can't remember. The green thing on the pvc is from the odd-not guy
https://www.odd-not.com/shop/p/angel-wing-seals seems to work good but it had better last for what it cost. It's the same feeling foam as the flat sheets from hobby lobby. but since it isn't actually pinched on a sharp edge hopefully it will last awhile.

Eventually I would like to find some place to machine the stub end of the adapter from harrison specialties https://www.harrisonspecialties.com/chuck-reversing-adapter-for-wood-turning-lathe/ that holds my old little no name chuck on the tailstock. If I can have a taper on the adapter to match the one on the axminster live center I wouldn't need the drill chuck and would be able to turn the bowl when it's held by the tailstock before running it up to the vacuum chuck.
**edit** I did find this place and they look like they might have exactly what I need instead of having the part I already have machined which would probably cost more. #AD-002
https://bestwoodtools.stores.yahoo.net/prstspadwith.html
 

Attachments

  • IMG_20230604_211534158 (1).jpg
    IMG_20230604_211534158 (1).jpg
    350.7 KB · Views: 101
  • IMG_20230604_211544629.jpg
    IMG_20230604_211544629.jpg
    328.9 KB · Views: 94
  • IMG_20230604_211934258.jpg
    IMG_20230604_211934258.jpg
    344.4 KB · Views: 96
  • IMG_20230604_211631397.jpg
    IMG_20230604_211631397.jpg
    275.3 KB · Views: 91
Last edited:
Joined
Dec 29, 2022
Messages
835
Likes
814
Location
West Central, IL
rest of the photos.
 

Attachments

  • IMG_20230604_211711511.jpg
    IMG_20230604_211711511.jpg
    207.2 KB · Views: 69
  • IMG_20230604_212148948.jpg
    IMG_20230604_212148948.jpg
    306.7 KB · Views: 68
  • IMG_20230604_211909678.jpg
    IMG_20230604_211909678.jpg
    290.8 KB · Views: 61
  • IMG_20230604_211755714.jpg
    IMG_20230604_211755714.jpg
    282.4 KB · Views: 68
Joined
Dec 29, 2022
Messages
835
Likes
814
Location
West Central, IL
Out of the way when not needed or could unplug from the magnet mounted outlet and put the cabinet anywhere. Which isn't saying much because my shop is really small. That door it's in front of here is to my basement where I keep my wet rough turned bowls. Dry rough turned bowls are over my right shoulder from where I took this picture.
 

Attachments

  • IMG_20230604_211902411 (1).jpg
    IMG_20230604_211902411 (1).jpg
    396.4 KB · Views: 63
Joined
Dec 3, 2012
Messages
15
Likes
73
Location
Onalaska, WI
Sam, Nice system, write up and pics. My Frugal Vacuum system from Bob is still in the box....from many years ago. Plugged in couple yrs ago, still pulling vacuum. So, good incentive to gtr together and put to use.
 
Joined
Dec 29, 2022
Messages
835
Likes
814
Location
West Central, IL
The you tube algorithm actually recommended a bob video that I had never seen before just a little bit ago. It was him explaining what came in his kit from 8 years ago. Is that the set up you have? It was the kit where he rebuilt a Thomas pump and looked like he was using metal tubes for inside the spindles then.
 
Joined
Dec 29, 2022
Messages
835
Likes
814
Location
West Central, IL
Finished up an 18 inch disc vacuum chuck last night and took it for a spin today.

The foam is just held on with masking tape so it will be easily replaceable because I have three coats of polyurethane on the mdf and didn't want to use tools to remove the foam. It worked fine. I used a chuck in my tailstock to hold the bowl, slid it up close, locked the tailstock then run it up to apply pressure till the vacuum took a hold. easy peezy.

On the backside is 1 3/4" hard maple glued and screwed to the mdf which is held in the chuck with an axminster face plate ring.

The bowl is one of my large boxelder that I finally got around to turning off the tenon. Discerning eyes will notice that I got carried away with sanding and oops one of the character grooves disappeared in a spot. Soooo there was a design change and they all disappeared and became one groove that width. funny how that happens.

As you can see in the first picture where the marks in the foam are, the boxelder wasn't on there yet but it is nice that I was able to do a little tiny bowl maybe 3 inches diameter and the boxelder is way bigger all with the same chuck as long as the rim is smooth and there aren't holes.

I have my other vacuum chucks still for natural edge or bowls with "character" that won't hold a vacuum with the rim. And if worse comes to worst I can friction chuck it.
 

Attachments

  • IMG_20230709_165417753_HDR.jpg
    IMG_20230709_165417753_HDR.jpg
    261.2 KB · Views: 44
  • IMG_20230709_165425124.jpg
    IMG_20230709_165425124.jpg
    326.5 KB · Views: 46
  • IMG_20230709_172619764_HDR.jpg
    IMG_20230709_172619764_HDR.jpg
    360.8 KB · Views: 43
Last edited:
Joined
Aug 6, 2009
Messages
707
Likes
506
Location
Lummi Island, WA
Wow - I haven’t tried to figure the actual pressure that 18” disk would exert on a bowl or platter, but it’s got to be incredible (I know I put that calculation somewhere). Do you really need that much holding power? The largest chuck I use is only 6” dia, and it has held bowls up to 24”dia without problems. In practice, nearly all my bowls from 18” down to about 10 or 12” dia are finished on a 4” vac chuck, my shop is only a few feet above sea level, and my vac system holds at a max of 29” regularly, so maybe I’m just lucky but…with a smaller chuck the area that needs to be perfectly sealed is much smaller with much less potential for failure. A 6” vac chuck at max vac pressure on my system is impossible to remove with my (probably feeble) arm strength. Why subject the entire large bowl to what would be magnitudes of increased pressure unless it was a desire to find a flaw in the wood that was overlooked.

Think I found the calculation - if correct, the force from 18” dia seal area is about 3,800 pounds and a 6” chuck is around 420 pounds of force (both at max vacuum). To me, that is asking for a cataclysmic failure. It’s roughly the difference between asking a couple of friends to stand on it verses parking a car on it.
 
Last edited:
Joined
Dec 29, 2022
Messages
835
Likes
814
Location
West Central, IL
Wow - I haven’t tried to figure the actual pressure that 18” disk would exert on a bowl or platter, but it’s got to be incredible (I know I put that calculation somewhere). Do you really need that much holding power? The largest chuck I use is only 6” dia, and it has held bowls up to 24”dia without problems. In practice, nearly all my bowls from 18” down to about 10 or 12” dia are finished on a 4” vac chuck, my shop is only a few feet above sea level, and my vac system holds at a max of 29” regularly, so maybe I’m just lucky but…with a smaller chuck the area that needs to be perfectly sealed is much smaller with much less potential for failure. A 6” vac chuck at max vac pressure on my system is impossible to remove with my (probably feeble) arm strength. Why subject the entire large bowl to what would be magnitudes of increased pressure unless it was a desire to find a flaw in the wood that was overlooked.

Think I found the calculation - if correct, the force from 18” dia seal area is about 3,800 pounds and a 6” chuck is around 420 pounds of force (both at max vacuum). To me, that is asking for a cataclysmic failure. It’s roughly the difference between asking a couple of friends to stand on it verses parking a car on it.
It won't be often that I put an 18" bowl on it. The pressure is only calculated from the diameter of the bowl if I understand what the guys were saying in posts with the formula. So a 6 inch diameter bowl on this plate would be the same as your 6 inch chuck. When I used it for a very thin walnut bowl I did turn the pressure down with the bleeder valve so it didn't implode.

I also had a bowl in the past where the vacuum chuck pulled dust through the wood and created a circle of lighter colored wood matching the pvc chuck size. With the whole bowl sealing if it does it again at least it will be the whole interior instead of a circle that I had to work at to get rid of.

I like it mostly because I have been batching bowls and this gives me the ability to turn a small diameter, some which I don't have a small enough "regular" chuck for or a larger bowl without changing the chuck.
 
Last edited:
Joined
Aug 6, 2009
Messages
707
Likes
506
Location
Lummi Island, WA
It won't be often that I put an 18" bowl on it. The pressure is only calculated from the diameter of the bowl if I understand what the guys were saying in posts with the formula. So a 6 inch diameter bowl on this plate would be the same as your 6 inch chuck. When I used it for a very thin walnut bowl I did turn the pressure down with the bleeder valve so it didn't implode..
You’re right - the pressure is a result of the dia of the rim with your disk chuck. I understand the convenience of having one chuck for all sizes but I guess I got over the perceived benefit of speed a while ago. I’m not a production turner, just addicted to the enjoyment of the process and the result of the creative impulse (I like making stuff). Horses for courses, as they say. I do like making tools that help the process though, and I’ve got a pile of tools that solve a particular problem that I’ve not had since building that solution (mine often wind up as the bone yard holding parts for the next great solution).

I have found that the ring can be eliminated by a quick wipe of sanding sealer or very dilute final finish before turning the piece on the vac chuck to finish the bottom, but then it’s best to let the piece dry for a bit before drawing a vacuum otherwise sometimes you’re just trading a dark ring of finish pulled through the pores for the lighter ring you’re trying to avoid…and, of course there‘s that dreaded drying time. I just leave it in the chuck, remove the bowl and chuck from the lathe and set it aside to dry while I move on to something else - usually another piece I had pulled earlier to dry.

As I said, I’m in less of a hurry every day now that I’ve passed the mid-seventies mark - it’s all about the pleasure of making.
 
Joined
Apr 12, 2022
Messages
73
Likes
23
Location
Papamoa Beach, New Zealand
Sam I built a compressor using the motor from an old fridge.and an old 4.5Kg lpg gas bottle. for a non return valve I used a valve from a truck tyre tube.
This runs up to I dont know what max pressure but I have the control set at 150psi max this is reached in a matter of minutes the whole thing runs very quietly no louder than your fridge in the house. there are plenty of sites on u tube how to build one but if you want to know how I did mine just ask. Thanks for your vaccum chuck article its got me thinking.
 
Joined
Dec 29, 2022
Messages
835
Likes
814
Location
West Central, IL
Sam I built a compressor using the motor from an old fridge.and an old 4.5Kg lpg gas bottle. for a non return valve I used a valve from a truck tyre tube.
This runs up to I dont know what max pressure but I have the control set at 150psi max this is reached in a matter of minutes the whole thing runs very quietly no louder than your fridge in the house. there are plenty of sites on u tube how to build one but if you want to know how I did mine just ask. Thanks for your vaccum chuck article its got me thinking.
I've been looking at those new quiet compressors that have a motor assembly that look just like my vacuum pump but I'm waiting till my old one finally throws a rod or whatever is making the noise.

I do have two chest freezers in my basement that quit freezing and I'd like to move them out. Compressors are probably what's bad with them though. They were making some funky noises and over 40 years old.

You don't know a Marty T. do you? j/k I follow him on you tube and he builds and fixes a lot of stuff in New Zealand.
 
Joined
Apr 12, 2022
Messages
73
Likes
23
Location
Papamoa Beach, New Zealand
Hi Sam no I dont know him but hes a Typical Kiwi its in our DNA from way back we fix and build all sorts of things that others throw away I actually get a big kick out of building things that I want or need rather than buying them and its not because I can not afford them its just the sense of achievement.
 
Back
Top