• Beware of Counterfeit Woodturning Tools (click here for details)
  • Johnathan Silwones is starting a new AAW chapter, Southern Alleghenies Woodturners, in Johnstown, PA. (click here for details)
  • Congratulations to Jim Hills for "Journey II" being selected as Turning of the Week for May 6th, 2024 (click here for details)
  • Welcome new registering member. Your username must be your real First and Last name (for example: John Doe). "Screen names" and "handles" are not allowed and your registration will be deleted if you don't use your real name. Also, do not use all caps nor all lower case.

New to me MDF Rose Engine

Joined
Aug 6, 2019
Messages
41
Likes
28
Location
Chassell, MI
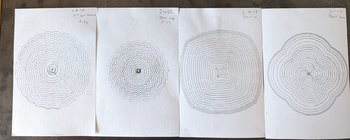
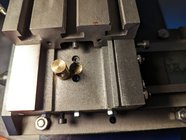
Look what followed me home, thanks to a very generous offer! It's still a work in progress, the overhead drive parts are on hand but need to be assembled, and the new LMS XY table needs to be disassembled, cleaned, and adjusted since it's sticky. The printed-yesterday spring loaded pen holder works, but the end of the roller ball pen flexes and it's path doesn't always overlap. While the new MDF parts (table base and paper chuck) were CNC cut (the metal was cut with an angle grinder and it shows), and the pen holder was 3D printed no CNCing is planned for actual operation. Bit making will be fun, no shop to speak of here (yet) so the first attempts will be with the angle grinder and file and could be interesting.

Of course this is the easy part. The journey continues...

1675963996326.png

1675963947211.png
 
Joined
Aug 6, 2019
Messages
41
Likes
28
Location
Chassell, MI
Progress! After cleaning and oiling the XY table no longer needs a pipe wrench (no, I didn't use one) to turn the knobs. It has about a thousandth of play in Y, but 25 (I've emailed LMS) in X that I can't find a cause for without another disassembly. After some practice and user retraining in appropriate pressure, and using the xy table instead of holding the pen back by hand, the pen holder works well. Using the paper chuck has been a useful exercise in dial turning, although you can find a few spots where they weren't quite coordinated in the pictures.

I plan to experiment with the amplitude adjuster next, then probably start putting the motor on the overhead drive.
 

Attachments

  • PXL_20230211_204318518.jpg
    PXL_20230211_204318518.jpg
    288.2 KB · Views: 36
Last edited:
Joined
Aug 6, 2019
Messages
41
Likes
28
Location
Chassell, MI
My XY table has just over 25 thousandths of play in the X direction, after disassembling it again there's a brass pin that fits into a hole in the casting, the hole is over 10 thousandths larger than the pin, and is the source of the slop. There is no play in the leadscrew or gibbs, it's all in this brass pin, and it obviously moves when wiggled by hand. Is this normal? Y is a little over one thousandth, which is a big difference. It's very obvious when moving the longer table back and forth by hand. LMS is willing to replace the table but the person I've been emailing with doesn't know if that's normal for that table or not, and I don't have another to compare with.

Also I need to grind some cutters, how far should they stick out of the cutting frame? I have some 3/16 by 3 1/2" round tool bits which would divide nicely into either 1 3/4" or around 1 1/8 but I'm not sure if the shorter length is too short.
 

Attachments

  • table-pin.jpg
    table-pin.jpg
    440.4 KB · Views: 18
Joined
Dec 5, 2015
Messages
753
Likes
365
Location
Seattle, WA
My XY table has just over 25 thousandths of play in the X direction, after disassembling it again there's a brass pin that fits into a hole in the casting, the hole is over 10 thousandths larger than the pin, and is the source of the slop. There is no play in the leadscrew or gibbs, it's all in this brass pin, and it obviously moves when wiggled by hand. Is this normal? Y is a little over one thousandth, which is a big difference. It's very obvious when moving the longer table back and forth by hand. LMS is willing to replace the table but the person I've been emailing with doesn't know if that's normal for that table or not, and I don't have another to compare with.
What you describe as a brass pin from your picture appears to be the nut for the leadscrew. No, it is not at all normal for that to be loose. Poor quality control at the factory is the problem. There doesn't seem to be any way for the nut to be permanently attached other than a press fit which would be a poor design.

If you have access to machine tools you could make a new nut with the correct diameter. That's a poor solution, you shouldn't have to repair new merchandise. More and more I see on various forums stories about individuals taking pride in repairs they've made on poor quality junk. But that does nothing to encourage LMS and other junk sellers to demand better from their suppliers. It speaks poorly about LMS that they aren't aware this is a problem. Send it back and demand a full refund including shipping both ways.

There should be OT'ers with opinions on better sources than LMs for XY tables.

On edit: OOPS, apparently you didn't buy the XY table, it came with the complete setup you bought. I suppose you could accept the offer of a replacement. If LMS doesn't understand the looseness is a problem what's the chance you'll get a good one?
 
Last edited:
Joined
Aug 6, 2019
Messages
41
Likes
28
Location
Chassell, MI
didn't buy the XY table,
I did buy the XY table, based on it being recommended for the MDF Rose Engine. LMS is willing to replace it, I'm trying to find out if I got a lemon (which I suspect) or if it's a common problem and I should just return it. Alas, no machine tools here, space limited so no place to put them. I've thought about beverage can aluminum shims, looks like it would take one and a half wraps, but like you say that's a poor solution for a new part.

After just checking again I think the pin was cut too short, when it's all the way in the mounting hole it's solid, but it has to be raised up to meet the screw and can tilt in the hole. If that's the case then shimming the outside won't work.
 

RichColvin

Super Moderator
Staff member
OTI Member
Joined
Mar 13, 2016
Messages
669
Likes
500
Location
Marysville, OH
Website
www.colvintools.com
The one from LittleMachineShop is a good option, especially for the cost. That one sells for less than $200, and does require more maintenance than one like those made by Hardinge (which, when rebuilt, sells for about $2500).
 
Joined
Aug 6, 2019
Messages
41
Likes
28
Location
Chassell, MI
The one from LittleMachineShop is a good option, especially for the cost. That one sells for less than $200, and does require more maintenance than one like those made by Hardinge (which, when rebuilt, sells for about $2500).
Are you aware of anyone else having that much play (it was along the long X axis) in their table? LMS decided mine was defective, and sent an email that they're shipping a replacement. The dimensions of the brass pin in mine matched one from another table, both length (17.1mm) and diameter (10mm). I measured it as 9.995mm, but that's more likely my cheap digital caliper. The pin was good (by feel) when all the way down in the hole, still able to turn but no play I could detect. I wonder if the hole in the casting has a slight taper but I have no way to measure that.

How far should bits stick out of the holder in the cutting frame?
 
Joined
Aug 6, 2019
Messages
41
Likes
28
Location
Chassell, MI
A little slow, the replacement XY table arrived, and out of the box had less play and backlash then the original after several dis-assemblies/re-assemblies. And to clarify (I am not a machinist so my terminology is likely off) what I was calling play was how far the table moved with reasonable hand pressure, basically shoving it back and forth. I didn't check backlash (how far the knob has to be turned after a change of direction before it started moving on the indicator) on the original, on the replacement they were pretty darn close to the same. The usual situation, company and honey-do projects delayed the project way more than expected.

After taking the new table apart, cleaning with brake cleaner, a light coat of oil (superlube iso 68), and reassembly there was around 4 thousandths play on Y (vs about 2 on the first), about 15 on X. Took it apart, and loctited (blue 242 medium strength, 10 minute working time, 24 hr full cure) the pin in its slip-fit hole. Reassembled, let cure overnight, X is now between 1 and 2 thousandths. Think that's more than good enough, and I'm grateful that LMS customer service sorted it out.

@RichColvin you mentioned maintenance, what should I be doing to the LMS XY table?
 

RichColvin

Super Moderator
Staff member
OTI Member
Joined
Mar 13, 2016
Messages
669
Likes
500
Location
Marysville, OH
Website
www.colvintools.com
The big deal is the need to adjust the gibs on a regular basis. depending on the cross slide’s use, they seem to wear unevenly.

This video by Frank Hoose covers that activity on a low end metal lathe’s cross slide. The activities are similar for the one that you have.

View: https://youtu.be/qt5cAf1ZcDA


It isn’t hard, but takes 15-30 minutes to get it tuned in well. And I think you should plan to do it every 3-6 months.
 
Joined
Aug 6, 2019
Messages
41
Likes
28
Location
Chassell, MI
The big deal is the need to adjust the gibs on a regular basis. depending on the cross slide’s use, they seem to wear unevenly.

This video by Frank Hoose covers that activity on a low end metal lathe’s cross slide. The activities are similar for the one that you have.

View: https://youtu.be/qt5cAf1ZcDA


It isn’t hard, but takes 15-30 minutes to get it tuned in well. And I think you should plan to do it every 3-6 months.

Thanks! I watched that video some time back but forgot about it, but my infrequently used gib adjusting skills need a refresh.
 
Back
Top