I have my dad's original Escoulen Chuck but how in the world does it work?. Does anyone have a video or reference on how to use the chuck? I searched the web but didn't have any luck. Thank you for any leads!


I realized last night that he is going to be there. I'll be at the symposium. What great luck! Thanks!!!!!My suggestion is that you go to the Rocky Mountain Woodturning Symposium and ask Jean Francois Escoulen. He'll be about an hour away at the end of September.
Thanks! The only ones that I have found are on the newer version of the chuck. Not sure when this one was made but maybe before the time of Youtube videos?Check out You Tube and search for "Escoulen chuck". I found at least 3 videos on it. I did not play the videos, but the titles seem to be what you may be looking for. Enjoy.
You are welcome. Did not realize there were different versions. I hope you get it figured out. Looks pretty neat.Thanks! The only ones that I have found are on the newer version of the chuck. Not sure when this one was made but maybe before the time of Youtube videos?
You are welcome. Did not realize there were different versions. I hope you get it figured out. Looks pretty ne
Check out You Tube and search for "Escoulen chuck". I found at least 3 videos on it. I did not play the videos, but the titles seem to be what you may be looking for. Enjoy.
Actually, your dad's original chuck is a #2 Escoulen, not a #3 which is much larger and has built in counter weights.I have my dad's original Escoulen Chuck but how in the world does it work?. Does anyone have a video or reference on how to use the chuck? I searched the web but didn't have any luck. Thank you for any leads!
View attachment 65724
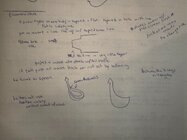
I'm glad you got to see it demoed by the man himself!Escoulen demonstrated at the Rocky Mountain Wood Symposium last year and I was able to bring it to him and ask questions. He was super approachable so I would recommend reaching out to him to see if he has anything to reference. My notes are from his demonstration and convo but might not mean much to you. I am attaching a photo just in case they could be of value. Unfortunately I didn't get to try it afterwards so not sure how helpful I would be. My three big takeaways are that the wood is put in with a taper, you use the tailstock to push it in, and you always screw in the flat screw first which is for safety. Let me know if you can't read my handwriting!
Awesome info. I thought I was missing something. Didn’t expect to make a taper and jam it in.Check out this recent video from the Front Range Woodturners. At the 1 hour 30 minute mark of the video on Multi-Axis Turning, Don Prorak demos the chuck: CLICK HERE.
Thank you for the infoI'm glad you got to see it demoed by the man himself!
There's a big emphasis that the taper is very minimal. If you taper too much the wood will have minimal contact with just the rim of the cup chuck. The more gentle taper will keep allow more wood to contact the walls of the cup chuck. And you want to use the tailstock for as long as you can before solely relying on the friction.
Screwing in the flat set screw first is both for safety and more accurate than screwing the pivot screw first. If you screw the pointed screw first you can twist the ball out of the intended axis, but screwing the flat first will hold it in position.
As far as actually using the chuck, get the wood secure in the cup chuck and start experimenting. I got a ball chuck after the RMWT Symposium last year and it's a lot of fun, but it takes quite a lot of use before you get a hang for what it can do. The hardest part is just understanding what the shapes do when they interact. It's all beads and coves, but when you kick a cove off axis and put a bead under it, you get the iconic Escoulen golf club shape.
Thanks Alex. I’m sure your note will make sense after watching the video fromEscoulen demonstrated at the Rocky Mountain Wood Symposium last year and I was able to bring it to him and ask questions. He was super approachable so I would recommend reaching out to him to see if he has anything to reference. My notes are from his demonstration and convo but might not mean much to you. I am attaching a photo just in case they could be of value. Unfortunately I didn't get to try it afterwards so not sure how helpful I would be. My three big takeaways are that the wood is put in with a taper, you use the tailstock to push it in, and you always screw in the flat screw first which is for safety. Let me know if you can't read my handwriting!
Send your address to me for 3 videos plus some extras. rfbrown@cox.netEscoulen demonstrated at the Rocky Mountain Wood Symposium last year and I was able to bring it to him and ask questions. He was super approachable so I would recommend reaching out to him to see if he has anything to reference. My notes are from his demonstration and convo but might not mean much to you. I am attaching a photo just in case they could be of value. Unfortunately I didn't get to try it afterwards so not sure how helpful I would be. My three big takeaways are that the wood is put in with a taper, you use the tailstock to push it in, and you always screw in the flat screw first which is for safety. Let me know if you can't read my handwriting!
Robert, the message is meant for the person who started the thread. Also my reply asks for her to send me her address. Not sure if it's legal to copy these. They are originals. I'll give her time to reply. Bob, good turning.Thanks Alex. I’m sure your note will make sense after watching the video from
front range.
There was a previous post where someone shared a link to the Front Range Woodturners meeting on YouTube. The demo in the meeting included a demonstration of the Escoulen chuck in question.Robert, the message is meant for the person who started the thread. Also my reply asks for her to send me her address. Not sure if it's legal to copy these. They are originals. I'll give her time to reply. Bob, good turning.