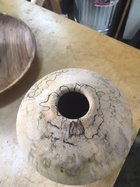
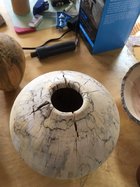
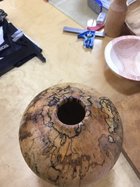
I turned this vase from some heavily spalted and punky sweet gum. While drying the top split wide open with cracks. I started to go to work with CA or epoxy but decided to set aside and just see what happened. After a few more days it "healed" to the point where I can't even find the original cracks. I plan to give it a few more days to see if the stabilization holds but I suspect it will. It's down to stable MC now all over. Sometimes you get lucky. Before and after pics below. I would be skeptical of the before and after pics if I saw them but I promise, they're real.

-
Congratulations to Chris Lawrence for "Dragon's Grip" being selected as Turning of the Week for March 30, 2026 (click here for details) -
Welcome new registering member. Your username must be your real First and Last name (for example: John Doe). "Screen names" and "handles" are not allowed and your registration will be deleted if you don't use your real name. Also, do not use all caps nor all lower case.
You are using an out of date browser. It may not display this or other websites correctly.
You should upgrade or use an alternative browser.
You should upgrade or use an alternative browser.
Patience pays off for healing cracks...sometimes.
- Thread starter Randy Anderson
- Start date
A festivus miracle!
If you can still remount it on the lathe you might want to make a rim with some stable wood. This will help hold the cracks together so they have less of a chance of spreading open again.
Got any plans to keep changes in humidity from reopening those cracks?
Chis, the cracks were all the way through so unless I turned off most of the top there wasn't any solid wood to get to for a different rim. Or maybe you meant turn it off and put on something else for a rim?
Karl, no real plans. Sand, put on oil and set it on a shelf for a while in the house. That is a real risk but if small ones come and go it'll just be part of the character. I've been thinking for a while on getting a vacuum pot and some cactus juice (or whatever most folks use) and try on stuff like this. Not sure if this is the right kind of candidate for that process.
Karl, no real plans. Sand, put on oil and set it on a shelf for a while in the house. That is a real risk but if small ones come and go it'll just be part of the character. I've been thinking for a while on getting a vacuum pot and some cactus juice (or whatever most folks use) and try on stuff like this. Not sure if this is the right kind of candidate for that process.
Last edited:
- Joined
- Feb 28, 2021
- Messages
- 1,813
- Likes
- 1,625
- Location
- Roulette, PA
- Website
- www.reallyruralwoodworks.com
if it was me, I might consider turning a new rim for it (perhaps in contrasting wood?) and cut out a portion of the top of the original and glue in the new rim - but only if there was a way to re-mount the whole piece to blend the new rim into the original vessel...
personally, I thought about experimenting with cactus juice (and epoxy) but after a very recent "tryout", I don't think I'll be bothering - I took some leftover epoxy from another project, mixed in some brass powder (just because I had it laying around) and stuffed in a bunch of bits small scraps from the "firewood" (throwaway) box (it was about a pint size container once all filled up with scraps and epoxy) I did just today finish turning a small box out of the result, and I can say I hate the odor and the static-clingy ribbons of epoxy shavings I got out of it, and that made up my mind, I won't be doing epoxy work on the lathe any time soon.. It ain't for me.. and what I've read, cactus juice is basically a type of epoxy? either case, I just don't see a pressure pot investment in my future...
personally, I thought about experimenting with cactus juice (and epoxy) but after a very recent "tryout", I don't think I'll be bothering - I took some leftover epoxy from another project, mixed in some brass powder (just because I had it laying around) and stuffed in a bunch of bits small scraps from the "firewood" (throwaway) box (it was about a pint size container once all filled up with scraps and epoxy) I did just today finish turning a small box out of the result, and I can say I hate the odor and the static-clingy ribbons of epoxy shavings I got out of it, and that made up my mind, I won't be doing epoxy work on the lathe any time soon.. It ain't for me.. and what I've read, cactus juice is basically a type of epoxy? either case, I just don't see a pressure pot investment in my future...
Something like this. You could make it flush to. Just turn a little bit off the opening then flatten the top and inside of the opening to a 90 degree angle to glue the wood into. Cut a tenon on the good piece of wood to give you glue surface on inside and top of the opening. That should keep the cracks from opening at the rim.
Chris, interesting solution and look - thanks. I'll keep it in mind for more of the same stuff I have out back to turn, whether it cracks or not would be good to try. The current piece would be tough to mount again to do that much work.
Brian, same here. No interest in turning big pieces of epoxy and digging out of the spider webs and the mess I see in videos online. The cactus juice vacuum pot solution, as I understand it, simply replaces the air in the wood with the juice and then hardens. You don't end up with a big solid block of resin but resin saturated wood. That said, every time I look at it I pull back due to cost, hassle, process to cure (no way my wife will allow it in her oven), etc just to salvage some punky wood, which I get plenty of.
Brian, same here. No interest in turning big pieces of epoxy and digging out of the spider webs and the mess I see in videos online. The cactus juice vacuum pot solution, as I understand it, simply replaces the air in the wood with the juice and then hardens. You don't end up with a big solid block of resin but resin saturated wood. That said, every time I look at it I pull back due to cost, hassle, process to cure (no way my wife will allow it in her oven), etc just to salvage some punky wood, which I get plenty of.
- Joined
- Jan 27, 2005
- Messages
- 13,223
- Likes
- 5,851
- Location
- Dalworthington Gardens, TX
- Website
- pbase.com
Randy, since you put "heal" in parentheses, you know that the crack just got too small to see, but it is still there. I think the reason for the cracks closing is the outer diameter is losing bound water and shrinking. And, that is forcing the cracks to close. While the wood will change moisture content with seasonal humidity changes it shouldn't be as drastic as the initial drying. CA glue might help stabilize movement. I would go with something much more substantial than an oil finish, either varnish or lacquer. I also think that it would be a good idea to apply finish to the interior.
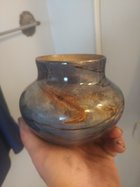
Randy I think you could cut a not too narrow groove in the neck of that vessel and then wrap some brass or stainless wire around that, I received an Apple graft burl that already had some large splits in it, I turned it and placed a hose clamp on it so I could hollow it, then I wrapped brass wire around the neck to keep it from opening up any further, shown below, you could do something like that.
Yes. the spilts are maybe invisible, but they are still there and can open up anytime and get even worse that before.


Yes. the spilts are maybe invisible, but they are still there and can open up anytime and get even worse that before.
Informative thread...
many solutions to explore. I like the turned collar from a stable wood solution. I tried soaking a piece in water (so that the piece swelled a bit closing the the cracks) and then epoxied the piece before allowing the piece to dry again. Worked mostly but the cracks opened again (not nearly as much). A collar of a more stable wood may have helped with the cracks opening up again. How much time and effort is worth a solution for a flawed piece? I do get attached to every piece myself so good to see other solutions.
many solutions to explore. I like the turned collar from a stable wood solution. I tried soaking a piece in water (so that the piece swelled a bit closing the the cracks) and then epoxied the piece before allowing the piece to dry again. Worked mostly but the cracks opened again (not nearly as much). A collar of a more stable wood may have helped with the cracks opening up again. How much time and effort is worth a solution for a flawed piece? I do get attached to every piece myself so good to see other solutions.
Odie
Panning for Montana gold, with Betsy, the mule!
How much time and effort is worth a solution for a flawed piece? I do get attached to every piece myself so good to see other solutions.
Hey Al......just checked out your instagram account.....some very creative stuff you do!
")
As for how much effort we need to invest for flawed wood......well, not nearly as much effort as I invested in an earlier time. On my wall, I've written: "Don't mess with it, reject it", and that is sometimes expensive, for the cost of some of the exotics I turn, but it does save a lot of effort trying to save something that will always look like a repair. In my opinion, it just isn't worth the effort.

-----odie-----
- Joined
- Jan 27, 2005
- Messages
- 13,223
- Likes
- 5,851
- Location
- Dalworthington Gardens, TX
- Website
- pbase.com
Amen to what Odie says. Also, John Jordan has a saying that, '"Life is too short to turn crappy wood". I've encountered more than a few new turners who are under the mistaken impression that wood with defects automatically qualifies it as art. This might be fallout from the joke that says if it doesn't hold water then it must be art. My suggestion is to visualize in your mind how the turning would look if it were painted to hide the grain
It's hard to know when to quit on a piece and the decision to continue can be for different reasons - it still has potential if I keep working with it, I'm trying something new, etc. I know I've spent more time than they're worth on pieces while I've got a stack of blanks of the same wood out back. Sometimes we get wrapped up in the challenge too deep for the reward. As Odie says, I do know that if I recognize the effort as a repair then I reject it.
Leo's piece is a good example to me of the subjective choices we all make in the difference between flaws and character. Hard to do sometimes. While some would have rejected the blank as too flawed to spend time on, with some attention to shape, finish and a bit of enhancement it looks great to me and would sell in my markets.
Leo's piece is a good example to me of the subjective choices we all make in the difference between flaws and character. Hard to do sometimes. While some would have rejected the blank as too flawed to spend time on, with some attention to shape, finish and a bit of enhancement it looks great to me and would sell in my markets.
So, because the wood is spalted, it’s weak, easier for cracks to form. I think you might reconsider your drying methods. The top will always dry too quickly. It shrinks before the body. But then the body catches up and the cracks close, but don’t go away.
Try, next time, making a collar of craft paper and set aside. It’ll take longer to dry, but be far less likely to crack.
Ive noticed, especially with woods like Oak, that the wood moves a lot, initially, but will often straighten back out, not fully but largely. Then the trick is to slow that initial change, keep stresses low.
In the last year I made a bunch of Oak bowls. I was doing my initial turning, then fully coating with anchor seal. Ten days later I found heavy warping and a few cracks opening. I added a layer of blue paper towel to the rims with lots more anchor seal, only to the rims. The cracks already formed closed up, and no other bowls cracked at all.
Also, with pieces such as yours Randy, I find finishing with lots of oil/wax slows things down a lot. Still cover the opening for a while.
Decided to sand and finish. I can't even find a crack or crack line now. Will they come back as it adjusts to the humidity inside vs my shop? Who knows. Wood is amazing stuff.
Marc, I've gotten to where I don't even bother with oak much, especially red oak due to the high failure rate I get from cracking. Plus it doesn't sell that well for me around here. Not sure what you mean by a collar of craft paper. I typically set my hollow forms aside for a good part of the day right after turning and then put them in my paper bags to finish drying.
Marc, I've gotten to where I don't even bother with oak much, especially red oak due to the high failure rate I get from cracking. Plus it doesn't sell that well for me around here. Not sure what you mean by a collar of craft paper. I typically set my hollow forms aside for a good part of the day right after turning and then put them in my paper bags to finish drying.
Attachments
The collar is the same idea as tin foil around the crust of a pie. Helps prevent burning it in the oven. I think my main point is that this area dries much faster than the rest of your hollow form, so regardless of your technique, it’s best to slow the edge losing moisture.
I’ve been making some mortar and pestles from green wood, hoping the end grain turning will survive without cracks. The very wet Sweetgum started cracking on the very top, which I then covered with painter’s tape. Cracks closed in two days. I should mention that I soak my once turned green pieces in walnut oil, which seems to slow the drying considerably.
I enjoy Oak, find it a challenge to work successfully, repeatedly. Sorry that it doesn’t sell well in your area.
Your finished piece looks great, by the way!
That is an excellent point since just because the cracks closed up does not mean the crack has healed.Got any plans to keep changes in humidity from reopening those cracks?
That form is not a good choice for once turned since it is difficult to control the drying without staining the wood as in Ankorseal.
I think, there are some blanks that should immediately be discarded. However, the most beautiful grain patterns live in the burls, crotches, and roots where often the splits and cracks are the "Rule" rather than the exception. Safely turning these blanks without having fragments going airborne, or worse, flying off the lathe is the challenge. The captive ring mentioned above is a good method to keep the wood together. I often use band clamps with success with other methods. It is important to secure the wood from any chance of splitting first before it is put on the lathe. The best solution is marine epoxy, the least is super glue.
I took a session with Craig Timmerman, a Texas turner. He often turns crack prone Mesquite and epoxys the cracks first to stabilize from cracking. After woodturning, He then grinds the strong marine epoxy away and then inlays those gaps with turquoise and a jewelers grade epoxy. The message here is to first secure the blank as best you can before continuing on the lathe. If time is an issue, or you hate sanding, then may not be for you.
I am working on a crack-ridden hollow form of walnut crotch which I began in the summer.
People ask me when is it going to be done? Is it worth the effort?
I reply,
I wonder how long it took Michangelo to finish the Sistine chapel?
I have been through the same thought process and came to the same conclusion about cactus juice, resin, vacuum and pressure chambers.Punky wood is a pita but can result in some gorgeous pieces. I have done a few using resin/epoxy thinned 1:1 with acetone and brushed on, with good results. I will be doing more of them. It does need to be warm enough outside to stand there and apply it - you dont want your shop full of those fumes.The cactus juice vacuum pot solution, as I understand it, simply replaces the air in the wood with the juice and then hardens. You don't end up with a big solid block of resin but resin saturated wood. That said, every time I look at it I pull back due to cost, hassle, process to cure (no way my wife will allow it in her oven), etc just to salvage some punky wood, which I get plenty of.
Yes, some interesting methods shown here worth keeping in the back pocket when the time comes.
In your original post, you stated that the piece had reached "stable MC". Did you do any before and after measurements of MC?
Yes, was pushing 20%+ in some places near bottom like they typically do. Stable MC for my area is about 13% so once I get to that on the thickest areas I consider items ready to sand and finish. Punky wood can dry quickly in some areas and much slower in others, hence the stress and cracks I got. I've done another like it since and no cracks. Time will tell on this one. I won't be putting it out for sale for a while to be sure.
How are you measuring the MC? Has there been a newly developed meter that will read below the surface of the blank?Yes, was pushing 20%+ in some places near bottom like they typically do. Stable MC for my area is about 13% so once I get to that on the thickest areas I consider items ready to sand and finish. Punky wood can dry quickly in some areas and much slower in others, hence the stress and cracks I got. I've done another like it since and no cracks. Time will tell on this one. I won't be putting it out for sale for a while to be sure.
The difference between 20% and 13% is enough to cause some checking around the opening especially considering that it is mostly end grain, then add the fact that the interior of the blank was likely much higher MC.
General model MMD4E MC meter that I think is fairly common. Handheld unit with pin probes on the end. Been using it for years with great success and yes, it's a surface MC I'm getting I know. My experience is that when the surface reads at 13% that pieces are stable enough to finish out.
Sorry for the badly focused image. I need to repair my camera lens.I had cracks start to open around the inclusions of this spalted hard maple. A little CA and a few coats of shellac and a few more of lacquer and not a bit of movement even going from my 45 degree garage to the house and back.
That is the best decision in my eyes. I’m not a fan of different woods on such a beautiful piece of wood. In my eyes it looks like a “fix” .Decided to sand and finish. I can't even find a crack or crack line now. Will they come back as it adjusts to the humidity inside vs my shop? Who knows. Wood is amazing stuff.
Marc, I've gotten to where I don't even bother with oak much, especially red oak due to the high failure rate I get from cracking. Plus it doesn't sell that well for me around here. Not sure what you mean by a collar of craft paper. I typically set my hollow forms aside for a good part of the day right after turning and then put them in my paper bags to finish drying.
let it crack a bit. It’s spalted wood. It’s doing what it’s suppose to do.
How are you measuring the MC? Has there been a newly developed meter that will read below the surface of the blank?
The difference between 20% and 13% is enough to cause some checking around the opening especially considering that it is mostly end grain, then add the fact that the interior of the blank was likely much higher MC.
The only I have found to know a piece has reached equilibrium and is ready to finish is to weight it (when wt stops dropping its ready).General model MMD4E MC meter that I think is fairly common. Handheld unit with pin probes on the end. Been using it for years with great success and yes, it's a surface MC I'm getting I know. My experience is that when the surface reads at 13% that pieces are stable enough to finish out.
I decided early on that weight tracking wasn't the drying method for me. My friend and turning mentor had used the MC meter method for hundreds of bowls for quite a few years with great success. Much easier to manage and seems more efficient to me. After a few years of doing it this way, and hundreds of bowls later, I've found it works quite well for me.
I’ve did the weight thing . It’s frustrating, it changes daily up down depending on weather.I find the moisture meter just as accurate.the hardwood floor guys who lay flooring for a living and if they lay flooring before it hits equilibrium could cost them $10’s of thousands of dollars. They don’t weigh it, they use moisture meters with great success.I decided early on that weight tracking wasn't the drying method for me. My friend and turning mentor had used the MC meter method for hundreds of bowls for quite a few years with great success. Much easier to manage and seems more efficient to me. After a few years of doing it this way, and hundreds of bowls later, I've found it works quite well for me.
Good point Doug that is exactly how I have been doing it for at least 25 years. I have had rough turned pieces where the record shows them increasing weight slightly in the summer.The only I have found to know a piece has reached equilibrium and is ready to finish is to weight it (when wt stops dropping its ready).
- Joined
- Jan 27, 2005
- Messages
- 13,223
- Likes
- 5,851
- Location
- Dalworthington Gardens, TX
- Website
- pbase.com
Sorry for the badly focused image. I need to repair my camera lens.
Don't blame the lens. The cause of the fuzzy image is motion blur due to camera shake ... and, possibly also some motion blur due to hand movement.
- Joined
- Jan 27, 2005
- Messages
- 13,223
- Likes
- 5,851
- Location
- Dalworthington Gardens, TX
- Website
- pbase.com
I’ve did the weight thing . It’s frustrating, it changes daily up down depending on weather.I find the moisture meter just as accurate.
Things might be different in the frozen north than here in the humid south. In my part of the world when the weight starts fluctuating it means that the wood has already reached EMC and is just fluctuating due to changes in daily weather conditions.
I quess that makes sense. When the wood starts dancing around a certain number going up and down a few grams, I guess it wood be at emc and just showing it acting out to daily humidity changes. And yes right now it is the frozen north. -35 this morning and -50 in some parts of Canada. Even -30 across the border in the USA from us. It’s cold!Things might be different in the frozen north than here in the humid south. In my part of the world when the weight starts fluctuating it means that the wood has already reached EMC and is just fluctuating due to changes in daily weather conditions.
Dave Landers
Beta Tester
I decided early on that weight tracking wasn't the drying method for me
I'd say that it doesn't matter what drying technique you use - I usually use the "time" method (sit in a bag for 6-12 months). The thing that I think matters is that you find something that works for you, in your climate, in your shop, with the woods you work with, etc... If it works, it works.
(The time it does matter is when you don't yet have a "technique", and are wondering what to do - unfortunately that just takes trying things, experimenting (i.e. failures), and talking to others in your region/climate)
Checking MC
I’m sure the drying process, as well as the making process, has an impact on how one chooses to check MC. I opted to use kraft paper bags or sheets (for big turnings) to control the drying process. I didnt like the idea of coating the items with something to do it, nor building a kiln of some type. I use the method even for thin wall turnings, to slow the drying and limit cracks etc. I keep the bagged items in the house on a wire shelf. The house has a much more constant temp and humidity making the drying process much more predictable.
As for frustration, unbagging to check mc would be a giant pita for me. Weighing is very simple and easy, as is writing the date and wt on the tape that keeps the bag closed. Much less frustrating for me vs the time and mess of brushing on a coating, boiling, soaking in various concoctions, desiccant beads, etc….
As with many turning subjects, ask 10 turners and get a dozen different answers.
The hardwood floor guys are dealing with relatively thin boards and the meters are the only solution other then time or a kiln. The method I use is to weigh and record the fresh green rough turned piece with Anchorseal on the end grain areas as soon as I put it into my drying area, then weigh after a day or 2 record etc. The amount of weight loss will be more to begin with and as the change lessens the weigh interval time can be increased. This method does work with the only weather fluctuations being very minor when the humid summer days are on us. Another example of weight variation is raised panel inset cabinet doors that grow in the summer and shrink down every winter.I’ve did the weight thing . It’s frustrating, it changes daily up down depending on weather.I find the moisture meter just as accurate.the hardwood floor guys who lay flooring for a living and if they lay flooring before it hits equilibrium could cost them $10’s of thousands of dollars. They don’t weigh it, they use moisture meters with great success.
Note: today I took my dog out for her daily morning walk at -18F where as last July we had temps up to 100 F so I am familiar with temperature variations.
- Joined
- Feb 6, 2010
- Messages
- 3,520
- Likes
- 2,597
- Location
- Brandon, MS
- Website
- threeringswoodshop.square.site
The flooring guys are looking at expansion and contraction and has nothing to do with finish . As most know expansion across grain is a big consideration for flatwork, But not so much for turning. So maybe that is talking apples and oranges,
I use weight and have never (even when I was using bags) had one to take over 2 months. If it is losing only 2 Grams in 3 days it is ready for second turn or sanding and finish. Since turnings (most anyway) do not involve more than one kind of wood and no joints it is like the difference between horseshoes and hand grenades. Close only counts for grenades and that works for finishing for me.
Now using refrigerator kiln and yes after removing from the kiln the bowl will gain weight again. Have not waited to see how much it will gain as yet , but for a future project.
Mine dried by the time I read all the comments. Won't say what I really thought.
No. It's actually my lens. There is a hairline crack in it and the camera Constantly tries to refocus. You can hear it as it adjusts hundreds of times a minute. I could repair it, but as I'm replacing the phone I just don't want to take the screen off again. I've already replaced the screen a few times as well as the mic, and charging port. I know a thing or two about a thing or two. Repairing cameras, phones, etc... Was covered when I got my certs. Taking good photos I learned over three years of photography courses.Don't blame the lens. The cause of the fuzzy image is motion blur due to camera shake ... and, possibly also some motion blur due to hand movement.