• Congratulations to John K. Jordan winner of the June 2025 Turning Challenge (click here for details)
  • Congratulations to John Shannon"Cherry Bowl" being selected as Turning of the Week for June 30 2025 (click here for details)
  • Welcome new registering member. Your username must be your real First and Last name (for example: John Doe). "Screen names" and "handles" are not allowed and your registration will be deleted if you don't use your real name. Also, do not use all caps nor all lower case.

Photo setup critique needed

Joined
Nov 15, 2020
Messages
822
Likes
681
Location
Huntington, VT
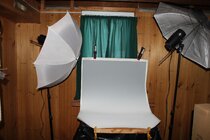
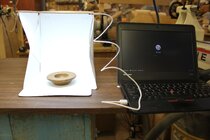
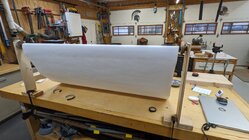
I need a simple, effective system for documenting my work. Like most people I don't have room for a permanent setup but this is what I have cobbled together so far. The first pic shows the finishing corner behind a cnc router with a cover sheet on the bed which I use for an assembly bench. The second shows the cover sheet slid over and supported by the router and a couple of bench/carts with a white backdrop slung from a pole suspended in front of the exhaust fan, The lighting consists of a single 5500K compact flourescent with about 3400 lumens behind a white parasol for diffusion and a couple of white bounce panels. The windows are covered so 95% of the ambient light is shut out and whatever daylight makes it in should not conflict with the photo bulb. The front of the table is about 9' from the back wall, allowing the backdrop to drape gradually. I have a DSLR camera with a 70-210 zoom lens which allows me to set it up far enough back to have some room to maneuver.

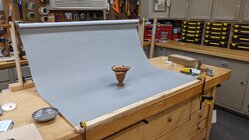
The third photo is a test shot with 105mm focal distance, auto white balance and f18 aperture. The color seems right, but I may compare it with a custom white balance and a designated color temp just for grins. The image of the vessel itself seems fairly clean. I see some wrinkles and schmutz in the flat backdrop, more shadow than I might like and a hot spot on the vessel shoulder. I could get the vertical background darker with a shade panel between it and the light. I'm sure the wrinkles could be rubbed out with editing software. I have another lightstand so could easily add another light if advisable or another diffusion panel.

What do your eyes see that mine don't, and how would you suggest changing things around?

20250702_131740.jpg20250702_135331.jpgDSC_0005.JPG
 
Last edited:
I need a simple, effective system for documenting my work. L


Kevin,

This has served me well for years. I used PVC pipe and fittings to make a cube, covered the sides with a thin white cloth (that doesn't collect dust) and hold it on with safety pins, and cut a piece of (usually) neutral grey board to start flat on the bottom and bend upwards, clamped to keep the bend. This give a seamless background. (I like that mat board better than rolls of thiner backdrop paper since the paper can show wrinkles such.)

I set the whole thing on a workbench or my tablesaw top. Most of the 3-way corner PVC fittings are not glued so the pieces come apart easily for storage. A board on top lets me suspend things from a fine wire if needed.

Some photo pros say to stick with a single light, but I prefer two: I use two daylight photo CFLs on adjustable bases, the light diffused through the cloths on the sides of the cube. I position the lights closer, further away, higher/lower, forwards or back according to my mood at the moment.

I use a third light on a flexible arm with a diffuser on the front. I wish it had variable brightness. I used to tape a piece of tissue to this lamp but now use a soft box diffuser make for strobe lights on a camera: https://www.amazon.com/dp/B003Y30334

This is without the softbox diffuser on the light in the front. The softbox does makes shadows less harsh.

photo_cube.jpg

I use a digital camera on a tripod or sometimes just snap a shot with my cell phone camera

One VERY important thing: turn off all other lights in the room. If not, they can compete with each other and change the color of the light. Best to cover any windows.

I move the side and front lights to suit my mood at the moment, and sometimes substitute a different color of mat board, always going for a neutral color that doesn't detract too much form the subject. I'm certainly no pro but I can usually get photos that suit me. Sometimes I'm not too picky!

For this one I was going for a more dramatic contrast.
BOC_C_Jack_01_IMG_6687.jpg

On some of these I used a more even lighting. Some could use some editing but that's life.
Spindles_misc_A_comp.jpg

Before I built this I used the same type of mat board and improvised with a chair for a stand. This gave more trouble with color temperatures as ambient light changed, but worked fine. Again, I prefer a seamless background.

P1114198.JPG

I almost always adjust some image things in Photoshop/Photoshop Elements to edit, crop, size, remove dust, etc. (Photos from most cameras and phone cameras are WAY bigger than needed for sending by email and posting.) And to get past the 4-photo per message limit on this form, I like to make composite photos which can show lots of things but just count as one!

JKJ
 
Last edited:
It seems like you have some dirt or dust on the camera sensor. Those out of focus blobs in the top right and bottom left quadrants are the result. I'm not sure if that is something that is user fixable on your DSLR, or in need of a service technician.
 
One thing I've found is that post processing goes a long way. And that I don't know nothing about it. But you know who does? ChatGPT. It'll tell you about all the settings in your editing software and which ones to adjust etc.
 
One thing I've found is that post processing goes a long way. And that I don't know nothing about it. But you know who does? ChatGPT. It'll tell you about all the settings in your editing software and which ones to adjust etc.

Ha! I've never once used any of the so called AI programs but I have used Photoshop extensively in my work since version 1. Almost second nature now. A tip: Photoshop Elements has maybe 95% of everything useful in the full version. Amazingly powerful. I suspect other editors are as well.
 
It seems like you have some dirt or dust on the camera sensor. Those out of focus blobs in the top right and bottom left quadrants are the result. I'm not sure if that is something that is user fixable on your DSLR, or in need of a service technician.
Will, I believe you are right. I will talk to the camera shop I bought it from (used) recently. Thanks for pointing that out.
 
I see sensor dust also. Most times I can get rid of it by using a squeeze air bulb on the sensor. I also always post process using free Gimp and the spots are pretty easy to get rid of using the clone tool. Since I post process I dangle a white balance card up in the corner. This allows me to get good color in the post processing and I just crop out the card.

Your setup looks similar to my arrangement.
 
One thing I've found is that post processing goes a long way. And that I don't know nothing about it. But you know who does? ChatGPT. It'll tell you about all the settings in your editing software and which ones to adjust etc.
I used GIMP to clean up a bunch of mediocre photos when I assembled my website. It can do a lot, but it's like sanding a mediocre turning. I would rather start with a well-lit shot that doesn't need a lot of cleanup. I'll leave ChatGPT to the lawyers who need bogus citations to bulk up their filings. Any suggestions on how to improve the setup as shown would be very welcome.

I did speak to a former pro photographer at our guild sawdust session this evening. He suggested another light and/or shinier reflector boards and more scrim material for better control of where the lighting lands on the piece, as well as trying a different background paper that will drape more cleanly. He said that more light was better in a pro shoot because you could have shorter exposures that were less susceptible to vibration. He also leafed through some Fine Woodworking mags that someone was giving away and pointed out various lighting and editing techniques and the variations in light intensity on the subjects of various shots- very illuminating. I need to develop my eye to make best use of his advice.

I really just want a convincing, repeatable and easily set up arrangement that will suffice for a website or gallery submission. The photography rabbit hole may be deeper than the woodworking one I am in.
 
Kevin without setting up permanent place for photos one of the easiest things to do is setup a stand or chair like photo above and set it up outdoors on a overcast day. I have dual soft boxes with CFL bulbs But I was never satisfied with the results. I ended up buying a setup from Cowboy Studios (which seems to be non existent now) that uses strobe lights. It was a little over $125. I cannot find a comparison setup that does not cost 5 times that now. But there are strobes on Ebay that are very fairly priced. Initially I would set it up in the kitchen or living room and wait until I had a bunch to photograph, not very convenient for a quick photo. So I found a spot in a store room in the basement and now have a permanent place. I sometimes use this little LED photo tent for small pieces. Small photo tents can be had on Amazon for about $10. Large photo tents can be had for under $30. Lots of clubs use these tents for pictures.
 

Attachments

  • Photo Setup.JPG
    Photo Setup.JPG
    228.5 KB · Views: 17
  • Small Photo Tent.JPG
    Small Photo Tent.JPG
    194.2 KB · Views: 17
I
Thanks, Kent. I tried a different setup like the one in your link, using my cellphone on a jerry-rigged adapter as the sensor on my dslr seems to be scratched. I used a different backdrop paper and set the vessel closer to the back curve which subdued the wrinkling. It lessened the gradient though, despite using a shade panel at the back of the tent. The first shot shows the setup, the second with a main light on the left and a fill farther away on the right, the third has the fill light in closer. Having two lights is a bit easier to control than one. The setup is pretty quick to put together. The depth of field seems less with the phone's camera and it is less convenient and controllable than the dslr. I feel I am getting closer- any comments?
setup 2.jpgtest shot 1.jpgtest shot 2.jpg
 
CFL lights are terrible for photography. They have a low cfi (color fidelity index, I think). The big issue for these bulbs is that regardless of being called daylight, warm, cool, they have a big green spike from the mercury. Your photo software or camera cannot control for that. It skews all the colors. There are high quality led lights with very high cri. Your colors will be brighter, more vivid.

Shadows are fine, and can be very nice. One shadow only. We, as animals are used to one big light source, hence one shadow. I suggest that you harden your main light and place it nearer your camera. Your fill light is ok on the side as you have it in the last images. A fill light is used to fill the black shadow created by the main light.

A hot spot is undesirable if it’s totally blown out, but the reflection of the light source is fine and desirable. The only way in a photograph to show the finish quality, whether mat, satin, semi-gloss, gloss or mirror shine is the bright spot. Mat shows nothing, satin/semi-gloss shows a soft, out of focus bright area, and gloss and mirror will show what the light source is.

Your first photo is more compelling than after you fixed it.
 
The lighting is looking good!
Several comments:

One, it's really difficult to hold a cell phone perfectly horizontal while taking a picture! Some phone cameras have a horizon detector that puts a line across the screen when the cam is horizontal. When not using my Canon DSLR, I often use a little spring-loaded cell phone holder that mounts on a tripod. (This is great to take photos of me working on something by using the 10-sec self timer.)

Two, cell phone lenses are usually a little too "wide angle" to suit me. When the lens is close, this introduces distortion in the image. I find I sometimes get a better picture by moving the camera physically back away and zooming in - the object may be the same size on the screen but the perspective is a bit different. This is the reason pro photographers often use a "portrait" lens when shooting faces and people - if a "normal" lens is 50mm, a portrait lens might be about 105mm. It tends to make a more flattering portrait with less distortion on facial features. Might try it both ways. When I shoot an object I usually take multiple photos from different distances and heights, and often rotate the piece to different angles - decide what I like best later.

Also, I do post processing on almost every shot - send the image to one of my computers by email if I don't want to bother with connecting by USB, then load into Photoshop Elements. This lets me straighten images I when I accidentally tilted the camera a bit, crop to what I think is a pleasing boundary, and make minor corrections on brightness and contrast. (and remove spots of dust or whatever that showed up on the backdrop.)

Then I save the file in a reduced pixel size in a folder called I call "for posting" since web pages and email don't usually need pictures with 4000 pixels across! Most target and transfer software will do some of this automatically but I'd rather keep the control it myself.

Keeping up with photos can turn into a nightmare. For woodturning photos I put the photos in sub-directors with names that make sense: tools, wands, ornaments, etc. I save the originals in the original full resolution, unedited form in case I need them later. (That's probably one reason I had over 70,000 photos on my drive at last count! .... and don't forget to backup everything!)

I give each image file a name that is useful for searching, but leave the numerical name the cameras usually generate at the end of the file name so I can find the original easily if needed.

But about all this remember one thing - I'm a card-carrying, certified hopeless photo maniac! You should see my boxes of slides and film and file cabinets of prints from past decades - digital makes things SOOO much easier! (and incredibly inexpensive)

And remember, take advice on the number and type of lights and other things from me or others with the proverbial grain of salt. Everyone has an opinion. Do what looks good to you. There official credentialed photo police do not exist in art. And almost ANY picture is better than no picture.

Can't wait to see more of your photos!

Oh a little story about "shooting" photos. Once a 4-yo grandson stayed with us and at bed time I told him I might not be there when he got up - I had to go shoot a wedding. He was shocked: "WHAT, what did you say???" I had to explain that "shooting" a wedding meant taking pictures with a camera. :)

I had to clear up the same terminology by text with a young friend in Italy learning English - when can the word "shoot" be used? Shoot me a text. Shoot a photo. Look at this shot. Shoot the moon. Shoot at a target. Oh, shoot, didn't mean to do that. These tires are shot. A young shoot on a plant. The car shot forward. And when the friend visited we took her to DC and she shot 100's of photos - has a very good eye for composition, lighting,!

JKJ
 
Back
Top