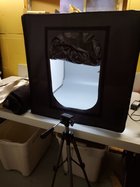
I am curious if anyone would like to share any specific advice or show their photography set ups. I am using a small self contained 24" cube table top studio rig that I bought off amazon. It has plastic "seamless" backdrops, 2 banks of LED lights. The lights are moveable and dimmable. I am not terribly happy with the results. It is designed to produce very diffuse lighting. I find the light is too diffuse as it doesn't show texture or depth very well. I would prefer that I could get the background to be more gradated (from light in the foreground to dark in the background) as I see in many of your photographs posted. I am looking to find a better system. Any help would be hugely appreciated.

-
It's time to cast your vote in the March 2026 Turning Challenge. (click here for details) -
Congratulations to Chris Lawrence for "Dragon's Grip" being selected as Turning of the Week for March 30, 2026 (click here for details) -
Welcome new registering member. Your username must be your real First and Last name (for example: John Doe). "Screen names" and "handles" are not allowed and your registration will be deleted if you don't use your real name. Also, do not use all caps nor all lower case.
You are using an out of date browser. It may not display this or other websites correctly.
You should upgrade or use an alternative browser.
You should upgrade or use an alternative browser.
Photographing Finished Turnings
- Thread starter Will Armstrong
- Start date
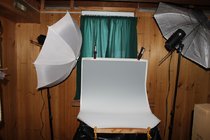
My standard set-up. Modified my photo setup a little to be able to screen off so that the background at the top becomes darker. The bowls look more three-dimensional this way. The background is a roller blind from IKEA painted melange in grey, without gradient. The light shielding is also a roller blind to easily change the height. On the right, I'm holding a piece of styrofoam with aluminum foil on it that acts as a reflector. The fluorescent tubes are four standard 18 W 4000K. I easily set the color temperature with the gray background. If anyone is wondering about some other stuff in the picture, the space also functions as a spray cabinet connected to the chip suction system via filter and only for water-based varnish/paint.

Tom Gall
TOTW Team
I would recommend a Varitone graduated background. I have a #09 (black to white). They come in various sizes and colors. Here are a few sources - many available if you spend the time searching.

 www.etsy.com
VARITONE GRADUATED BACKGROUND - Etsy
This Color Photography item by SetShopNYC has 40 favorites from Etsy shoppers. Ships from New York, NY. Listed on Dec 12, 2022
www.etsy.com
john lucas
AAW Forum Expert
I have several handouts I would be glad to send you if you send me an email. John Beaver has a great article in the current Woodturning fundamentals. You can search for my previous articles in American woodturner. If you need to show texture stay away from the light tents or boxes.
In a previous thread that I initiated I asked for opinions on those fold up cubes like you got from Amazon. The responses I got were decidedly against the them so I am still using my sky blue seamless with common led light bulbs, which the digital cameras don't seem to mind.
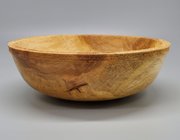
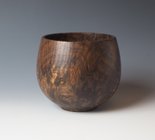
This natural edge bowl was finished with walnut oil and is photographed supported off the seamless on 2 pine triangle strips after learning on a previous photo session that the walnut oil can leave ring stains.
This natural edge bowl was finished with walnut oil and is photographed supported off the seamless on 2 pine triangle strips after learning on a previous photo session that the walnut oil can leave ring stains.
John, can you recommend a medium price softbox light?
I like the Varitone backgrounds but I need improvement on my lighting.

I like the Varitone backgrounds but I need improvement on my lighting.
I need to get a lot better at taking pictures of my work.
I'm using a really simple setup for my "studio". It is just a piece of fabric thumbtacked to a shelf in my reloading closet. The fabric drapes down to cover a cookie tin sitting on the tool chest that holds my dies and such.
.jpeg")
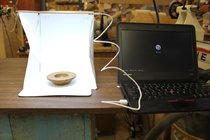
I'm using a Pentax KS-2 DSLR with a fast 50mm portrait lens in aperture priority mode. I use a hot-shoe flash set to 80% power for lighting. I'm still tweaking the settings and lenses to find the best settings but am pretty happy with these results.
I'm not suggesting that you need to spend a couple of grand on camera equipment. A cell phone camera is at the low end of the photography spectrum. An inexpensive digital point and shoot might be worth a try.
.jpeg")
I'm using a Pentax KS-2 DSLR with a fast 50mm portrait lens in aperture priority mode. I use a hot-shoe flash set to 80% power for lighting. I'm still tweaking the settings and lenses to find the best settings but am pretty happy with these results.
I'm not suggesting that you need to spend a couple of grand on camera equipment. A cell phone camera is at the low end of the photography spectrum. An inexpensive digital point and shoot might be worth a try.
- Joined
- Feb 6, 2010
- Messages
- 3,520
- Likes
- 2,597
- Location
- Brandon, MS
- Website
- threeringswoodshop.square.site
I use a Varitone gradient background . Light has a t-shirt over it to reduce glare. Usually one light dies the truck. I do have another photo light farther back if more light is needed. 
We all have different taste, but I think that the most important things are:
1 Uncluttered background, without any fold or wrinkles
2 Neutral grey background. Makes it easy to set white balance. Coloured backgrounds always result in a colour cast.
3 Diffuse lighting to avoid hard shadows and reflections
I would say that if you look in any book on famous woodturners, you will see that they almost always follow this rules.
I have something similar to what Will has. I just have an iPhone and work with that.
john lucas
AAW Forum Expert
I just did a search for soft boxes to fit my lights. If you want a box with lights I got a doid one from cowboy studios but I dont know if they still exist.John, can you recommend a medium price softbox light?
I like the Varitone backgrounds but I need improvement on my lighting.
View attachment 48209
These are 3 good rules to follow, though there are stunning exceptions commonly seen, especially rule 3. @Marc Banka oak bowl in this month’s challenge is an amazing example of directional lighting, and some of @Donna Banfield use of lighting to emphasize negative space is striking as well.We all have different taste, but I think that the most important things are:
1 Uncluttered background, without any fold or wrinkles
2 Neutral grey background. Makes it easy to set white balance. Coloured backgrounds always result in a colour cast.
3 Diffuse lighting to avoid hard shadows and reflections
I would say that if you look in any book on famous woodturners, you will see that they almost always follow this rules.
Shadows provide important visual ques to form.
John Beaver & John Lucas both have excellent tutorials.
John Beaver & John Lucas both have excellent tutorials.
Thank you Lennart for showing us your setup! Very helpful. I applaud your ingenuity. You refer to painting a "melange" in gray. I like the mottled effect. Is there anything more you can tell us about how you did this? Was it a paper blind or vinyl? What sort of paint?My standard set-up. Modified my photo setup a little to be able to screen off so that the background at the top becomes darker. The bowls look more three-dimensional this way. The background is a roller blind from IKEA painted melange in grey, without gradient. The light shielding is also a roller blind to easily change the height. On the right, I'm holding a piece of styrofoam with aluminum foil on it that acts as a reflector. The fluorescent tubes are four standard 18 W 4000K. I easily set the color temperature with the gray background. If anyone is wondering about some other stuff in the picture, the space also functions as a spray cabinet connected to the chip suction system via filter and only for water-based varnish/paint.View attachment 48194View attachment 48196
Thanks for the links Tom.I would recommend a Varitone graduated background. I have a #09 (black to white). They come in various sizes and colors. Here are a few sources - many available if you spend the time searching.
VARITONE GRADUATED BACKGROUND - Etsy
This Color Photography item by SetShopNYC has 40 favorites from Etsy shoppers. Ships from New York, NY. Listed on Dec 12, 2022
Good tip about the potential staining Don!In a previous thread that I initiated I asked for opinions on those fold up cubes like you got from Amazon. The responses I got were decidedly against the them so I am still using my sky blue seamless with common led light bulbs, which the digital cameras don't seem to mind.View attachment 48208
This natural edge bowl was finished with walnut oil and is photographed supported off the seamless on 2 pine triangle strips after learning on a previous photo session that the walnut oil can leave ring stains.
Thanks for the details Monty. I am using my phone on a tripod at the moment but I have pondered a DSLR. I'm hoping to find a friend with one that I can at least try out.I'm using a really simple setup for my "studio". It is just a piece of fabric thumbtacked to a shelf in my reloading closet. The fabric drapes down to cover a cookie tin sitting on the tool chest that holds my dies and such.
View attachment 48210
I'm using a Pentax KS-2 DSLR with a fast 50mm portrait lens in aperture priority mode. I use a hot-shoe flash set to 80% power for lighting. I'm still tweaking the settings and lenses to find the best settings but am pretty happy with these results.
I'm not suggesting that you need to spend a couple of grand on camera equipment. A cell phone camera is at the low end of the photography spectrum. An inexpensive digital point and shoot might be worth a try.
View attachment 48211
Good observation Michael. I have checked out your references to Mac and Donna. Thanks!These are 3 good rules to follow, though there are stunning exceptions commonly seen, especially rule 3. @Marc Banka oak bowl in this month’s challenge is an amazing example of directional lighting, and some of @Donna Banfield use of lighting to emphasize negative space is striking as well.
A white night blind, something like this https://www.ikea.com/gb/en/p/fridans-block-out-roller-blind-grey-70396917/ The mottled effect by a sponge and dilute dark grey acrylic paint.Thank you Lennart for showing us your setup! Very helpful. I applaud your ingenuity. You refer to painting a "melange" in gray. I like the mottled effect. Is there anything more you can tell us about how you did this? Was it a paper blind or vinyl? What sort of paint?
I have the roll of graduated backdrop hanging from the low ceiling over my drafting table. When it's time for a shoot, I unroll the backdrop and clip the leading edge to the front of the table so it doesn't slither off. My lights are on tripods, with an umbrella style reflector and detachable diffuser.
It’s possible to have better results with the outfit you’re presently using. A real camera would help, but that’s something different all together.I am curious if anyone would like to share any specific advice or show their photography set ups. I am using a small self contained 24" cube table top studio rig that I bought off amazon. It has plastic "seamless" backdrops, 2 banks of LED lights. The lights are moveable and dimmable. I am not terribly happy with the results. It is designed to produce very diffuse lighting. I find the light is too diffuse as it doesn't show texture or depth very well. I would prefer that I could get the background to be more gradated (from light in the foreground to dark in the background) as I see in many of your photographs posted. I am looking to find a better system. Any help would be hugely appreciated.
Add directionality by moving your lights into one bank (as tightly grouped as possible) and position them at the near left edge of your box. Adjust the height of your lights to suit.
Try removing that front ‘shield’ and turn off the house lights. Have only the one light source. Removing that shield will eliminate that one reflection, which will increase your contrast.
There are excellent tutorial, as mentioned. A few general thoughts though.
Some directionality is good. We are animals, and respond best when things fit our world. Because we have a sun, we come to expect light to be coming from a place, a thing. Because it (light) has a source, it will create a shadow. Big, small, hard or soft, it’s there with these different qualities. Small light far away (our sun) produces a hard light with a hard, sharp shadow. A big light source such as the light on an overcast day has soft shadows. It’s a big soft box.
A shadow can be inky black, or justly slightly (or not at all) noticeable. That’s controlled by reflectors in the environment, nature’s or ours. These reflections ‘fill in’ the shadows. The shooting boxes are generally max softness and minimal shadow. It’s good for showing what something looks like, but provides no life. No drama. We like drama!
The quality of light, hard or soft is controlled by the size of the source and it’s distance from the object. Smaller and further = harder. Larger and nearer = softer. Hard light = sharp shadow.
Fill light/darkness of shadow is controlled with a second light source. Could be another light, but usually a reflector of sorts. By changing its placement and proximity to the object, one can lighten or darken shadows.
Soft light is easier to deal with, is more forgiving, but not as exciting.
Harder, more directional light, with harder shadows has more drama, shows detail and surface quality. For instance, if I want the chatoyance to sing, I’ll want to be using hard light, especially if my surface is flawless. It’ll really ‘pop’. If you have scratches though, or torn grain, or other blemishes, you and everyone else will see them.
So, it’s not a method — I don’t do methods or recipes very well. So, I leave you with a way to think about light, and what is it that you might want to share, a starting point for your own exploration. It’s so awesome that digital has allowed us to do that so easily.
Last edited:
A graduated background or a shielded off upper part as illustrated in my first post, makes your piece more 3D. In this case I also used a reflector to lighten the front.


Another possibility is to fix this in post-processing. Lightroom classical got a very good improvement for masking in the latest update. You can now apply a linear mask, intersect it with the background, reduce the exposure and it automatically darkens the background. The cataloging function of LrC also makes it very easy to search and retrieve what you want. This is the first image post-processed in LrC.

Another possibility is to fix this in post-processing. Lightroom classical got a very good improvement for masking in the latest update. You can now apply a linear mask, intersect it with the background, reduce the exposure and it automatically darkens the background. The cataloging function of LrC also makes it very easy to search and retrieve what you want. This is the first image post-processed in LrC.
- Joined
- Jan 27, 2005
- Messages
- 13,221
- Likes
- 5,851
- Location
- Dalworthington Gardens, TX
- Website
- pbase.com
Here is a link to my post in a similar thread showing the typical set up that I use for photographing turnings.
That's very cool Lennart. Thanks for the info. I find it interesting that the digital editing with LrC has added only that background shadow and no change to the bowl, but it makes it look like the bowl has more depth and contrast. Thanks for all your effort and discussion on this topic.A graduated background or a shielded off upper part as illustrated in my first post, makes your piece more 3D. In this case I also used a reflector to lighten the front.
View attachment 48248View attachment 48250
Another possibility is to fix this in post-processing. Lightroom classical got a very good improvement for masking in the latest update. You can now apply a linear mask, intersect it with the background, reduce the exposure and it automatically darkens the background. The cataloging function of LrC also makes it very easy to search and retrieve what you want. This is the first image post-processed in LrC.
View attachment 48251
thanks for the ideas Marc! The mechanisms for attaching the light bars to the structure unfortunately don't allow for much freedom, but I will fiddle around with it.It’s possible to have better results with the outfit you’re presently using. A real camera would help, but that’s something different all together.
Add directionality by moving your lights into one bank (as tightly grouped as possible) and position them at the near left edge of your box. Adjust the height of your lights to suit.
Try removing that front ‘shield’ and turn off the house lights. Have only the one light source. Removing that shield will eliminate that one reflection, which will increase your contrast.
There are excellent tutorial, as mentioned. A few general thoughts though.
Some directionality is good. We are animals, and respond best when things fit our world. Because we have a sun, we come to expect light to be coming from a place, a thing. Because it (light) has a source, it will create a shadow. Big, small, hard or soft, it’s there with these different qualities. Small light far away (our sun) produces a hard light with a hard, sharp shadow. A big light source such as the light on an overcast day has soft shadows. It’s a big soft box.
A shadow can be inky black, or justly slightly (or not at all) noticeable. That’s controlled by reflectors in the environment, nature’s or ours. These reflections ‘fill in’ the shadows. The shooting boxes are generally max softness and minimal shadow. It’s good for showing what something looks like, but provides no life. No drama. We like drama!
The quality of light, hard or soft is controlled by the size of the source and it’s distance from the object. Smaller and further = harder. Larger and nearer = softer. Hard light = sharp shadow.
Fill light/darkness of shadow is controlled with a second light source. Could be another light, but usually a reflector of sorts. By changing its placement and proximity to the object, one can lighten or darken shadows.
Soft light is easier to deal with, is more forgiving, but not as exciting.
Harder, more directional light, with harder shadows has more drama, shows detail and surface quality. For instance, if I want the chatoyance to sing, I’ll want to be using hard light, especially if my surface is flawless. It’ll really ‘pop’. If you have scratches though, or torn grain, or other blemishes, you and everyone else will see them.
So, it’s not a method — I don’t do methods or recipes very well. So, I leave you with a way to think about light, and what is it that you might want to share, a starting point for your own exploration. It’s so awesome that digital has allowed us to do that so easily.
Thanks for your comments Kalia!I have the roll of graduated backdrop hanging from the low ceiling over my drafting table. When it's time for a shoot, I unroll the backdrop and clip the leading edge to the front of the table so it doesn't slither off. My lights are on tripods, with an umbrella style reflector and detachable diffuser.
Thank you Bill!Here is a link to my post in a similar thread showing the typical set up that I use for photographing turnings.
I see you have a Color checker chart in your set up. Do you find it helpful?Here is a link to my post in a similar thread showing the typical set up that I use for photographing turnings.
- Joined
- Jan 27, 2005
- Messages
- 13,221
- Likes
- 5,851
- Location
- Dalworthington Gardens, TX
- Website
- pbase.com
I see you have a Color checker chart in your set up. Do you find it helpful?
Yes, I use it to create custom color profiles for my cameras. The profiles are used by Camera Raw. I believe that the custom profiles will also work in Lightroom.
Steve Worcester
Admin Emeritus
And one you wrote some years agoI have several handouts I would be glad to send you if you send me an email. John Beaver has a great article in the current Woodturning fundamentals. You can search for my previous articles in American woodturner. If you need to show texture stay away from the light tents or boxes.
Blog - TurningWood
Hi,I have several handouts I would be glad to send you if you send me an email. John Beaver has a great article in the current Woodturning fundamentals. You can search for my previous articles in American woodturner. If you need to show texture stay away from the light tents or boxes.
I'm just nee to photographing my pieces and would love to read your material.
Many thanks in advance.
Ivanewitt@gmail.com
I generally use one of these light tents. I don’t use any lighting, I just wait for an overcast day and use it outside. Failing that I have a room in the house with good daylight that I sometimes use for small stuff.

Thanks everyone for your responses. John I'll check out some of your references. Marc I especially liked your explanation of natural light and the effects. Gives me a better understanding of how to emphasize what I want in a photo.
My dad used to say, "keep things awfully simple instead of simply awful." You've certainly kept to the former! Thanks!