• August 2025 Turning Challenge: Wooden Version of Non-Wood Item! (click here for details)
  • Congratulations to David Croxton for "XOXOXO" being selected as Turning of the Week for August 11, 2025 (click here for details)
  • Welcome new registering member. Your username must be your real First and Last name (for example: John Doe). "Screen names" and "handles" are not allowed and your registration will be deleted if you don't use your real name. Also, do not use all caps nor all lower case.

Question on Bark Edge Bowl

Joined
Jan 29, 2019
Messages
115
Likes
57
Location
Rome, GA
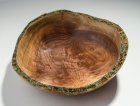
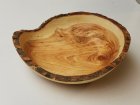
I am researching but most fo the time I get enough information to send me back here to try and understand what I need to know. I am turning a natural (bark) edge bowl and was searching how to help keep the bark on during the drying but a lot of the folks just turn a green bowl and let it warp as it may. Will it work to twice turn a bowl with bark? I prefer to have the bowl maintain it's shape after the final turning. I did get the 14-inch Robust J rest and it is barely long enough to do a large bowl or it may just be me, I'm as green as this walnut bowl I'm trying to turn. I also read that some folks mix 50% DA and shellac and soak the bark to help keep the bark on. Does anyone here use that? I appreciate any advice and I'm posting a couple of pictures of my project that you may see something that will help me in the future. I've got the bowl in a plastic bag tonight until I find out what I need to do.

P1165709.jpg P1165713.jpg
 
I single turn NE bowls and emphasize the ovalness by starting with blanks longer than wide.
The curves and wall thickness let the bowls dry to finishing in a few days.
To me the bark or barkless rim edge is a marvelous organic element that goes better with oval form than one that is truly round.

however, a round bowl can look terrific too.

if you want a true round bowl you can twice turn the bowl. Turn the wall thickness about 10% of the diameter to the high rims. Thin ca glue Will keep the bark on during the drying process. Using paper bags to dry the bowl is bark friendly. Change the bag bags that become damp every day for dry bags until the bags are notdamp - usually 4-5 days. Then let dry in the bags for 6 months. Then continue the drying outside of the bags 2-3 months on a shelf.

when you second turn the dry bowl you should put thin CA on the bark after turning the outside and after turning the inside.

CA should be applied where the bark meets the wood and allowed to penetrate the bark to strengthen it.

While it is a lot more work, I often take the bark off the NE bowls so that the bowl can be functional.
With a white sap ring Walnut NE bowls look dramatic without he bark.

this photo is One I took of oak bowls in progress
The two bigger ones are 16” on the longest diameter. This is about the limit of the robust J rest. On larger bowls I remove the last 1 or 2 inches from the center bottom with the banjo move well inside of the rim to get the end of the J rest close to the bottom a little right of center,
A217FB1D-8A3A-48A4-A57B-959090C3CF42.jpeg
 
Last edited:
On a NE, with an obviously irregular border, nobody can tell if the bowl warped a little and is not perfectly round. Sometimes I bring a load of wood to the shop, turn a NE, and finish it the day after. I never dry my NE more than a few days to be able to sand them.
 
The major key to keeping the bark on is starting with live wood fresh cut when the sap is not running (late summer to late winter - for my location that would be labor day weekend to the end of February). The species can also have a bearing on whether or not the bark will stay on, I know that black cherry is excellent in my view if properly harvested. The shape of the bowl needs to be addressed no matter if you are rough turning or turning to finish, since the wood is going to shrink as it drys and the form you have chosen will more than likely crack on those end grain areas where the grain is nearly perpendicular to the wall. The desired form is a continuous curve with parallel walls, which will have less chance of checking. Note my personal preference is to remove the bark if it will not stay on. The bowl in the photo is northern red oak cut down in late august, turned once and after a day or 2 sanded and lacquered.
9081Bowl.JPG
 
The major key to keeping the bark on is starting with live wood fresh cut when the sap is not running (late summer to late winter - for my location that would be labor day weekend to the end of February).

This may be more of an issue in the north. Here in central Florida many of the deciduous trees are evergreen. maples and sweet gums are just now turning colors. They will drop these leaves and have new leaves by mid February so 3-4 weeks of semi dormancy. Many of the maples and sweet gums will not have dropped all their leaves before the new ones bud out.

The bark will generally stay on wood harvested any time of the year if
It is turned soon after coming down
care is taken when turning the bark edge
And CA glue is applied along the bark edge.
 
I single turn NE bowls and emphasize the ovalness by starting with blanks longer than wide.
The curves and wall thickness let the bowls dry to finishing in a few days.
To me the bark or barkless rim edge is a marvelous organic element that goes better with oval form than one that is truly round.

Thank you for all the information and those are beautiful bowls you have pictured.

On a NE, with an obviously irregular border, nobody can tell if the bowl warped a little and is not perfectly round. Sometimes I bring a load of wood to the shop, turn a NE, and finish it the day after. I never dry my NE more than a few days to be able to sand them.

Thanks Emiliano. What kind of foot do you use to keep the bowl stable after it warps?

The major key to keeping the bark on is starting with live wood fresh cut when the sap is not running (late summer to late winter - for my location that would be labor day weekend to the end of February). The species can also have a bearing on whether or not the bark will stay on, I know that black cherry is excellent in my view if properly harvested. The shape of the bowl needs to be addressed no matter if you are rough turning or turning to finish, since the wood is going to shrink as it drys and the form you have chosen will more than likely crack on those end grain areas where the grain is nearly perpendicular to the wall. The desired form is a continuous curve with parallel walls, which will have less chance of checking. Note my personal preference is to remove the bark if it will not stay on. The bowl in the photo is northern red oak cut down in late august, turned once and after a day or 2 sanded and lacquered.

Thank you for your reply. It was cut at the right time for North GA. So I need to choose a different shape because of cracking. If I had chosen this shape and used the bark side for the bottom and an even top would that still be likely to crack? I think I understand with the continuous curve that none of the end grain is 90° to the wall of the bowl. Your bowl is really nice. What kind of foot do you have on this bowl? I'll try that shape with walnut tomorrow.
A shape similar to this would have been better?
a.jpg
 
For the bottom I usually leave the tenon on or the shoulder of the tenon so I can chuck it up and sand it when dry. I then reverse and jam or vacuum chuck and remove enough of the tenon for it to sit flat. If I want a foot I leave some tenon. Sometimes I remove it all together and just have a flat spot on the bottom.
 
Thank you for all the information and those are beautiful bowls you have pictured.


Thanks Emiliano. What kind of foot do you use to keep the bowl stable after it warps?


Thank you for your reply. It was cut at the right time for North GA. So I need to choose a different shape because of cracking. If I had chosen this shape and used the bark side for the bottom and an even top would that still be likely to crack? I think I understand with the continuous curve that none of the end grain is 90° to the wall of the bowl. Your bowl is really nice. What kind of foot do you have on this bowl? I'll try that shape with walnut tomorrow.
A shape similar to this would have been better?
View attachment 31605
If I remember right I used a recess in the base which has the advantage of shrinking to an oval which can then be resized to the original dimension by jam chucking (notice the spot in the middle of the recess where the cup center held it against the jam chuck) and you can also flatten the base. The bowl shown is a larger bowl from a crotch in the same tree as the the previously pictured bowl. The wall thickness is about 3/16th inch except for the material required to form the base.
IMG_20200117_233301.jpg
 
I also do most of my NE without a foot.
The are amazingly stable.

this also give one of the most esthetic look to the bowls profile. The curve truly continues all across the bottom.
Sanding off the lathe is easy too.
When I do use a foot - necessary in a bowl taller than wide. I sand the foot on the lathe and recess it slightly. When dry I push the bowl over a sheet of 220 clamped to the table saw. A few strokes flattens the narrow rim at the edge of the recessed foot. I also use a small foot usually 1” diameter.

My crotch bowls have a near flat curve across the bottom and the drying usually produces three stable points for the bowl to sit on as the center part between the two limbs pushes up a little as it dries.

this photo of a sweet gums bowl with the pith in was taken to show how the curve is distorted by the pith pushing out as it dries. Also shows the round bottom.
Pith bump and bottomA093156D-1300-46CE-A74E-16B1EAFA359C.jpeg Pith depressionFDF78403-AFE1-4714-9E88-F7F22CFF61D7.jpeg
 
I only leave the bark on with about half my NE bowls. The reason is either the wood sits too long, or the bark was fragile or I simply want the customer to be able to handle the bowl without worrying about the fragile bark. So I sponge paint the edge. This has been quite popular for me. I will be doing a demo on that today in Chattanooga if you happen to live close by. It is for the Tri City woodturners.
 

Attachments

  • photo 8 final bowl copy.jpg
    photo 8 final bowl copy.jpg
    419.1 KB · Views: 30
Some good advice. I use CA glue. I usually turn my NE bowls once as well. I do burn the edge with a propane torch if the bark falls off for contrast.

Thank you, Rob and the bowl you shared is beautiful also.

I only leave the bark on with about half my NE bowls. The reason is either the wood sits too long, or the bark was fragile or I simply want the customer to be able to handle the bowl without worrying about the fragile bark. So I sponge paint the edge. This has been quite popular for me. I will be doing a demo on that today in Chattanooga if you happen to live close by. It is for the Tri City woodturners.

I like the color also John. I just noticed the demo was the day you posted. I go to Chattanooga often and would like to have attended. Thanks.


Okay guys, I've been listening and started another bowl yesterday and finished the turning after Church today. This is another piece of green walnut. I change the shape to have a more continuous curve. It is 14 inches by ¼". How long should I wait to sand and finish? It is really green and my shop is cool and the weather in N GA is humid. Thank you for being tolerant of beginners. I know some folks say why doesn't he just research and I do but you can't research the experience available here.

P1195729.jpg P1195730.jpg P1195726.jpg
 
Ron.....maybe put it in wooden drawer say 4 or 5 days.....1/4 inch even green wood would probably dry.....something nobody has mention is heartwood dust being sanded into the nice white sapwood wood u have....
 
Ron looks good you have obviously got a good handle on the tooling part and the curve is much more pleasing. As far as drying is concerned it may help to weigh the piece then leave it in your humid shop out of the light. On a daily basis weigh and record the weight and you should see the most weight loss in the first days then it should taper off to no change.
 
Nice looking bowl, Ron. I really like the contrasting sapwood and heartwood walnut presents. That is some serious bark. I have some similar ragged bark on the honey locust I have. I carved the most jagged parts down, but left most of the bark on, think I g it would be more useable.
 

Attachments

  • 20200115_234156.jpg
    20200115_234156.jpg
    309.2 KB · Views: 22
Back
Top