• July 2025 Turning Challenge: Turn a Multi-axis Weed Pot! (click here for details)
  • Congratulations to James Seyfried for "NE Red Oak II" being selected as Turning of the Week for July 21, 2025 (click here for details)
  • Welcome new registering member. Your username must be your real First and Last name (for example: John Doe). "Screen names" and "handles" are not allowed and your registration will be deleted if you don't use your real name. Also, do not use all caps nor all lower case.

Question on the vector grind jig

Status
Not open for further replies.

john lucas

AAW Forum Expert
Joined
Apr 26, 2004
Messages
8,600
Likes
4,357
Location
Cookeville, TN
Actually my question is on the bowl gouge holder that looks like an Ellswirth jig. How is the flute oriented so the wings come out equal or is that even necessary. On my wolverine and Ellsworth jigs there is a flat area that pushes against the flute so that it is oriented to give you the same grind on both sides. Assuming of course that you remove equal amounts of steel. The vector grinding jig simply has a round hole bored through so it looks to me like you could mistakenly or on purpose orient the flute clockwise or couterclockwise rather than parallel to the bottom. That would obviously change the wing shape each time you sharpen if you dont do it exactly the same way each time.
 
The tool holder not only looks like the Ellsworth jig, it is dimensionally identical to the Ellsworth jig that I have. There is another part to the Vector jig that sets the protrusion and also orients the gouge so that the wings can be ground equally.
 
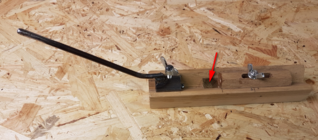
I would say that the main advantage of the Vector jig is that the orientation of the flute is made at the end of the gouge. You are not dependant on a long flut up and beyond the screw. My shop made variety. The flute is oriented by the plate indicated by the arrow.

1667826608444.png
 
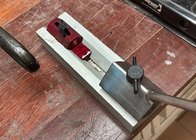
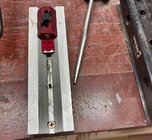
What William said. You use the gizmo he has pictured to the right to both set how far the gouge tip protrudes but also orient the flute to be straight up (symmetric wings). As shown in the left photo the tool holder sits upside down in the gizmo (butted up against a pin). The gouge is slipped in (flute down as pictured) and the wings of the tip are then referenced off the "plateau" of the red component. One of the vector's advantages is that the thumb screw is on the bottom of the jig and stays out of the way at the grinder.
 
I would say that the main advantage of the Vector jig is that the orientation of the flute is made at the end of the gouge. You are not dependant on a long flut up and beyond the screw. My shop made variety. The flute is oriented by the plate indicated by the arrow.

View attachment 47816
???? explain jig?
 
Last edited:
???? explain?
With Onway and similar the flute is oriented by the screw fixing the gouge in the jig. Typically you need the protrusion 50 mm or so plus the distance to the screw with plate. If the flute is shorter than this it will not work. With the Vector jig it works even if the flute is only 20 mm. Also the location is much more positive than with a potentially wobbling screw.
 
The two flute edges of the tool locate at the top of the jig and sit flat against the plated and the screw on the holder tightens on the bottom side of the gouge. The holder sits against a stop that gives the correct length of protrusion to give the hat makers grind. As long as the flute was cut correctly you will have uniformity. If the flute was cut of center it would still sharpen every time the same through the life of the tool but I believe one side of the flute would be a bit longer. I cannot stress enough how little pressure is needed to resharpen especially with CBN wheels. I really believe my Thompson gouges will never see me wearing one out.
 
A couple years ago I built the part of the Vector jig that supports the bowl gouge jig. I've been using it with the Wolverine jig. I printed a photo and transposed dimensions knowing that the support bar was 3/4" square tubing. When I finished t took it to a friends shop who has the vector jig and I nailed it. One hole is .005" off.
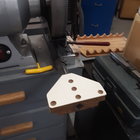
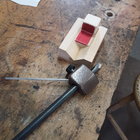
A couple of my gouges are getting short so I thought I would build the vector jig version of the Ellsworth jig. It is different than the Ellsworth in that it is V shaped on the top to fit in the V notch of the gouge setting part. This should allow me to get the last bit of use out of these tools.

20221110_114536.jpg


20221110_113303.jpg
 
Last edited by a moderator:
There is a huge difference in building a copy of someone's design for personal use than copying for sale. In my case I will use this when I'm teaching sharpening to help people understand the differences between the various jigs on the market.
 
There is a huge difference in building a copy of someone's design for personal use than copying for sale. In my case I will use this when I'm teaching sharpening to help people understand the differences between the various jigs on the market.
So if one has yet to build his very first sharpening jig, to save a lot of trial and error, and headaches what is the most efficient way to go? Been looking at a few designs, not sure what I want. I like simple and function. Thank you for reading.
 
There is a huge difference in building a copy of someone's design for personal use than copying for sale. In my case I will use this when I'm teaching sharpening to help people understand the differences between the various jigs on the market.

@john lucas, that is a common misconception. Pecuniary interests have nothing to do with it.
 
I don't have a dog in this copying hunt thing but I know of no one that has purchased the Vector that doesn't like it.
 
Copying art work is encouraged for learning but not for profit.
The community regulates this somewhat. Collectors and museums often shun the copier.
The symposiums rarely invite the copier.

At some point in time the turned objects become the equivalent of public domain.

Copying turning tools is a theoretically controlled through patents but few small guys have the time or means to get a patent approved.

I continue to be amazed at Trent Bosch’s creative genius in coming up with the camera system for hollowing. When he first showed it to me it was amazing. My first reaction was - this can’t work then quickly realized it’s simplicity - the camera moves with cutter…. Within days of its sale people were copying it and posting instructions on how to copy it.

Consider there are tens of thousands of people hollowing who were familiar with video cameras and the ubiquitous laser hollowing.
Only 1 guy thought of using video to hollow….. it’s so simple anyone could have thought of it. Why didn’t they.
 
Not sure why this went from discussing how the vector jig works to a copying transition. I wanted to learn more about the Vector jig and simply cant even remotely justify $300 plus dollars to try it out. I have the skills to build it entirely out of metal if I wanted so I could copy it exactly if I choose. I dont see anything wrong with that since i am not going to market it. I decided to make it out of wood simply because its quicker and cheaper and will work fine for my purposes. It allows me to answer questions on the system for other turners.
 
I am still trying to figure out what the vector grind set up does. As near as I can tell, it is for removing the heel and sides of the primary cutting edge bevel. If that is true, then I would just do that by hand rather than buying a jig to do it with. There are many references to 'secondary' bevels. On your bench chisels or plane blades, the secondary bevel is the primary cutting edge. With our bowl gouges, the secondary bevel is just a relief cut or rounding of the primary bevel.

robo hippy
 
with all do respect nobody has yet to answer my question. While it seems to be fairly obvious by context, when you sort it all out what works the best? Watch a video under bobbin boy on you tube. Making a spinning wheel. An old time german with a foot treddle lathe makes a spinnimng wheel from start to fininsh. Ans one of the key moments in the video is where with one stone he sharpens or touches up a spindle gouge and a skew.. The most straight forward I've seen to date.
 
I am still trying to figure out what the vector grind set up does. As near as I can tell, it is for removing the heel and sides of the primary cutting edge bevel. If that is true, then I would just do that by hand rather than buying a jig to do it with. There are many references to 'secondary' bevels. On your bench chisels or plane blades, the secondary bevel is the primary cutting edge. With our bowl gouges, the secondary bevel is just a relief cut or rounding of the primary bevel.

robo hippy
Yep, the advantage of the jig is the localization of the flute. Otherwise it has nothing special to offer. Grinding off the heel is just as simple manually. The strange thing here is John´s question, which is answered by his own post in comment #13.
 
The primary purpose of the Vector grinding jig/fixture is to replicate the hatmaker's grind, which can be done by hand, but is difficult to learn. The hatmaker's grind has wings that are "tucked in" to the flute

This is accomplished by placing the tool holder's leg in the right hand pivot of vector plate to form the right wing, and the left pivot to form the left wing.

If you do not want tucked wings you can position the tool holder in the back center pivot of the vector plate and get regular wings. The two remaining pivot points are convenient for relieving the heel.

You can, of course, grind various nose angles by varying the position of the Vector plate.
Placing the thumb screw on the underside of the tool holder keeps it from hitting the grinder housing when forming the wings (which is a plus in my book) and also allows for a longer useful tool life.

I am looking at shifting completely over to the Vector system. But, I still have to explore how I would sharpen spindle gouges on the Vector, haven't looked at that yet.
 
I am still trying to figure out what the vector grind set up does. As near as I can tell, it is for removing the heel and sides of the primary cutting edge bevel. If that is true, then I would just do that by hand rather than buying a jig to do it with. There are many references to 'secondary' bevels. On your bench chisels or plane blades, the secondary bevel is the primary cutting edge. With our bowl gouges, the secondary bevel is just a relief cut or rounding of the primary bevel.

robo hippy
From my limited experience, it is a different grind from what the OneWay system produces. I am unlikely to get a catch using the Vector jig. I won’t go back to the OneWay system.


I am looking at shifting completely over to the Vector system. But, I still have to explore how I would sharpen spindle gouges on the Vector, haven't looked at that yet.

I am guessing you mean spindle “roughing” gouges. I use the Sorby ProEdge for my roughing gouges, skews, scrapers, and parting tools. I have the Hannes thimble jig for sharpening skews, but don’t use it, The Sorby is very fast and easy to set for those tools.
 
Last edited:
@robo hippy The BIG advantage to grinding with the vector grind is (if used correctly) that whatever angle is ground on the nose of the gouge will remain the same all the way around the wings to the flute.
The Ellsworth and other swept back grinds the nose angle changes as you roll and swing the gouge. The result is hunting for the “sweet spot” by slowly opening the flute open it just a little too far and congratulations you have achieved a massive catch. With the Hannes (vector) grind the constant and consistent bevel angle catches are hard to come by.
The Hannes grind may resemble other swept wing grinds but it is way different it is more versitle and can give a cleaner cut. It works with any flute shape.
The Vector fixture can be used to sharpen any gouge profile bowl or spindle. Also the Lacer skew.
Go to Hannes‘ web site and watch the videos. https://hannestool.com/product-category/vector-grind-fixture/
 
I've been grinding my gouges with the wolverine jig. After grinding the main bevel I move the jig forward in the V slot and grind a secondary bevel so the main bevel is about 1 or 2 mm. Then I remove the tool from the jig and hand grind the heel of the tool. Fir all practical purposes it functions just like the Hannes tool. The only difference with the vector grind is it makes the wings slightly less acute. Which should be obvious since your grinding them with the jig off center. The nose is no different in feel when I'm cutting. It does look different because there is a very slight transition line where the nose meets the wing when using the vector jig. Catch free. I cant tell that it's any different than my grind.
 
Clyde. I have hand sharpened many times especially when demonstrating on my spring pole lathe. It's very easy to change the bevel angle if you rock the stone as you sharpen. Not that difficult when sharpening spindle gouges and skews. Very hard to keep the same angle on bowl gouges with swept back wings.
 
Any chance i could get my question answered? thank you
Not sure if this will help any, but when I first started learning sharpening, I made myself a home-made "sort of like" wolverine arm and vari-grind (varigrind from plans I found on youtube, wolverine arm by seat of my pants) which I originally rigged up to my Oregon blade grinder (it was a 1750 RPM motor with 8 inch ruby wheel) , then adapted to the new Rikon grinder , and after struggling with the home made version, I finally bit the bullet and bought a Wolverine with Vari-Grind attachment as a set, and from that experience, I would suggest that it would be $180 bucks or so VERY well spent - If you find your choice of jig (perhaps a vector setup?) I would suggest simply buying the factory made jig instead of trying to save money by fabricating your own. (unless you're good at fabricating things)

Basically, there's no one "BEST" option, to be honest- They all work well for what they do, and if you don't want to do an Ellsworth or Irish grind on your bowl gouge, for example, and just want to go with traditional grinds, there's no real reason you even NEED a jig - You'd likely choose whichever jig is most suitable to the grind you prefer. So, I think you'd need to know the grind you want to pick the best jig to achieve that grind.
 
I am still trying to figure out what the vector grind set up does. As near as I can tell, it is for removing the heel and sides of the primary cutting edge bevel. If that is true, then I would just do that by hand rather than buying a jig to do it with. There are many references to 'secondary' bevels. On your bench chisels or plane blades, the secondary bevel is the primary cutting edge. With our bowl gouges, the secondary bevel is just a relief cut or rounding of the primary bevel.

robo hippy
The jig lets you get a very thin primary bevel. Johannes did it by hand for decades, but those who wanted to duplicate it had all kinds of trouble. It takes a complicated swivel and push all around the gouge. I am one of those who had trouble holding that 3/32" wide primary bevel. I was thrilled when he spent so much time to invent this fixture. You only position the gouge in the holder once, and it makes hitting all three bevels very quick because of the multiple position holes. . For a quick refresh on the primary bevel, you only have to do that single bevel for a couple of grindings.
 
thanks to all that replied. I wasn't trying to hijack a post. I did think within reason that it sort of fit the discussion.. it was kind of like an empty spot on the merry go round. So i thought i'd jump on. Again thanks to all. It is greatly appreciated
 
So if one has yet to build his very first sharpening jig, to save a lot of trial and error, and headaches what is the most efficient way to go? Been looking at a few designs, not sure what I want. I like simple and function. Thank you for reading.

with all do respect nobody has yet to answer my question. While it seems to be fairly obvious by context, when you sort it all out what works the best? Watch a video under bobbin boy on you tube. Making a spinning wheel. An old time german with a foot treddle lathe makes a spinnimng wheel from start to fininsh. Ans one of the key moments in the video is where with one stone he sharpens or touches up a spindle gouge and a skew.. The most straight forward I've seen to date.

Any chance i could get my question answered? thank you

@Clyde Leitold , you are trying to hijack another person's thread and then become angry that you are being ignored. That's very rude.

You should start another thread and clarify your vague question by stating what tool(s) you are wanting to sharpen and what you are turning.
 
Status
Not open for further replies.
Back
Top