Over time one of my bowl gouges has become too pointed at the tip. I have 80 grit and 180 grit CBN wheels on my 8" grinder. I use the Oneway system with the Vari-Grind jig. How should I proceed to get the gouge back to a parabolic shaped tip?
-
June 2025 Turning Challenge: Turn a Wand! (click here for details) -
Congratulations to Carl Ford for "Rings of Raindrops in Living Color" being selected as Turning of the Week for June 16, 2025 (click here for details) -
Welcome new registering member. Your username must be your real First and Last name (for example: John Doe). "Screen names" and "handles" are not allowed and your registration will be deleted if you don't use your real name. Also, do not use all caps nor all lower case.
You are using an out of date browser. It may not display this or other websites correctly.
You should upgrade or use an alternative browser.
You should upgrade or use an alternative browser.
Reshaping Bowl Gouge
- Thread starter Jerry Bridges
- Start date
When you resharpen, spend more time on the nose of the tool to round it over. I do remove at least half of the heel of the bevel, and this makes reshaping easier when I have to do it... Some prefer to start on the wing and then move to the nose. Some prefer to start on the nose and move to the wing.
robo hippy
robo hippy
Thanks for the info. I am sure I spent too much time on the nose.When you resharpen, spend more time on the nose of the tool to round it over. I do remove at least half of the heel of the bevel, and this makes reshaping easier when I have to do it... Some prefer to start on the wing and then move to the nose. Some prefer to start on the nose and move to the wing.
robo hippy
Actually - if the nose is too pointy, too much time was spent on the side/wing. Spending time directly on the nose should round it out.
Was thinking it might be helpful to shape the nose how you like, then go back and fair the curves into the wings. The suggestion to grind the heel away is stellar - i usually wait til last, but it makes a lot of sense to do that earlier.
Was thinking it might be helpful to shape the nose how you like, then go back and fair the curves into the wings. The suggestion to grind the heel away is stellar - i usually wait til last, but it makes a lot of sense to do that earlier.
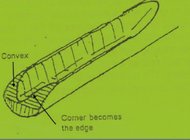
I follow the advice of the bowl gouge gurus like Jerry Glaser and Doug Thompson by grinding the preferred edge profile first and then grinding the bevel to match that. Here is Jerry Glaser's diagram with the wing profile ground first...
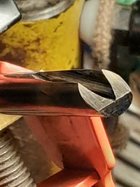
You do that with the gouge inverted on a platform with the wings towards the wheel and by lightly sliding the gouge up and down and inspecting regularly to make sure you are getting the profile you prefer. Here is an example of a gouges with its wing edge profile ground back ready for its bevels to be added...
Of course, if you are reshaping your wing profile on an already bevelled gouge this will happen very quickly and requires a very light touch on the finest grit wheel you have on your grinder. The bevel re-grind to match the new edge profile may need a coarser wheel if you have a lot of bulk metal to remove, but more then likely if you are just adjusting your edge profile a bit you will just use the normal wheel you use for refreshing edges.
Great information. Just what I need.I follow the advice of the bowl gouge gurus like Jerry Glaser and Doug Thompson by grinding the preferred edge profile first and then grinding the bevel to match that. Here is Jerry Glaser's diagram with the wing profile ground first...
You do that with the gouge inverted on a platform with the wings towards the wheel and by lightly sliding the gouge up and down and inspecting regularly to make sure you are getting the profile you prefer. Here is an example of a gouges with its wing edge profile ground back ready for its bevels to be added...
Of course, if you are reshaping your wing profile on an already bevelled gouge this will happen very quickly and requires a very light touch on the finest grit wheel you have on your grinder. The bevel re-grind to match the new edge profile may need a coarser wheel if you have a lot of bulk metal to remove, but more then likely if you are just adjusting your edge profile a bit you will just use the normal wheel you use for refreshing edges.
The gouges in our studio get mis-shapened fairly regularly as new students are learning to sharpen. I used to re-profile them by shaping upside-down on the 80 grit wheel, then to 180g to finalize sharpening (laborious). Since the mistakes are usually either mild over-grinding in a spot, or too pointy, I've found it possible to simply remove the "proud metal" to restore shapes.
Using the 180g wheel, for a too pointy nose, I'll grind the tip first to blunt it and then rotate in bigger and bigger arcs as I work my way to the wings. Always evaluating one side as I roll to grind the other. For an edge that's gotten a little dip, I'll grind the areas around it to bring them down to make the edge clean and make the opposite wing match.
This is all for not-too-serious problems. Huge over-grinds get the upside-down treatment. Always on the coarser wheel, to lessen overheating issues while cutting faster.
Thank you. Good advice. I want to take off a little metal as possible.The gouges in our studio get mis-shapened fairly regularly as new students are learning to sharpen. I used to re-profile them by shaping upside-down on the 80 grit wheel, then to 180g to finalize sharpening (laborious). Since the mistakes are usually either mild over-grinding in a spot, or too pointy, I've found it possible to simply remove the "proud metal" to restore shapes.
Using the 180g wheel, for a too pointy nose, I'll grind the tip first to blunt it and then rotate in bigger and bigger arcs as I work my way to the wings. Always evaluating one side as I roll to grind the other. For an edge that's gotten a little dip, I'll grind the areas around it to bring them down to make the edge clean and make the opposite wing match.
This is all for not-too-serious problems. Huge over-grinds get the upside-down treatment. Always on the coarser wheel, to lessen overheating issues while cutting faster.


