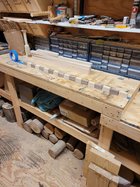
This is my first attempt at a segmented bowl. It was fun and I will definitely be making more. It is nothing fancy. I just used some scraps to learn the process.


")
When you consider the amount of time it takes a green rough turned bowl to dry enough to finish the segmentation would be a lot quicker start to finish. You would just have quite a bit more hands on time. I do like the fact that the glueup can give you 100 percent side grain to turn.The pros are a lot less mess and faster to turn. The cons are it takes longer to cut and glue everything. It was a fun process and I will definitely make some more.
Gary no drying time is one of the best parts. I should have put that in the pros.When you consider the amount of time it takes a green rough turned bowl to dry enough to finish the segmentation would be a lot quicker start to finish. You would just have quite a bit more hands on time. I do like the fact that the glueup can give you 100 percent side grain to turn.
In segmenting, there is really no absolute right way (or wrong way) to do things ... some just work better than others. It looks like this process is working for you!This is my process for making the rings. If anybody sees a problem or easier way feel free to let me know.
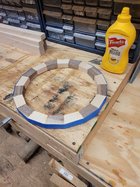
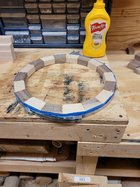
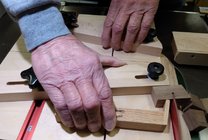
Rusty from the looks of your joints the angle must be pretty exact if you can glue the entire ring at once. To add to what John said I cover my assembly board with poly sheeting then take the first piece put some glue on it and run the 2nd piece against it to evenly spread the glue on both then put glue on the other side of the second piece and rub the 3rd piece. Set the 3rd piece down and push 1 & 2 together, then the 3rd to the 4th ETC. and when all of the joints have glue put the hose clamp on, hammer the joints even and wash the glue off of both sides. Note; I flatten the rings with my drum sander and excess glue is hard on the sanding belt but the joint between rings is near perfect.I'm following. That's how I did it early on. Lately after years of not making segmented pieces I put glue on both piece and push them together lightly. I don't try to squeeze the glue out. I do this on a board that is flat and waxed. When I get the ring assembled I put the hose clamp on and squeeze the ring fairly snug. then I use a plastic mallet to drive them all flat and snug up the clamp further. I wipe off the glue on the top surface. I have done what you do years ago and still do on compound miter rings.
My brother is cutting a set of Wedgies for me on his CNC router. Also doing the parts for the Wedgie Sled. (He’s bored of making flags )
I’m hoping to cut segments accurate enough to glue the entire ring at once.

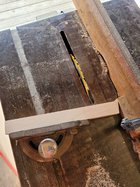
I'm hoping to eliminate the tedious angle setting and the need to cut test segments. We'll see...The first step is to set the saw as accurately as possible to the required angle, which in 8 segment rings is 22 1/2 degrees. The secondary table is mounted and a set of segments is cut from low grade material and dry fitted to checked for accuracy. This jig also has the advantage of cutting every possible segment from a strip.
I know that my method may seem tedious but by clamping the piece to be cut down and fine tuning the angle you guarantee repeatability.I'm hoping to eliminate the tedious angle setting and the need to cut test segments. We'll see...
How do you adjust the sled and how do you know if the angle is accurate if you don't do a test ring. It only takes seconds of a degree to cause miss fit.Wedgie Sled will allow cutting the angle accurately enough to glue the ring together all at once. Need to pay attention to getting the sled square and parallel when you make it.
Phil
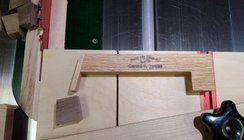
If you are referring to the segment jig post the wood used for test rings is partially rotten black ash.What type of wood is that in your picture Don?
Accuracy depends on the wedgie angle being dead-nuts on and the fence edges exactly parallel with the opposite edge. Presumably the CNC router will take care of this.How do you adjust the sled and how do you know if the angle is accurate if you don't do a test ring. It only takes seconds of a degree to cause miss fit.
Well I watched the video and I can see that if the setup gauge is an accurate angle that the angle between the 2 fences will be accurate however the cut angle may not be the same on each fence, which is why I shied away from the double fence sled. If I missed the part about getting the the 2 fences to the same cut angle I would be interested to know how it is done. The other problem I see and none of the videos seem to show is the amount of waste on each stick since it seem obvious that you would not be able to safely hold the stick for cutting the maximum amount of segments as I can do with my jig.Accuracy depends on the wedgie angle being dead-nuts on and the fence edges exactly parallel with the opposite edge. Presumably the CNC router will take care of this.
Here’s a video explaining the concept and use.
View: https://m.youtube.com/watch?v=jj1d9OSA2UQ
The fences can be deliberately set off center and if you keep the wedges in sets by marking the upper and back sides the angles still cancel but you get interesting looking segments. You can even cut with the blade off square with this technique for even more interesting glueups. Jerry Bennett has videos on his site illustrating this fact.Well I watched the video and I can see that if the setup gauge is an accurate angle that the angle between the 2 fences will be accurate however the cut angle may not be the same on each fence, which is why I shied away from the double fence sled. If I missed the part about getting the the 2 fences to the same cut angle I would be interested to know how it is done. The other problem I see and none of the videos seem to show is the amount of waste on each stick since it seem obvious that you would not be able to safely hold the stick for cutting the maximum amount of segments as I can do with my jig.
Since you need 3-4" of the "stick" to hold against the Wedgie sled fence, you will need to add this amount of materiel to the length. I tried Gary's blade tilting thing and found that it was very difficult to keep the rings flat while clamping. The compound angle cut made the glued segments slide all over the place. I wouldn't try it again unless I grow some more hands.The other problem I see and none of the videos seem to show is the amount of waste on each stick since it seem obvious that you would not be able to safely hold the stick for cutting the maximum amount of segments as I can do with my jig.
I haven't tried segmented turning at all yet, however, I am familiar with the issue you speak of.. Solved by: two MDF Cauls with a sheet of wax paper "glue-sticked" (dollar store tube of glue that looks like giant chap-stick) to each face, then assemble and glue segments on one face, position your band/ring clamp lightly around, then apply and lightly clamp the second caul on top of the sandwich, tighten up band clamp... of course, you can cut a hole in middle of the upper caul for sight/finger space to adjust wayward segments as clamping pressure is applied.. or cut your caul(s) to diameter of your rings and adjust from the outside edges... I dunno.. it worked great for a 6-sided piece of flatwork I was working with that I used compound angles on..I tried Gary's blade tilting thing and found that it was very difficult to keep the rings flat while clamping. The compound angle cut made the glued segments slide all over the place. I wouldn't try it again unless I grow some more hands.
I had already realized that the different angles would cancel out, if as Gary said you mark them to keep them in the proper order.Any error in the angle of one fence is canceled out by an equal and opposite error on the other. I’ll mark a centerline on the sled and on the wedges. Matching them will make any difference insignificant.
I’m hoping to keep the waste to a minimum by adding toggle clamps to the fences.
The other problem I see and none of the videos seem to show is the amount of waste on each stick since it seem obvious that you would not be able to safely hold the stick for cutting the maximum amount of segments as I can do with my jig.
Not necessarily ... I have been using this little device for years ... my fingers are a good 3 inches away from the blade and it provides a firm grip on the stock.Since you need 3-4" of the "stick" to hold against the Wedgie sled fence, you will need to add this amount of materiel to the length.
I see that your fences are slotted presumably so that when changing angles a new end could be advanced for support right up to the cut and that should cut the waste down to one segment. Do you have any problems with the piece lifting up from the sled?Not necessarily ... I have been using this little device for years ... my fingers are a good 3 inches away from the blade and it provides a firm grip on the stock.
I could advance the fences to back up the cut, but in more than 4 years with this sled, I haven't felt the need to. I think the key is a sharp blade and controlled feed rate of the cut.I see that your fences are slotted presumably so that when changing angles a new end could be advanced for support right up to the cut and that should cut the waste down to one segment. Do you have any problems with the piece lifting up from the sled?
I did see one video where the length stop was attached to the fence and a clamp was fabricated to hold the piece being cut down to the sled for the second cut but I didn't see how he got the first cut made.
I use hold down toggle clamps with good success. The finger saver is a great idea! I use one on chop saw to cut segmented pieces, never thought about using it on wedgie sled. I usually mark the last segment from a previously cut piece and reverse it on the sled so the hold down can hold it. I can cut waste down to less than .5 in.I see that your fences are slotted presumably so that when changing angles a new end could be advanced for support right up to the cut and that should cut the waste down to one segment. Do you have any problems with the piece lifting up from the sled?
I did see one video where the length stop was attached to the fence and a clamp was fabricated to hold the piece being cut down to the sled for the second cut but I didn't see how he got the first cut made.