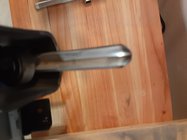
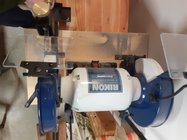
I am still getting stuff ready. Today I finally made it to the sharpening stage after mounting the grinder and progrind jigs (which was a pain to get all lined up). Most of the sharpening went OK except for the spindle gouge and the bowl gouge which I used that pivot tool on. The tool kept wanting to skip around on the wheel and did not want to contact the wheel smoothly and the bowl gouge did the same as well and heated up so much faster than any of the other tools. It got red hot at one point, even though I was trying to be quick and do water dips. I moved from the coarse wheel to the fine, thinking that may mitigate the jumpiness but it didn't really help much. I'm wondering what I'm doing wrong. Maybe I shouldn't be using that pivot holder? But it seems that's what most people use for the bowl gouges. Or maybe it is not very good steel? But the other tools in the set (Benjamin's best) did just fine. Just those two gouges gave me grief, especially the bowl gouge. The grinder is a Rikon. So is it me? is it the turning tools? Is it the grinder wheel, do I need to dress it again?

-
We just finished moving the forums to a new hosting server. It looks like everything is functioning correctly but if you find a problem please report it in the Forum Technical Support Forum (click here) or email us at forum_moderator AT aawforum.org. Thanks! -
Beware of Counterfeit Woodturning Tools (click here for details) -
Johnathan Silwones is starting a new AAW chapter, Southern Alleghenies Woodturners, in Johnstown, PA. (click here for details) -
Congratulations to Dave Roberts for "2 Hats" being selected as Turning of the Week for April 22, 2024 (click here for details) -
Welcome new registering member. Your username must be your real First and Last name (for example: John Doe). "Screen names" and "handles" are not allowed and your registration will be deleted if you don't use your real name. Also, do not use all caps nor all lower case.
You are using an out of date browser. It may not display this or other websites correctly.
You should upgrade or use an alternative browser.
You should upgrade or use an alternative browser.
Sharpening question
- Thread starter Joe Eckre
- Start date
Joe, it's hard to help you without knowing more about your grinder set up. What grinder do you have, running at what speed? What jig are you using, how is it set up, can you provide pictures? Maybe a description or picture of your gouge, too.
Its not the steel, Ive sharpened many BB tools. The jig is fine. Grinding gouges with a jig, and handles attached, is not easy with no prior grinding experience. It takes a light touch.
You state you got the tool red hot - you are pushing waaayyy too hard and letting it sit in one spot for too long if that is the case. Especially with large 5/8” shaft bowl gouges, having the handles attached just makes them more difficult to handle. Work on one side of the gouge at a time, then blend the nose. Practice swinging the tool/jig with power off, then give it another try, only allowing a light touch to the wheel.
You state you got the tool red hot - you are pushing waaayyy too hard and letting it sit in one spot for too long if that is the case. Especially with large 5/8” shaft bowl gouges, having the handles attached just makes them more difficult to handle. Work on one side of the gouge at a time, then blend the nose. Practice swinging the tool/jig with power off, then give it another try, only allowing a light touch to the wheel.
Last edited:
- Joined
- Feb 28, 2021
- Messages
- 1,225
- Likes
- 1,075
- Location
- Roulette, PA
- Website
- www.reallyruralwoodworks.com
Yup. what Doug said - Just let the weight of the tool apply the pressure , all you want to control is the alignment (can be difficult with handles on the tool, depending on length and the wing angle setting) and the even roll or movement around the tool's diameter - Applying too much pressure into those wheels easily can shift them out of alignment - I suspect if you bring the dresser up (very gently) to the wheel you'll find it went out of round - Those wheels aren't a precise fit on the shaft so if you push too hard you can shift them out of round and have to re-dress - out of round wheels can and will cause your hopping and skipping. (Don't try to solve that by overtightening the wheel retainer nut either, which can actually warp things)
Thank you. I will dress it again and try to be lighter with my touch.
Good advice here. A couple of other things worth mentioning. Assuming those are the standard white wheels that came with the grinder, I would recommend staying away from the course wheel unless you’re intentionally reshaping a tool. For sharpening purposes, there is no need to use the rough wheel. It also looks like there is a lot of metal in your fine wheel. If you dress it regularly, you’ll find that you get far less hops/skips and the pressure needed is way less than otherwise.
Some pictures from different angles, showing you applying your gouge in the jig to the grinder, with the grinder turned off, would be helpful too.
When I was at your stage of learning to turn, I struggled mightily with learning to sharpen. I feel your frustration.
I suspect you have an issue with the set up. By Far, the easiest way to get you started is by standing next to you at the grinder. Anything else and it's really hard to help. We'll try, but you'll help a lot by providing us with as much visual information as possible. A better way would be to contact your nearest AAW chapter and they will have an experienced turner who is willing to help you with this. (I don't know where Canyon Country is, but there are 4 bazillion turners in Cali and one can't be too far away)
(Edit--I had provided detailed information on the wrong system. You had mentioned you have a ProGrind system, so comments on the Wolverine system are not fully helpful. The maker of the ProGrind system has a very good video on youtube at
View: https://www.youtube.com/watch?v=GgndIjoIgNg
)
When I was at your stage of learning to turn, I struggled mightily with learning to sharpen. I feel your frustration.
I suspect you have an issue with the set up. By Far, the easiest way to get you started is by standing next to you at the grinder. Anything else and it's really hard to help. We'll try, but you'll help a lot by providing us with as much visual information as possible. A better way would be to contact your nearest AAW chapter and they will have an experienced turner who is willing to help you with this. (I don't know where Canyon Country is, but there are 4 bazillion turners in Cali and one can't be too far away)
(Edit--I had provided detailed information on the wrong system. You had mentioned you have a ProGrind system, so comments on the Wolverine system are not fully helpful. The maker of the ProGrind system has a very good video on youtube at
)
Last edited:
Thanks, I watched that video alot. The guy skips over a lot of details. That thing was a pain to get lined up. I didn't realize there is a whole protocol for putting the bevel and wings on a new tool. I just went with what that guys video said, and I got all that jumping. I found another video from Wood magazine, where the guy just uses the platform guide to make a bevel at the tip, then ground wings with the platform as well, and then finally put it in that pivoting jig. When I tried his method it worked a lot better. The final stage where I used the pivoting jig, there was still some jumpiness, despite using a gentle touch, but when I started at the wings instead of the tip of the tool i had a much better time. I will go to a meeting in a couple of weeks and ask them a million questions. Hopefullly someone can get with me in person and help me get to running a smooth show.Some pictures from different angles, showing you applying your gouge in the jig to the grinder, with the grinder turned off, would be helpful too.
When I was at your stage of learning to turn, I struggled mightily with learning to sharpen. I feel your frustration.
I suspect you have an issue with the set up. By Far, the easiest way to get you started is by standing next to you at the grinder. Anything else and it's really hard to help. We'll try, but you'll help a lot by providing us with as much visual information as possible. A better way would be to contact your nearest AAW chapter and they will have an experienced turner who is willing to help you with this. (I don't know where Canyon Country is, but there are 4 bazillion turners in Cali and one can't be too far away)
(Edit--I had provided detailed information on the wrong system. You had mentioned you have a ProGrind system, so comments on the Wolverine system are not fully helpful. The maker of the ProGrind system has a very good video on youtube atView: https://www.youtube.com/watch?v=GgndIjoIgNg
)
I don't intend to make a bowl right away anyway. I will touch all these tools up with these diamond plates I got and then go to the lathe for the first time.
The jumping around you describe is not normal on a properly set up grinder.
A. your stone wheels may be out of balance or out of round or out of alignment. Fixing this is beyond both my ability and the scope of a response on the forum, but maybe some other members can direct you to resources on how to do this or explain it clearly.
B. If your grinder is running at full, 3500 rpm, turn it down to 1725. If it's running at 1725, try turning it on, and when it gets to full speed, turn it off, and then sharpen as it slows down. This should not be necessary, but it's a trick to allow you to sharpen until you get your wheels squared away.
Platform sharpening is harder to learn than sharpening with the jig. You can get there with practice--after 1.5 years of working at it, I was just finally getting acceptable results with the platform when I got a Wolverine system. You should be able to get acceptable results with your system in hours or days. (But first you have to have a grinder that works right)
It only did it when using the multi angle tool. All the other tools sharpened up just fine. It is a 1750 speed grinder. I feel like I've worn down a lot of the wheel already. I can see I need to keep dressing it. The grinder is mounted to the platform but the platform not to the bench. It's a new grinder. I saw in the instructions that if there is as wobble I can adjust some flange washers. Here is a video of it coming up to speed and slowing down. I suppose a video of me actually grinding would help too but I don't want to mess up the gouge since I did finally get a good tip on it (subjective from a newbie, you all are the experts) and touched it up with diamond cards. here is video: Turning on grinder
Attachments
I don't plan on making a bowl first thing anyway. I still just have to learn the basics. Tomorrow I hope to fire up the lathe for the first time.
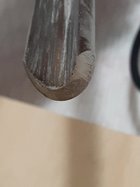
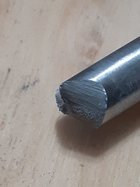
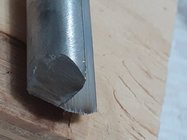
Good “traditional” grind. Have you measured the bevel angle? A flat tool face, no bevel, is a 90 deg bevel. This “looks” too steep (except for a bottom feeder gouge), maybe 75 deg? Looks can be deceiving. Target 50-60 deg to get started. A flat grind (no wing sweep at all) can get “grabby” - cutting an uneven surface, the lower wing grabs more wood, more tool edge cutting, leading to the tool wanting to twist, as well as getting a catch by quickly loading the entire edge with a cut. Tilting the wings back ~10 deg alleviates this issue.
You do not need the jig for this type grind (perfectly ok to use it tho)- you can stick the end of the tool handle in the arm pocket, set the bevel angle by sliding the pocket in/out, then rotate the tool to create the grind. The gouge jigs are for creating “swept back wing” grinds.
A fact of grinding - the more time spent in area removes more material. Knowing this helps correct edges - a hi spot is corrected by spending a bit more time there, a low spot is corrected by spending more time everywhere but the low spot. Allways blend facets by faring heavy grind areas, then making sweeping, light passes to blend the bevel into one large facet (which you did in your pictures).
Sanding projects works the same as grinding tools for hi and low spots.
If I understand it correctly, the sharpening system you're using has 3 combinations of settings to produce 3 different grinds. The one you have there is probably the least popular of the 3. It will cut wood, but you might want to try one of the other two grinds when you get to bowls. Of those two others, probably not the longest swept back grind, but the third one (maybe "standard" in his terminology)
The grind you have right now can be improved by reducing the tops of the edges, as seen with flute up. The best example I've seen of how to do that is in a David Ellsworth video/DVD where he demonstrates how to achieve his 'signature' grind. You might not want the rest of the grind, and the instructions don't apply to your system, but how he begins by reversing the tool, so the flute is towards the wheel, and shapes the top of the gouge is what I'm suggesting for you to look at.
The grind you have right now can be improved by reducing the tops of the edges, as seen with flute up. The best example I've seen of how to do that is in a David Ellsworth video/DVD where he demonstrates how to achieve his 'signature' grind. You might not want the rest of the grind, and the instructions don't apply to your system, but how he begins by reversing the tool, so the flute is towards the wheel, and shapes the top of the gouge is what I'm suggesting for you to look at.
Thanks. I did a 60 degree bevel and cut the wings by pushing it in at 45 degrees with the flute facing sideways.then I blended it. So you would cut the wings by pushing it in at 55 degree angle? I will try that next time. I will go to my first meeting in a couple of weeks and learn more. One thing I found confusing was that I didn't know how to actually measure the angle of the platform moving along the vertical axis to achieve that 60 degree bevel. I guess because wheels are round it comes out different than if I were grinding it against a flat surface. So I had to eyeball it and then measure what I got on the tool.Good “traditional” grind. Have you measured the bevel angle? A flat tool face, no bevel, is a 90 deg bevel. This “looks” too steep (except for a bottom feeder gouge), maybe 75 deg? Looks can be deceiving. Target 50-60 deg to get started. A flat grind (no wing sweep at all) can get “grabby” - cutting an uneven surface, the lower wing grabs more wood, more tool edge cutting, leading to the tool wanting to twist, as well as getting a catch by quickly loading the entire edge with a cut. Tilting the wings back ~10 deg alleviates this issue.
You do not need the jig for this type grind (perfectly ok to use it tho)- you can stick the end of the tool handle in the arm pocket, set the bevel angle by sliding the pocket in/out, then rotate the tool to create the grind. The gouge jigs are for creating “swept back wing” grinds.
A fact of grinding - the more time spent in area removes more material. Knowing this helps correct edges - a hi spot is corrected by spending a bit more time there, a low spot is corrected by spending more time everywhere but the low spot. Allways blend facets by faring heavy grind areas, then making sweeping, light passes to blend the bevel into one large facet (which you did in your pictures).
Sanding projects works the same as grinding tools for hi and low spots.
OK I will try that, thanks. I think I heard some of those you tube guys mention Ellsworth grind. I will look for it. Those jigs have long, short, and standard grind to try.If I understand it correctly, the sharpening system you're using has 3 combinations of settings to produce 3 different grinds. The one you have there is probably the least popular of the 3. It will cut wood, but you might want to try one of the other two grinds when you get to bowls. Of those two others, probably not the longest swept back grind, but the third one (maybe "standard" in his terminology)
The grind you have right now can be improved by reducing the tops of the edges, as seen with flute up. The best example I've seen of how to do that is in a David Ellsworth video/DVD where he demonstrates how to achieve his 'signature' grind. You might not want the rest of the grind, and the instructions don't apply to your system, but how he begins by reversing the tool, so the flute is towards the wheel, and shapes the top of the gouge is what I'm suggesting for you to look at.
I thought left wheel was course and right fine. I had it backwards!Good advice here. A couple of other things worth mentioning. Assuming those are the standard white wheels that came with the grinder, I would recommend staying away from the course wheel unless you’re intentionally reshaping a tool. For sharpening purposes, there is no need to use the rough wheel. It also looks like there is a lot of metal in your fine wheel. If you dress it regularly, you’ll find that you get far less hops/skips and the pressure needed is way less than otherwise.
OK I brought the wings back more as suggested. A little too much at first! Hopefully I have enough flute left. Sharpening is interesting. Hope to get better and learn more.


That’s a pretty good looking grind! Looking from the side, from nose to end of wing, you want a straight to slightly concave line with no dips - you have exactly that! You will find that grind a bit easier to learn with, but dont just forget about a traditional grind during your turning journey.
As far as setting angles on the grinder - there are various tools marketed for that - Ron Brown, who makes the jig set up you have, has a couple I think. My preference has been to make my own. For the platform, out of thin clear plastic I get at the box store. Adj the platform, grind check angle, correct, grind, check again till its where I want. I then take a piece of plastic ~ 3” x 6”, long edge flat on then platform, and let the wheel grind the curve. I then move in from each end of the curve ~1/4”, and relieve the curve inbetween, so that onlythe two 1/4” long areas contact the wheel. I put one these katty corner to the first, at a different angle. I think I have 3 of them, for 6 different angles I use platform sharpening.
For the jig, the jig arm needs to be marked somehow, etching, permanent marker, etc. For the distance to the wheel, use a wooden triangle or square that locates the wheel face with a vertical side, and then locates at the other end on a repeatable surface of the v area. Different horizontal lengths give different bevel angles. This is repeatable as the wheel wears down in dia. Many put a mark on the arm to set the horizontal distance, which must then change as the wheel wears.
- Joined
- Apr 27, 2004
- Messages
- 8,637
- Likes
- 4,976
- Location
- Lakeland, Florida
- Website
- www.hockenberywoodturning.com
I think Doug mistyped here and meant to say convex. The cutting edge from wing tip to wing tip should be a continuous CONVEX edge. Flat is ok but no dips.That’s a pretty good looking grind! Looking from the side, from nose to end of wing, you want a straight to slightly concave line with no dips - you have exactly that! You will find that grind a bit easier to learn with, but dont just forget about a traditional grind during your turning journey.
Thanks, I want to make some of those guides. That jig set came with a quad tool that includes 4 different angles for platform but I can see I'm going want more. Do you have a picture of yours?That’s a pretty good looking grind! Looking from the side, from nose to end of wing, you want a straight to slightly concave line with no dips - you have exactly that! You will find that grind a bit easier to learn with, but dont just forget about a traditional grind during your turning journey.
As far as setting angles on the grinder - there are various tools marketed for that - Ron Brown, who makes the jig set up you have, has a couple I think. My preference has been to make my own. For the platform, out of thin clear plastic I get at the box store. Adj the platform, grind check angle, correct, grind, check again till its where I want. I then take a piece of plastic ~ 3” x 6”, long edge flat on then platform, and let the wheel grind the curve. I then move in from each end of the curve ~1/4”, and relieve the curve inbetween, so that onlythe two 1/4” long areas contact the wheel. I put one these katty corner to the first, at a different angle. I think I have 3 of them, for 6 different angles I use platform sharpening.
For the jig, the jig arm needs to be marked somehow, etching, permanent marker, etc. For the distance to the wheel, use a wooden triangle or square that locates the wheel face with a vertical side, and then locates at the other end on a repeatable surface of the v area. Different horizontal lengths give different bevel angles. This is repeatable as the wheel wears down in dia. Many put a mark on the arm to set the horizontal distance, which must then change as the wheel wears.
I did mistype, or head where the sun dont shine, convex not concave, thanks @hockenbery. Here is a pic of a couple of my angle setters, plastic is ~0.080” thick. I etch the angle in with a dremel engraver and go over it with a sharpieDo you have a picture of yours?

There are plenty of YouTube videos that cover sharpening the various wood turning tools. A little finesse goes a long way in the sharpening process. Make sure you take care in sharpening the roughing gouge, depending on your jig, the angle can get dicey depending on the size of the grinding wheels and the length of the tool in the jig. The grinding wheel can grab the tool and bind it between the jig and grinding wheel if you don't support
the tool from underneath and put too much downward pressure on the tool while grinding. You can explode a grinding wheel when this happens, don't let this happen. Free hand sharpening can be safer for some tools and is a good practice to learn the skill.
the tool from underneath and put too much downward pressure on the tool while grinding. You can explode a grinding wheel when this happens, don't let this happen. Free hand sharpening can be safer for some tools and is a good practice to learn the skill.
As to using the gouge directly in the pocket of the Wolverine arm it is not recommended even for experienced turners and for sure not for beginners. It is possible for the gouge to slip down and dig into the wheel causing a real big explosion of the wheel.
- Joined
- Apr 27, 2004
- Messages
- 8,637
- Likes
- 4,976
- Location
- Lakeland, Florida
- Website
- www.hockenberywoodturning.com
It can also pull your hand into the wheel. The extra force can push the pocket back if it is not locked in extra tightly.It is possible for the gouge to slip down and dig into the wheel causing a real big explosion of the wheel.
A most experienced turner required hand surgery sharpening a gouge with a varigrind. The tool had a very steep bevel 70-80 degrees which put it low on the wheel to start. The pocket probably moved. the tool was definitely pulled down and to the side bring ing the hand into the wheel.
BOB tools should be sharped on a platform too..
Last edited:
That gouge does have a nice consistent grind. I would say the nose angle is very blunt, possibly 80 degrees or so. The very popular swept back grinds are generally in the 60 degree range.
robo hippy
robo hippy
I am a beginner getting ready to get into sharpening my gouges. I was planning to do that very operation that you mention can lead to bad things happenig. If you tightly lock the Wolverine arm, and you lay the gouge well above the middle of the grinder wheel, what mis-action will cause the problem you mention? Does the arm of the wolverine have a tendency to loosen?As to using the gouge directly in the pocket of the Wolverine arm it is not recommended even for experienced turners and for sure not for beginners. It is possible for the gouge to slip down and dig into the wheel causing a real big explosion of the wheel.
I'm referring to sharpening my large 3/4" roughing gouge to be used for initial shaping.I am a beginner getting ready to get into sharpening my gouges. I was planning to do that very operation that you mention can lead to bad things happenig. If you tightly lock the Wolverine arm, and you lay the gouge well above the middle of the grinder wheel, what mis-action will cause the problem you mention? Does the arm of the wolverine have a tendency to loosen?
- Joined
- Feb 28, 2021
- Messages
- 1,225
- Likes
- 1,075
- Location
- Roulette, PA
- Website
- www.reallyruralwoodworks.com
It's very difficult to do that with a SRG depending on how long the handle is, it can be near impossible to get a good angle (Unless you like a SRG with very acute angle like 20 or 25 degrees, which would be very catchy and hard to use properly, and it would dull very fast) It isn't the fact that wolverine arm might loosen (it hasnt for me) but the problem is in getting an angle that works, without getting the gouge too close to the center line of the wheel (especially friable wheels!) You're better off learning to sharpen your SRG on the wolverine platform (as opposed to the pocket arm) which should come with the wolverine set.I am a beginner getting ready to get into sharpening my gouges. I was planning to do that very operation that you mention can lead to bad things happenig. If you tightly lock the Wolverine arm, and you lay the gouge well above the middle of the grinder wheel, what mis-action will cause the problem you mention? Does the arm of the wolverine have a tendency to loosen?
You might think you have the gouge "well above center" but to get a working angle on the cutting edge, you're going to end up pretty close to it anyways, and with friable wheels they can wear down quickly and grab the gouge , driving it INTO the wheel - the wheel could literally explode in that case. That is why they advise strongly against using the pocket arm to sharpen a SRG (or anything else where to get your cutting angle, the tool ends up getting anywhere close to center line of wheel - you'd want gouge to be resting at least an inch, if not more above center line at its lowest point, and based on how low and far back the pocket arm would have to go, you won't get a good grinding angle on your edge. Even with that, if you let the gouge slip off the side of the wheel, you're screwed- quickly. (Trust me, that is WAYYY easy to do, no matter how careful you think you are being- it's like trying to drive on black ice- even if you know it is there, and know you're going to slip, you can't possibly control it within the fractions of an inch it needs to be controlled) Now if you were using a CBN wheel and a sharper than typical bevel angle on your gouge, it may be possible to grind the SRG that way. I tried it a couple times but both times, I had rear-end pucker-up the whole time... Too scary for me, so I definitely would not recommend it. (and I still had trouble trying to keep the gouge straight and on the wheel while trying to rotate the gouge- like I said it wants to slip and slide sideways way too fast!)
Brian’s answer above is excellent. I’ll second his recommendation to use a platform for your SRG. Also, using a lot of pressure while grinding could potentially lead to the problem you reference, as you’ll grind your tool down quickly. Especially using the coarser white wheels.what mis-action will cause the problem you mention?
Lance Mirrer
AKA "taxman"
The pro grind system comes with an extra support to keep this from happening. I am a long term Wolverine user and bought the pro grind for this piece.As to using the gouge directly in the pocket of the Wolverine arm it is not recommended even for experienced turners and for sure not for beginners. It is possible for the gouge to slip down and dig into the wheel causing a real big explosion of the wheel.

Sorry to be late to the party. Lewis, please accept the wisdom of the experienced turners on the forum and don't do it. It is very easy, effective and safe to sharpen the SRG on the platform that comes with the Wolverine system. Why do it an inferior and dangerous way?
EDIT: Oops, me too. I forgot it was a different system, but it still comes with a platform.
EDIT: Oops, me too. I forgot it was a different system, but it still comes with a platform.
Last edited:
I agree it's best to use the platform to sharpen SRG's.
Once you decide to use the platform, there's no need for the "V-arm" to be as long as it is out of the box. I cut mine down and made it shorter. Then it doesn't stick out behind the grinder as far, and I can place my grinder closer to a wall which is helpful in my small shop. If, for some reason, you decide it was a mistake to shorten the V-arm, you can buy a replacement one for about $25 from Craft Supplies.

Edit: Oops, just saw that the OP has a Progrind system. What I wrote above applies to the Oneway Wolverine system. I'm not sure if it also applies to his.
Once you decide to use the platform, there's no need for the "V-arm" to be as long as it is out of the box. I cut mine down and made it shorter. Then it doesn't stick out behind the grinder as far, and I can place my grinder closer to a wall which is helpful in my small shop. If, for some reason, you decide it was a mistake to shorten the V-arm, you can buy a replacement one for about $25 from Craft Supplies.
Edit: Oops, just saw that the OP has a Progrind system. What I wrote above applies to the Oneway Wolverine system. I'm not sure if it also applies to his.
Last edited:
With all due respect to the knowledge of the participants on this forum and with my thanks to all of you that have responded; I am just a beginner turner, but I have questions regarding the physical nature of the problem. Please read the attachment, which is from this forum back in 2007, and let me know what you think. Maybe I am not understanding the Wolverine V-arm problem that is being discussed, since the attachment participants mostly state that V-arm usage is fine if you are attempting a normal 40-to-50-degree bevel on the Spindle Roughing Gouge, and you have the Wolverine installed in accordance with the manufacturer's instructions. Aren't the typical lengths of the Sorby, Henry Taylor, or Crown very large (1-1/2") spindle roughing gouges on the order of about 24" max. in total length including the handle? Wouldn't a 40-to-45-degree bevel place the tip of one of those spindle roughing gouges well above the center of the wheel under those circumstances? I'm about to get started in turning and want to make sure I understand the real safety issues, and what to be frightened of. I have the Wolverine equipment, and I have, "I can already see the frowns", a high-speed 8" Jet grinder, a soon to have CBN 180 grit 1 inch wheel, and a full-size lathe: along with a bunch of other accessories. I want to set this up and begin to practice without being scared to death to turn the lathe onIt's very difficult to do that with a SRG depending on how long the handle is, it can be near impossible to get a good angle (Unless you like a SRG with very acute angle like 20 or 25 degrees, which would be very catchy and hard to use properly, and it would dull very fast) It isn't the fact that wolverine arm might loosen (it hasnt for me) but the problem is in getting an angle that works, without getting the gouge too close to the center line of the wheel (especially friable wheels!) You're better off learning to sharpen your SRG on the wolverine platform (as opposed to the pocket arm) which should come with the wolverine set.
You might think you have the gouge "well above center" but to get a working angle on the cutting edge, you're going to end up pretty close to it anyways, and with friable wheels they can wear down quickly and grab the gouge , driving it INTO the wheel - the wheel could literally explode in that case. That is why they advise strongly against using the pocket arm to sharpen a SRG (or anything else where to get your cutting angle, the tool ends up getting anywhere close to center line of wheel - you'd want gouge to be resting at least an inch, if not more above center line at its lowest point, and based on how low and far back the pocket arm would have to go, you won't get a good grinding angle on your edge. Even with that, if you let the gouge slip off the side of the wheel, you're screwed- quickly. (Trust me, that is WAYYY easy to do, no matter how careful you think you are being- it's like trying to drive on black ice- even if you know it is there, and know you're going to slip, you can't possibly control it within the fractions of an inch it needs to be controlled) Now if you were using a CBN wheel and a sharper than typical bevel angle on your gouge, it may be possible to grind the SRG that way. I tried it a couple times but both times, I had rear-end pucker-up the whole time... Too scary for me, so I definitely would not recommend it. (and I still had trouble trying to keep the gouge straight and on the wheel while trying to rotate the gouge- like I said it wants to slip and slide sideways way too fast!)
") !! Please read and respond. Thank you.
!! Please read and respond. Thank you.Attachments
- Joined
- Feb 28, 2021
- Messages
- 1,225
- Likes
- 1,075
- Location
- Roulette, PA
- Website
- www.reallyruralwoodworks.com
It would rather depend on your setup, as well as the gouge you are sharpening - On one gouge you might be just fine, and the next one might grab and cause damage. If you want to insist on using the V-Arm to sharpen your SRG then I would caution you to do your set up by finding the center line of your grinder's arbor, run it out to the wheel at exactly 90 degrees from vertical (I.E. straight and level from center of wheel to the business end of wheel) and mark that spot, then you can adjust your V-arm to get your gouge to the bevel angle you want, and before starting the grinder, take a "dry run" (moving gouge as if wheel was moving) if at any point any part of the gouge (heel of the bevel especially) comes close to or falls below that center line mark, you're likely to get a catch, and damage the wolverine arm, the gouge, the grinder (bent arbor) the wheel, or all of the above, or even worse, YOURSELF (and end up making an unscheduled trip to the E.R.)With all due respect to the knowledge of the participants on this forum and with my thanks to all of you that have responded; I am just a beginner turner, but I have questions regarding the physical nature of the problem. Please read the attachment, which is from this forum back in 2007, and let me know what you think. Maybe I am not understanding the Wolverine V-arm problem that is being discussed, since the attachment participants mostly state that V-arm usage is fine if you are attempting a normal 40-to-50-degree bevel on the Spindle Roughing Gouge, and you have the Wolverine installed in accordance with the manufacturer's instructions. Aren't the typical lengths of the Sorby, Henry Taylor, or Crown very large (1-1/2") spindle roughing gouges on the order of about 24" max. in total length including the handle? Wouldn't a 40-to-45-degree bevel place the tip of one of those spindle roughing gouges well above the center of the wheel under those circumstances? I'm about to get started in turning and want to make sure I understand the real safety issues, and what to be frightened of. I have the Wolverine equipment, and I have, "I can already see the frowns", a high-speed 8" Jet grinder, a soon to have CBN 180 grit 1 inch wheel, and a full-size lathe: along with a bunch of other accessories. I want to set this up and begin to practice without being scared to death to turn the lathe on
As for me, rather than going through that process just to sharpen a SRG, I'd just as soon simply set the platform angle as needed, fire up the grinder and sharpen the SRG on platform and be done with it. Faster, simpler, and more importantly, SAFER than using the V-arm.
@Lewis Elliott Sounds to me like you understand what gets folks in trouble with placing the tool handle in the V. The accidents occur when people “break the rules”. As with many things, facts get distorted (no longer being facts) with time and breadth across social media.
It is pretty easy to use the platform for srg’s, but using the v arm and following simple rules is a viable alternative
It is pretty easy to use the platform for srg’s, but using the v arm and following simple rules is a viable alternative
Back in 2007, you would have seen lengthy arguments about using SRGs on bowls, too. 5 years ago, you would have seen questions about fractal burning. Opinions evolve as new information and experience comes along. The current contributors to the forum are safety conscious, as is the AAW, and are hoping to reduce the chance beginners will be harmed. People have died pursuing this pastime, and every one of them thought it couldn't be them.
First time I looked at the Wolverine sharpening arm for SRGs, I didn't lose a second before saying, no way! Platform always, but I do all of my sharpening on a platform.
robo hippy
robo hippy
Thanks Brian and the other members that provided comments. I will reference your guidance above when I set up my system. I don't aspire to become a freehand sharpener either of my hand tools or my lathe tools (I concentrate in both areas); since I won't be able to do either with enough frequency to develop the needed muscle memory and natural skill, not enough years left on the books . But, I will be mindful of the Wolverine platform for the SRG if the setup looks threatening.It would rather depend on your setup, as well as the gouge you are sharpening - On one gouge you might be just fine, and the next one might grab and cause damage. If you want to insist on using the V-Arm to sharpen your SRG then I would caution you to do your set up by finding the center line of your grinder's arbor, run it out to the wheel at exactly 90 degrees from vertical (I.E. straight and level from center of wheel to the business end of wheel) and mark that spot, then you can adjust your V-arm to get your gouge to the bevel angle you want, and before starting the grinder, take a "dry run" (moving gouge as if wheel was moving) if at any point any part of the gouge (heel of the bevel especially) comes close to or falls below that center line mark, you're likely to get a catch, and damage the wolverine arm, the gouge, the grinder (bent arbor) the wheel, or all of the above, or even worse, YOURSELF (and end up making an unscheduled trip to the E.R.)
As for me, rather than going through that process just to sharpen a SRG, I'd just as soon simply set the platform angle as needed, fire up the grinder and sharpen the SRG on platform and be done with it. Faster, simpler, and more importantly, SAFER than using the V-arm.
I have another question. Since I will be using a 1HP high speed (3600rpm) 8" Jet grinder (already purchased); which do you think would be a better choice of grit for a CBN wheel, 180 grit or 220 grit? My understanding is that slow speed grinders allow for less aggressive metal removal for the increased time spent on the wheel; would a 220 grit CBN wheel tend to balance, somewhat, the high speed grinder's aggressive metal removal, while still reducing the time on the wheel? One thing I do plan to do is to keep the guards on the grinder after I install a 1" CBN wheel. Also, typically, how frequently do you have to return to the grinder during a turning session for a bowl being made from a pre-prepared blank? Thanks in advance for any information you can provide.
Concerning V-arm use, what are the thoughts on using the Wolverine Skew attachment for the v-arm? Does anyone use it for a straight across grind for a skew chisel?
I responded directly to Brian Gustin for my other comments, I don’t know if the group can see those.
I responded directly to Brian Gustin for my other comments, I don’t know if the group can see those.