... However I still can't seem to master the skew.
I have it sharpened correctly and it still scares me from catches I still get.
Input from you all on grind angle you use and the tool rest height in relation to center.
...
Hi Tim!
I find that once you get the "feel" for the skew things like the grind angle and tool rest height, cutting angle, flat/oval/round and more, don't make much difference. I think I mentioned this before, I start all students on the skew, even if they have never seen a lathe before. I usually hand them a fairly wide skew, slightly curved edge, with a larger included angle - this combination might be a little easier for some to learn on.
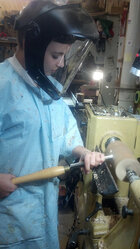
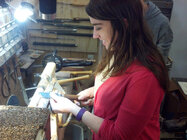
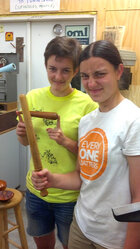
This is the skew, hard to see in the photo. The beginner had no problems, even with her boyfriend watching. (she didn't want to wear safety glasses or tie back her hair.

They all sign a release form written by my lawyer!)
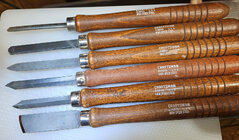
It's an old, cheap Craftsman skew at the bottom of this photo, ground to about a 60-deg included angle.
Some things I think are important, especially when learning: stance, hand position, support of forearm against body for stabilization, cutting angle, position of the cutting edge on the blank, finger support against tool rest.
IMO, even more important is the method of learning. I developed a way of introduction that so far, with dozens of student, has not failed - not one has ever gotten a catch (at least while in my shop!) In a short time we go from the skew to spindle gouge to roughing gouge and often they make something to take home.
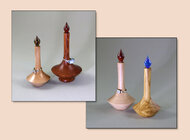
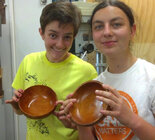
For example, in a one day these two "neverseenalathe" beginners learned to use those tools in the morning and bowl turning in the afternoon and made these. At the end of the day, one (who I knew from my SS kindergarten class years before) said she her favorite tool was the "pointy" one!

I've also taught remedial skew lessons to old turners who were scared by catches and just gave up. I didn't see one for a few years and when I did he ran over and wanted to shake my hand - he said the skew was now one of his favorite tools! One person drove across several states for a skew lesson. And while doing a demo for a private course at a craft school I took the huge risk of embarrassing myself by asking if anyone in the audience had never used the skew and would like to try - a guy came up and we went through the skew part in about 5 minutes and again, smooth planing cuts and no catches! Whew... My real goal was actually to show others, some with a lot of turning experience, the teaching method I use.
A brief description of how I go about it.
- I start by rounding a blank for them while they watch, then make a couple of planing cuts to smooth.
- Turn the lathe off.
- Show them how I hold the skew, brace my right arm against my side, position of left hand, position of feet, etc.
- Show them a good starting position on the blank, draw a good angle on the wood with a sharpy.
- Use a red sharpy to show what part of the skew edge to avoid touching to the wood!
- Have them hold the tool and place it on the (non-spinning) wood.
- I stand to the left and with the lathe motor off, turn the lathe and blank by hand and adjust the position until the edge slightly cuts into the wood.
- After they can consistently make fine shavings in one or two spots along the cylinder, I have them try moving the tool from right to left as an introduction to the planing cut. Special attention is to hand/arm position as well as foot/leg position and movement.
- By this time, the cylinder has been cut into so I take over, turn the lathe on, and smooth it again (so they'll have a clean slate!)
- I put the belt at the lowest position for the lowest speed (Jet and PM lathes) and set the speed control to the minimum speed.
- (drum roll...) Turn the lathe on.
- Since they can make a nice shaving now, I have them start a shaving at the lowest speed and move the skew to the left and try to maintain continuous shavings, not worrying yet about the smoothness of the cut. I'm still watching and providing verbal feedback on cutting edge position, angle, as well as arm, hand, and leg position ("bend the left knee and straighten the right"
 ) and how to easily adjust the cutting position on the skew edge by twisting the handle a bit. The biggest problem some have is not using the legs but just swinging the skew from right to left - this requires contortions to keep from making an arc with the skew and changing the cutting angle - not a good thing!
- After a pass or so, I smooth the cylinder again and they practice planing cuts.
- Then I turn up the speed a bit and as they get more confidence, keep increasing the speed until it's really truckin' along (I'm still watching over the shoulder and verbally correcting as needed and resmooth the cylinder if needed - I don't want them to have to deal with a bumpy surface yet.)
- It's surprising how little time it takes for them to make nice planing cuts!!
- Then I have them try planing in the opposite direction.
- I then demonstrate v-grooves, shallow at first, and they try try.
- We set the skew aside and I demonstrate the moves needed to make coves with a spindle gouge - the entry angle, starting and ending position (in the middle of the cove) and multiple coordinated movements needed. The spindle gouge is harder than the skew!
- I let them practice coves for a while, all the way down the blank.
- Mount a new square blank and introduce them to the spindle roughing gouge. They round the blank then smooth it with the skew.
- While still holding the skew, I have them make a few more shallow v-grooves then take over and demonstrate deep v-groves - gotta be careful on those!!
- Then back to the spindle gouge and learn beads.
- After all that, I suggest some possible 1st projects.
The dibble shown above is easy, the other girl had four older brothers and wanted to make a self-protection device! Several have made a tool handle. One teen girl visiting us from Italy made a wonderful "Bob Rosand style" ring keeper after the introductory lesson. When they come back again after getting some experience we may work on something more difficult such as thin spindles (wands, conductor baton, tops, etc. One went quickly from Close Encounter with the Lathe to making lidded boxes, bowls, platters, and some tricky things. They have a lathe now and make and embellish things to give as gifts! Makes me smile.

As mentioned, I have NEVER had a student get a single catch! Maybe that will continue! (Knock on Bubinga)
I once described to a well-known long time instructor (with a great reputation) how I start students with the skew - his response was "You can't do that." My response: Oh yeah? I figure that once if they learn the skew first some of other cutting tools may be easier.
My best advice is to try to find an experienced, patient, hands-on instructor for some one-on-one instruction! You may be surprised at how fast and how easy things get! A huge advantage of learning the skew and proficincy with spindles is, as described by several internationally known turners, it will teach the fine tool control that will make turning anything easy. All the experienced spindle turners I know have no problem turning face work but the opposite is not always the case for those who start and stick with bowls, especially from green wood.
That's my $0.02.
Oops, after writing this I noticed
@Brian Gustin posted a message. If you feel like taking a road trip my shop is your shop. I'll show you everything I know in about 15 minutes. The price is a good story or a good joke and a promise to take home a few spindle blanks.

Or if I can get out your way, I'm not opposed to dropping by your shop!
JKJ


