• August 2025 Turning Challenge: Wooden Version of Non-Wood Item! (click here for details)
  • Congratulations to David Croxton for "XOXOXO" being selected as Turning of the Week for August 11, 2025 (click here for details)
  • Welcome new registering member. Your username must be your real First and Last name (for example: John Doe). "Screen names" and "handles" are not allowed and your registration will be deleted if you don't use your real name. Also, do not use all caps nor all lower case.

So, a guy and a burl cap walk into a bar...

Joined
Jan 8, 2020
Messages
189
Likes
53
Location
Bloomfield, New Jersey
I've never turned a burl before and need some advice on how to mount this. I figure it's good for a small dish/bowl, but I I'm not sure how to begin. This is as dry as could be. It's probably nine or ten years old.

The are two black circles around some tiny checks (pic 3, in the center and the upper right) that seem to go into their own little pith ring.
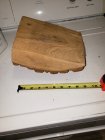
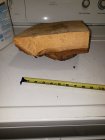
20200324_143421.jpg 20200324_143429.jpg 20200324_143513.jpg 20200324_143540.jpg

20200324_143421.jpg

If you could give me some advice/suggestions, I'd appreciate hearing them.
 
That could possibly be a grow over instead of a burl but it may still yield a shallow bowl with some character.
The way that I would handle it is to find the thickest point on the bark side, then using a nail or ice pick to mount a cardboard disk for a guide and band saw into a circle. The next would be to find the center on the cut side as in picture 3 and drill a hole for a wood worm screw, then mount and turn the bottom or base with a dovetail recess. There is also the the between centers method which may give you a better way to adjust for the best position.
The other alternative is to get together with your local AAW chapter.

I've only just joined the local chapter and haven't been to any meetings yet. The one they had last night was virtual to watch a live demo by Lyle Jamison.

Your idea sounds like a plan to me. Thanks, Don.
 
Like Don said, not sure if this is a burl or not. But it really doesn't matter what you call it... Here's what I do:

Try to clean up a couple of the sides (like clean cut and maybe some sanding) - so you can clearly see the figure. You might need to make some exploratory cuts, like lopping off some corners. Your goal here is to figure out where the good figure is. Sometimes burls have very shallow figure, sometimes it goes deep.

If the figure is pretty shallow, just around the bark, you might want the bottom of the bowl thru that part, so it'll show off more figure. If it goes pretty deep, you have more options - like a natural-edged piece with burl figure throughout.

I usually mount bowls of any kind between centers, but it's especially helpful on natural edge bowls (or odd-shaped blanks). Between centers, you can adjust the "tilt" and get the edge you want or maximize figure etc. I usually make the blank mostly round, then look at things and adjust until it looks like I want. Round again and repeat, till it's what you want (or you've turned a toothpick). On a natural edge bowl, I usually move the live center position till high-spots are even with each other, and same with low spots.

A "normal" spur drive (in my experience) just doesn't cut it - not enough grab to do the job. There was a good discussion of alternatives in this thread.
 
Given the smallish size, I would agree with Don's suggestion about rounding the blank and using the wood worm screw on the flat side which would be the inside of the bowl. However, I'd probly turn a tenon on the bottom(bark side) rather than a recess, and incorporate the tenon into the foot of the finished bowl. Tenon or recess is really a personal preference on the look of the finished product. Either way works.
 
You could run the flat side on a planner or sander to get a flat surface to glue to and use a flat board to glue to the piece then use a face plate and screws to mount the flat board.
This method will maximize the depth of wood you have to work with.
 
You could run the flat side on a planner or sander to get a flat surface to glue to and use a flat board to glue to the piece then use a face plate and screws to mount the flat board.
This method will maximize the depth of wood you have to work with.
Mike, if I'm following correctly, you would still need to use a tenon or recess so you could flip it around and hollow the bowl? If so, wouldn't the worm screw provide the same full depth?
 
John,

Depends on which end you want a tenon or recess. If the flat side ends up being the rim of the bowl you turn the other end until you get a good tenon or recess to work from
and then remount the work piece and turn off the flat board and turn the interior of the bowl. The worm screw normally works fine, unless you have to turn away too much material before you get a good tenon or recess to remount with. You never know what you have with a burl until you remove the bark and work your way into the blank.
 
Thanks for all of your comments. Now I have some things to think about before spinning this one up.

Fortunately, I just scored a trailer load of maple logs to process into blanks and will have many hours to ponder the ways to tackle that piece. Craigslist is a special place :-)
 
Back
Top