• June 2025 Turning Challenge: Turn a Wand! (click here for details)
  • Congratulations to Dave Landers for "Pod Box" being selected as Turning of the Week for June 2, 2025 (click here for details)
  • Welcome new registering member. Your username must be your real First and Last name (for example: John Doe). "Screen names" and "handles" are not allowed and your registration will be deleted if you don't use your real name. Also, do not use all caps nor all lower case.

Spindle Gouge Videos?

Joined
Feb 8, 2014
Messages
1,222
Likes
662
Location
Evanston, IL USA
Can anyone suggest a good video (or two) on Spindle Gouge techniques and practice for the beginner?

I want to direct some students to something helpful where they can get some help in between classes.

Thanks.
 
That's totally different than the way I was taught. Mark clearly gets excellent results. Hmmmmm. I wonder how much of the success is related to the very different bevel grind and long wing. And how much is related to his method of locking the left hand and rotating his trunk. Could you even succeed by doing the motion without this specific grind. I also wonder if that super smooth surface he gets is from burnishing the wood with his convex bevel, rather than by cutting with a superior method.

I'm gonna have to try this out and see what I get. Possibly a paradigm changer. Thanks for sharing that. (thumbs up)
 
While I don't use them much, the method Mark uses is what I figured out to work for me. Perhaps because of a workshop I took with Allen and Stuart Batty.

robo hippy
 
That's totally different than the way I was taught. Mark clearly gets excellent results. Hmmmmm. I wonder how much of the success is related to the very different bevel grind and long wing. And how much is related to his method of locking the left hand and rotating his trunk. Could you even succeed by doing the motion without this specific grind. I also wonder if that super smooth surface he gets is from burnishing the wood with his convex bevel, rather than by cutting with a superior method.

I'm gonna have to try this out and see what I get. Possibly a paradigm changer. Thanks for sharing that. (thumbs up)
Its more about his tool control methods and tool edge angle of attack. I dont use his convex bevel, but I do use a narrow bevel, ~1/16”, with a secondary bevel and heel ground away, kind of simulates his grind ( I use a jig to sharpen).

The cleanness of the cut is from the angle of attack, always slicing the wood. Doesnt hurt a thing to give his methods a try. Use some good ole construction lumber, its great for showing the benefits of his methods.
 
Very interesting video - looking forward to trying out some of his techniques later today. A warning to others, he uses a different reference for the hands of a clock - most people describe the orientation of the flute, but Mark either uses the edge of the gouge or he is relating to the audience point of view. It took me a few rewinds to understand this.

The technique of locking the left hand against the body eliminates a lot of potential issues from the left hand doing something it should not. Mark emphasizes the body motion, but if you watch David Ellsworth, he also moves his body with the tool constantly, like a dancer - light on his feet with smooth motion.

Like @Doug Freeman , I'd guess this technique could be used with any grind, as long as you can position your body to allow the correct entry angle for the chisel/gouge.

There are 3 or 4 other videos he does using this technique for bowls (end grain and side grain) and an introduction. All worth a binge watch.
 
Yesterday, without really planning it, I did what Doug suggested. I'm teaching honey dippers to 4 high school classes tomorrow and was practicing. I threw a 2X2 chunk of fir on the lathe and wondered how good of a surface I could get with my traditional method. Smooooth and burnished is the answer. Sharp tool applied well seems to be the key, rather than a particular grind, and other body mechanics, for example, as taught by Eric Lofstrom, work fine.
 
Richard Raffen has spindle detail gouge videos up on You Tube, as well as a bunch of others that he has done recently. Mine seem to be more pointed, and his are more round. Worth checking out.

robo hippy
 
Richard Raffen has spindle detail gouge videos up on You Tube, as well as a bunch of others that he has done recently. Mine seem to be more pointed, and his are more round. Worth checking out.

robo hippy

Yes, I've long heard of Richard, and have read at least one of his books, and numerous articles over the years, but until recently, had never seen him turn. Definitely good stuff to check out. Thanks
 
If I can learn this cut, then my turning life will be complete....

View: https://www.youtube.com/watch?v=_KdPGAqXOds&t=547s


His book was the first one I ever read, and his old video was the first one I ever saw, on tape it was so long ago. I thought every one turned like him..... Nope, not even close...

robo hippy
 
I've been leery of trying that cut, but only for the fact that my largest spindle gouge is 3/8 and it feels 'light' for that sort of cut. But it is fascinating. Nice tip on the pull cut thought.
 
I have some 1/2 inch spindle gouges on the way! I have been meaning to get a 3 part box turning video done.....

robo hippy
 
GAACK! I've been doing it wrong for 10 years without knowing.:eek: Did he say to use a 1/2" bowl gouge? If so, it's a pretty shallow bowl gouge he's got in his hand. Thanks for sharing, Reed.

Also, if you're Richard Raffan you can get away with sticking your fingers over a tool rest into a spinning box, but if you're not Richard Raffan, it's really stupid and dangerous.
 
Out of curiousity - could that back cut be done safely with a continental spindle gouge? Richard's video mentions that the grind simply needs to be convex on the wing.
 
Out of curiousity - could that back cut be done safely with a continental spindle gouge? Richard's video mentions that the grind simply needs to be convex on the wing.
it would depend on the width of the gouge and the depth of the flute and the thickness of the forged bar.
I own a couple of continental gouges - they have wider shallower flutes and are thinner than my bar ground spindle gouges.
My gouges would be a poor choices.

If you can get a wing ground on it it should work. But the wing support will be less because of the flat vs round bar.

My thought is the back hollowing will be more difficult to learn with a continental. Once you have learned it you can probably do it with a property ground continental.

Safely. By the nature of the cut you are out of the line of fire.
If the wood cannot drive down onto the cutting edge you won’t get a catch.
If you pull the handle too far to the left the tip contacts the side wall and the wood drives onto the tool for a catch
If you open the flute too much the wood can drive onto the wing for a catch. - a continental will require more tool control to prevent the tool from rolling open.
 
Last edited:
Out of curiousity - could that back cut be done safely with a continental spindle gouge? Richard's video mentions that the grind simply needs to be convex on the wing.
I would say no (but what do I know, I've been doing it wrong). You need a fingernail grind, with a little side bevel, to do the cut, and a stiff tool is very helpful. The continental gouge could be ground with an atypical, rounded end, but I would not expect them to be rigid enough.

BTW, at the point of the video where the clip above starts, he refers to the tool as a 1/2" "bowl gouge", but earlier on 2-3 occasions, he made clear it is a spindle gouge. The earlier portion of the video shows back hollowing twice over again, as well.
 
Last edited:
I was successful at back hollowing a small goblet - about 1 1/2" diameter cup and about the same in depth. used the 3/8" spindle gouge. Much faster than the other approach I've tried which is more of a scrape at 8 o'clock or so.

@Dean Center I noticed a couple of those mislabeling of gouges in his videos as well.
 
I have some 1/2 inch spindle gouges on the way! I have been meaning to get a 3 part box turning video done.....

robo hippy
In the video clip I use a 3/8 spindle gouge to back hollow. Also drill and give brief review of the ABC basics.
It is from an old demo but I added a new commentary and used the iMovie freeze frame to emphasize the ABC
@Tom Albrecht if you show them how to drill with the gouge it is in there.

Spindle Gouge - Drilling & Hollowing -
View: https://www.youtube.com/watch?v=dOEsrpLyDV4
 
Last edited:
I will never forget seeing spoon bits being used by Roy Underhill on the old PBS show. They are identical to what these are being used for or maybe as.... It does take some practice. Tried it a long time ago and had some spectacular catches.....

robo hippy
 
I will never forget seeing spoon bits being used by Roy Underhill on the old PBS show. They are identical to what these are being used for or maybe as.... It does take some practice. Tried it a long time ago and had some spectacular catches.....

robo hippy
A gouge is much like a spoon bit. Saw a show where Roy did a bodger style chair.
The spoon bit makes a cavity larger than the entrance hole a bulbous tenon is driven through the hole the wood expands to let it in and then contracts to keep it it. - aha moment - ball in a ball…..

Got to talk with Roy for about 45 minutes on a rainy morning In Williamsburg. He was waiting for a horse drawn wagon to bring logs for a barn. They were delayed by cars using the highway. Then they showed up a Roy had to go to work.

The back hollowing is a different. Cutting is done by the wing at the top. The spoon bit cuts from wobbling around center in the brace and bit cutting on the sides as it gets forward.

The big catches with back hollowing come when you swing the handle too far left and let the tip touch the side wall.


Back hollowing
 
A gouge is much like a spoon bit. Saw a show where Roy did a bodger style chair.
The spoon bit makes a cavity larger than the entrance hole a bulbous tenon is driven through the hole the wood expands to let it in and then contracts to keep it it. - aha moment - ball in a ball…..
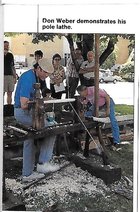
The way I learned the use of a spoon bit was talking to Don Weber at the 1992 symposium at Provo Utah and subsequent research into the art of chair making. The photo of Don Weber was in the Sep 1992 American Woodturner - black and white and SEP/OCT 1992 Woodturning (UK).
DonWeber.jpg The basic technique is to first make the horizontal rungs with straight tenon ends, allow them to dry then finish to size. The next step is to make the verticals or legs from green wood and using the spoon bit make the holes such that the inside is larger then the entrance hole. The assembly is then done while the legs are still very green. The rungs are assembled with the annual rings vertical so that as the legs dry they will shrink around the rungs.
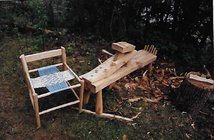
ShavehorseOnly.jpg The chair shown is the first and only one that I ever made during a family vacation in summer 1995 on Crane Lake. The pieces for the chair were all made of black ash from the same tree that the shave horse was made from. The only power tool used was a chain saw to cut the tree down and do some of the shaping on the shave horse. The chair parts and legs on the horse were split using a froe the shaped using the horse, draw knife, spoke shaves and brace & bits.
The shave horse and chair were left at my sisters cabin until about 4 years ago when the chair gave up and they brought the horse to me.
 
Back
Top