Lately, I mostly turn urns, both for pets and people. Instead of hollowing a solid piece of wood, I effectively make a barrel with glued-up staves, turn the barrel round and hollow the inside; then turn a top and a bottom. I often add a finial or cabochon to the top, depending on the wishes of the recipient.

If you've turned urns, you've probably heard that the interior volume need to be the same number of cubic inches as the weight of the occupant before death. That's a good number for pets, but for people, I use the standard volume of a purchased urn, 200 cu. in. I have a spreadsheet I created that will let me enter a volume (in cu. in.), and the thickness of the boards I will use to make the staves. I have columns for the number of staves in the barrel (I tend to favor 8 or 12, since a 4-jaw chuck closes on the same place on a set of 2 or 3 of the staves.) The rows define the height of the barrel, and then tell me the width of the turned barrel, and the width of the staves I need for my chosen number of staves.
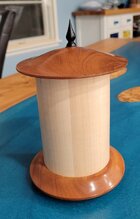
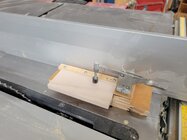
The urn above was designed to hold the remains of 2 cats for a family friend. The staves are maple, the top and bottom are cherry and the finial is ebony. I settled on a tall, narrow design with 8 staves. The taper on both sides of the staves is defined by the number of staves, n. The bevel angle of my table saw is set to (180/n), so for 8 staves, it's (180/8)=22.5 degrees. I made a sled out of Baltic birch plywood with a hold-down clamp. I move the fence at the back of the sled to set the stave width, and then set the table saw fence to just let the sled pass through. The first cut requires that I flip the piece around to bevel both sides, but after that I simply flip the offcut over so the bevel on the fence side of the sled faces up.

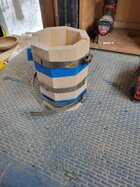
I glue the staves together with Titebond II wood glue, using pipe clamps to provide gluing pressure.

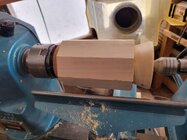
I've made tapered blocks of wood that will fit into my 4-jaw chuck on one end, and with a tapered center hole to match my 60 degree revolving center at the other. I turn the outside round with the barrel held between the blocks, and use a thin parting tool to cut the tailstock end of the barrel flat.

Next, I turn the base of the urn. I use a screw chuck to hold the blank, turn it round, and add a recess that fits my 4-jaw chuck to the back. Then I turn it around, holding it by expanding into the recess on the back, and turn a recess in the front that just fits the round barrel. I shape the rest of the base at that point, and then glue the barrel into the base with Titebond II. I bring the tapered block back up to apply clamping pressure while the glue dries. When the glue is dried, I turn the inside to the barrel round and flatten off the top of the barrel. Everything gets sanded and finished at this point. I tend to favor Minwax Wipe-on Poly for my finish.
Next I turn the top, using a screw chuck to hold the blank, turn it round and turn a wide shallow tenon on what will be the top. I turn it around into a 4-jaw chuck with larger jaws, create a recess to just fit over the top of the barrel, and shape the bottom side of the top. With a pet urn, I can then turn the top over, expand a 4-jaw chuck into that recess, and finish shaping and sanding the top. Finally, if I'm adding a finial, I'll drill a hole in the top to accept the tenon on the finial.
I've now made dozens of these. I've found that I prefer some definition between the staves, so I often glue contrasting strips of wood or veneer between the staves. A combination of walnut staves and 1/8" Baltic birch plywood spacers has been very well received.

If you've turned urns, you've probably heard that the interior volume need to be the same number of cubic inches as the weight of the occupant before death. That's a good number for pets, but for people, I use the standard volume of a purchased urn, 200 cu. in. I have a spreadsheet I created that will let me enter a volume (in cu. in.), and the thickness of the boards I will use to make the staves. I have columns for the number of staves in the barrel (I tend to favor 8 or 12, since a 4-jaw chuck closes on the same place on a set of 2 or 3 of the staves.) The rows define the height of the barrel, and then tell me the width of the turned barrel, and the width of the staves I need for my chosen number of staves.
The urn above was designed to hold the remains of 2 cats for a family friend. The staves are maple, the top and bottom are cherry and the finial is ebony. I settled on a tall, narrow design with 8 staves. The taper on both sides of the staves is defined by the number of staves, n. The bevel angle of my table saw is set to (180/n), so for 8 staves, it's (180/8)=22.5 degrees. I made a sled out of Baltic birch plywood with a hold-down clamp. I move the fence at the back of the sled to set the stave width, and then set the table saw fence to just let the sled pass through. The first cut requires that I flip the piece around to bevel both sides, but after that I simply flip the offcut over so the bevel on the fence side of the sled faces up.

I glue the staves together with Titebond II wood glue, using pipe clamps to provide gluing pressure.

I've made tapered blocks of wood that will fit into my 4-jaw chuck on one end, and with a tapered center hole to match my 60 degree revolving center at the other. I turn the outside round with the barrel held between the blocks, and use a thin parting tool to cut the tailstock end of the barrel flat.

Next, I turn the base of the urn. I use a screw chuck to hold the blank, turn it round, and add a recess that fits my 4-jaw chuck to the back. Then I turn it around, holding it by expanding into the recess on the back, and turn a recess in the front that just fits the round barrel. I shape the rest of the base at that point, and then glue the barrel into the base with Titebond II. I bring the tapered block back up to apply clamping pressure while the glue dries. When the glue is dried, I turn the inside to the barrel round and flatten off the top of the barrel. Everything gets sanded and finished at this point. I tend to favor Minwax Wipe-on Poly for my finish.
Next I turn the top, using a screw chuck to hold the blank, turn it round and turn a wide shallow tenon on what will be the top. I turn it around into a 4-jaw chuck with larger jaws, create a recess to just fit over the top of the barrel, and shape the bottom side of the top. With a pet urn, I can then turn the top over, expand a 4-jaw chuck into that recess, and finish shaping and sanding the top. Finally, if I'm adding a finial, I'll drill a hole in the top to accept the tenon on the finial.
I've now made dozens of these. I've found that I prefer some definition between the staves, so I often glue contrasting strips of wood or veneer between the staves. A combination of walnut staves and 1/8" Baltic birch plywood spacers has been very well received.
