-
Congratulations to Dave Potts, People's Choice in the August 2025 Turning Challenge (click here for details) -
Congratulations to Ted Pelfrey for "Cherry Burl" being selected as Turning of the Week for September 1, 2025 (click here for details) -
Welcome new registering member. Your username must be your real First and Last name (for example: John Doe). "Screen names" and "handles" are not allowed and your registration will be deleted if you don't use your real name. Also, do not use all caps nor all lower case.
You are using an out of date browser. It may not display this or other websites correctly.
You should upgrade or use an alternative browser.
You should upgrade or use an alternative browser.
Straightening bandsaw blade?
- Thread starter Mike Novak
- Start date
I have with limited success. I just clamped the blade in a vice and used vice grips to coerce the bent bit back into place. In my limited experience, I never got it quite right, but good enough to use the blade again.
that’s what I did for side to side. May try again front to back if I don’t get any other ideas
Thanks
Thanks
Maybe send it back? I guess you could try to call them. I do know there is a method for straightening out squares that are no longer square, and it requires dimpling which causes the blade to angle one way or another, I guess that expands the metal on one side, but I have not tried it.
robo hippy
robo hippy
Robo
I’m familiar with dimpling. I will give that a try.
I’m familiar with dimpling. I will give that a try.
john lucas
AAW Forum Expert
Never been able to get a burnt blade to run perfectly true. That's why I buy the cheapest blades I can for cutting green wood and turning stock. No matter how careful I am sooner or later I get a catch and bend one. I don't need high quality blades for this task. I have a good blade I use only for resawing dry wood.
I had a small mishap with my bandsaw blade. It’s an expensive carbide one from Laguna. I was able to get it running straight side to side, but not front to back. It cuts, but “thunks” pretty bad when the bent spot comes around.
I have bent a couple over the years. I've tried straightening but always end up getting a new one from the box. I buy 8 or 10 Lenox spring steel blades at a time from a local bandsaw blade shop. The box will last me for years (I sharpen each blade several times.)
I have a few carbide but the rarely use them for type of bandsawing I do, mostly turning green wood into blanks and cutting blanks before turning- I don't need glue-line cuts.
One thing about mishaps: NEVER, EVER make an unsupported cut! (an unsupported cut is quick way to ruin a blade, the wood, possibly damage the bandsaw, and ruin your day.) A friend cut the end of his thumb to the bone during such a cut - and he told me it was AFTER he watched my bandsaw video but decided to make the cut anyway. [sigh]
(I uploaded the video to this forum.)
Another thing about mishaps - make SURE the tension is right.
You prob already know this but the recommended tension for a carbide blade is sometimes higher than bimetal and spring steel. Buy, beg, steal, borrow or make a tension gauge. I've taken mine to other's shops to check and set their tension. (The little indicators on every bandsaw I've tested are not even close to useful.) The optimum tension is almost always higher than what people think. I measure, then make marks for the blades I use.
Aligning the bandsaw also helps a lot. I refer people to Mark Duginski's book on bandsaws.
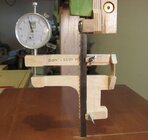
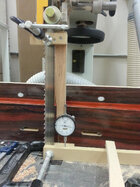
It's actually not difficult to make a tension gauge. I have photos and somewhere some instructions. You are basically measuring the stretch in the steel and using a formula to calculate the tension. The only thing that matters is the stretch - not the width or thickness.
Here are pictures of some people have made. Some are very simple.


And here's a web page. From past interactions I hereby declare John T a bandsaw wizard.
JTenEyck - Woodworker - Bandsaw Blade Tension Meter
There are many opinions about how to tension the blade on a bandsaw. I'm an engineer, and engineers measure and control things. Turns out, you don't have to spend much money in order to do exactly that with a bandsaw blade. There are commercial tension meters costing several hundred dollars, but
And very simple and easy way uses a dial or digital caliper and a couple of small clamps.
The only magic is the math.
JKJ
@robo hippy , “dimpling” worked. Not as good as an undamaged Resaw King, but better than an undamaged Timber Wolf blade.
Accomplished this by placing the blade flat on an anvil and hitting the back of the blade with a hammer until lt looked straight using a straightedge. If it was bent the other way, I would have used a punch by the gullets.
@John K Jordan, I thought I had good enough support ripping a log in half, but I didn’t. I must be missing something on blade tensioning in that link. I understand that if I need .010” stretch, that will work for any blade, but wouldn’t I need blade cross section to figure out what stretch I need? Says 20k PSI, but square inches isn’t in the formula.
I understand that if I need .010” stretch, that will work for any blade, but wouldn’t I need blade cross section to figure out what stretch I need? Says 20k PSI, but square inches isn’t in the formula.
The tension is independent of the cross-sectional area of the steel (as long as the section of steel tested has a consistent cross section.. A 1mm diameter steel wire will have the same tension as a 2x4" steel bar for a given stretch. That's the reason bandsaw tension gauges can be made so simply: measure the stretch, calculate the tension.
The Starrett gauge I use (now almost $800, a lot more than I paid a decade ago) won't work any better than one made with a dial caliper, unless weakness in materials or errors in geometry cause inaccuracies. The dial on one may be a lot easier to read than the method used by another.
The advantages of a good commercial gauge are strong and consistent clamps, craftsmanship that eliminates slop, an easily readable dial, and the fact that the dial is calibrated for direct reading of tension without having to do the math. Far better for my aging brain.
Look around - you can find a good gauge for much cheaper. I think every woodturning and woodworking club should have one to loan to members.
And the Starrett comes in a very nice case!
BTW, peening is a great way to work metals - straighten, make curves, bends, dishing, etc. I've straightened drill bits and metal rods and bars. The downsides are it can change the thickness and smoothness of the metal. The irregularities can put stress on the steel, the bandsaw guides, wheels and tires, and irregular tensions in the peened area. If it's not creating a lot of noise and vibration it should be ok but I'd be even more careful with cuts and replace it when possible. The peened area may be weakened too and even more likely to break - I'd inspect it often.
A broken blade might just relax and do nothing but there's a possibility it could be ejected in an unexpected direction at a high speed. Might wear face protection. And a suit of armor. (I'm not at all saying this WILL happen and can't judge the liklihood, I just know it can.) I had a blade break at the weld once and one end came out of the machine. Poor weld - the blade shop rewelded it and it was ok from then on. Fortunately, a broken blade instantly loosens and loses the driving force from the tires.
JKJ
Last edited:
I thought I had good enough support ripping a log in half, but I didn’t.
Just curious, what was the orientation of the log when cutting it in half? Cutting down the length while supported on a round side, ripping with one end resting on the table, or crosscutting a round? Was the log section irregular? (What I call "the unsupported cut" is the worst.)
If you haven't seen it, I cover most of this in my bandsaw video. It's quite long (and made in a rush for a pandemic zoom club meeting) but covers most of what I could think of at the time. (sadly, I thought of more later.
If you've already seen it, then "Nevermind"

(think Gilda Radner's voice on SNL)
I had taught a bunch of bandsaw classes in my shop before then so I had an idea of what some of the people wanted to know.
JKJ
I did see your video. I was cutting as you show at the 36 minute mark. One of the shims slipped…
It wasn’t bent much, so should be ok, but I will keep an eye out for cracks near the repaired section.
It wasn’t bent much, so should be ok, but I will keep an eye out for cracks near the repaired section.
I probably should mention that I’m using the carbide blade for cutting logs into blanks. I get terrible blade life out of “regular “ steel blades. I’d try bimetal, but I can’t find one suitable that fits my saw (2/3 tpi .025” thick). Carbide is 3x the cost, Hoping it lasts more than 3x as long
I’d probably get better blade life if I debarked first, but that’s too much work.
I’d probably get better blade life if I debarked first, but that’s too much work.
I did see your video. I was cutting as you show at the 36 minute mark. One of the shims slipped…
Ahh, unfortunate. Glad you didn't get injured.
I didn't mention it there but I've been known to use hot melt glue to help hold the wedges in place on an iffy round. I sometimes cut wedges to fit the curvature of the log, but not usually. The trick for me is continuously holding the wedges in place and adding new ones as needed. I keep a box of various wedges, straight and curved.
Also, the plywood method at about 40:30 in the video is extremely stable. I didn't mention this either: if supported by plywood I don't have to make a cut right down the center, but can cut off to the side if needed (just keep away from the screws and use caution when clearing the end of the log) or make an angled cut to follow the pith. (I first mark a cut line on the top with a Sharpie.)
Using the chainsaw to make a skimmed flat on the bottom also works well but does take a bit of time. I use an electric chainsaw for this.
The carbide is too expensive for me, I'm a cheapskate. I've also used bimetal blades with hardened teeth, but they cost more also.
Do you have a Lenox bandsaw blade shop in your area? I looked them up once on the internet and found them all over the country. The local one is in a room in an industrial compressed gas company. They make blades of any type to any length, sometimes while I wait. Easiest thing the first time is to bring a blade that fits and the guy makes new blades to match exactly. After trying several, I always use 1/2" 3tpi spring steel blades. The blades I get are every bit as good as ordering blades and the cost is generally less.
He often has the blade stock I use on the shelf but if not I order a 100' roll and a few days later go pick up 8 blades - lasts me a LONG time! (I think the blades for my 18" Rikon are 142", but my memory cells get older every day.)
For me, the Lenox spring-steel blades are the best balance between cost and function (and easier on the bandsaw due to the lower force needed for tensioning). I can cut up a LOT of log rounds with a single blade, depending on the wood, sharpening if needed. Keeping the sawdust clear with a powerful DC helps too.
I do clean the bark first (with a wire brush or, better, ahead of time outside with an electric pressure washer (to remove any dirt, embedded gravel, etc.) which makes the blade last a lot longer. If the bark is loose I'll sometimes remove it with a hand axe or skim down the top and bottom with an elect chainsaw to expose clean wood.
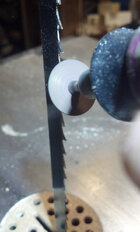
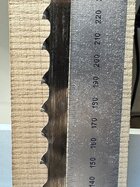
I've had several requests for a follow up video - how I sharpen bandsaw blades. I usually sharpen a spring steel blade several times, occasionally as up to 5 times, before discarding it. I mention in the video how I check for sharpneess. Another test is like checking a knife - if you see light glinting from the sharp tip of the tooth it's not sharp! (You might see such a glint on the tooth right above the sharpening disk in the photo below.)
I use an extremely simple method to sharpen, using the side of a small Dremel cutting disk. I can usually sharpen one tooth in 1-3 seconds so my 400+ tooth blades do take a bit of time, but I'm retired. I sharpen only the front of the tooth (that nearest to me - not the gullet) - this method does reduce the kerf a bit with each sharpening and can cause a rougher cut since it's done by hand, but that hasn't affected my log processing. I've cut up many hundreds (thousands?) of blanks with the cheap blades over the years.
I mark the starting point with a red sharpie, rest my right hand on the table, angle the dremel disk so it's very close to the angle of the tooth, then touch the tooth for a fraction of a second. Glance to make sure I've just ground a tiny angled flat on the tip of the tooth. Pull the blade down a tooth with the left hand, repeat. And repeat... (Might be best to unplug the bandsaw first)
Although the teeth on the blades I use angle the points to the left-right-center I don't adjust my hand position for that - I just grind straight across. I've experimented with both ways and could see no difference in the resulting cuts.
BTW, over the years I've read of others that use this exact technique - Steven Russell for one. One guy made a video showing him sharpening with the blade on the workbench - not for me. Some have devised complicated sleds and devices to keep the angle consistent but I think that's unnecessary (and would require precise indexing of each tooth to be effective). Some sharpen the gullet instead of the face but I see no need for the type of sawing I do. Most people don't sharpen at all, just cut until the blade is dull then keep cutting until they get frustrated!

JKJ
Last edited:
I’d probably get better blade life if I debarked first, but that’s too much work.
That reminded me of a visit I made to a huge commercial sawmill near here. (Big enough they had a least 10 people pulling boards off the end of the line and stacking on trailers.) I've taken logs there several times and sold them.
They run each log through a massive debarking machine so once through it is clean and in the cue for sawing. The operator sits high in an air-conditioned cubicle with a 360-deg view. He judges each log as it's fed and sets the clamps and spacers to trim the wane, roll the log as needed, and cut each board. As the log leaves the blade it enters a big circular conveyer which brings it around for another pass. The guy controls everything - the boards to down one conveyor trough, the junk goes down another to the chipper.
The whole thing is built on a slight slope and all movement is by vibrating shakers. A noisy place! When the boards reach the last stage then are moved down a very wide chute with a bank of big circular saws and sensors which cut the boards in to even 2' lengths, pulled off and stacked according to length.
I bought a trailer full of "pallet" grade oak for cheap - used it for siding on the chicken house and other farm buildings.
Amazing and efficient operation. My son and I watched for an hour.
Made my little sawmill operation look like a kindergartner's popsicle stick project.
JKJ

