• July 2025 Turning Challenge: Turn a Multi-axis Weed Pot! (click here for details)
  • Congratulations to James Seyfried for "NE Red Oak II" being selected as Turning of the Week for July 21, 2025 (click here for details)
  • Welcome new registering member. Your username must be your real First and Last name (for example: John Doe). "Screen names" and "handles" are not allowed and your registration will be deleted if you don't use your real name. Also, do not use all caps nor all lower case.

To fill or not to fill

Joined
Jan 24, 2022
Messages
363
Likes
473
Location
Bainbridge Island, WA
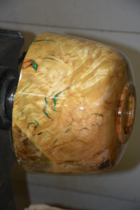
I have an elm burl dish roughed out. There are little 1/8" to 3/8" cracks all over the place. What would you do with these? Would you fill the little voids or leave as is for character. What would you finish it with? I am considering either leaving as is and sanding to 320 grit before using Osmo on the piece, or filling everything and putting a glossy finish. All ideas are appreciated.
IMG_0529[1].JPG IMG_0528[1].JPG
 
It depends on what you intend to use it for and how much time you want to spend on it. If utility then fill them. If decorative then leave as is. The finish you use will depend on intended use also. I just went through this on the what's on your lathe thread with a burl. I cleaned and filled worm holes and cracks. It took all day to fix it up and there are still some small cracks around burl areas I didn't fill because I would be another day. Pretty piece of wood.
 
You could always cover it with a food safe epoxy coating. It would fill in the holes and cracks and make it usable.
 
Me, I'd leave it. Those are small voids and often filling them will clash with the burl and leave you unsatisfied. My opinion. And also my opinion that a thick built-up shiny film finish also distracts from the wood.

I also want to say that even a "utility" piece can have voids and holes. It just depends on what it is utilized for. Nuts, chips, popcorn, fruit - no problem. Dry veggies or salad - ok. Drinking cups - no. Salad with dressing to seep into the voids - not so good. (If the holes go all the way thru and you're willing to rinse them thoroughly and clean the mess on the table - ok).
 
Hi Darryn- lots of good points here. I think Dave summed it up best. IMO leave the voids and carry on with the Osmo. I look forward to seeing it when it's done.
 
Hi Darryn- lots of good points here. I think Dave summed it up best. IMO leave the voids and carry on with the Osmo. I look forward to seeing it when it's done.
Thanks everyone. I have about 10 pieces of nice burl from a huge elm that was cut up mostly for table slabs. This piece will be finished with a little sanding and osmo as a decorative bowl. I plan to make some kind of lid for it eventually, maybe out of copper. Some of the other pieces may be filled or finished differently as I like to experiment with other options.
 
I typically fill cracks and voids with thickened colored epoxy - thicken to the consistency of drywall mud and apply with a squared off wood tongue depressor as a disposable putty knife. Takes maybe 15 minutes to mix & apply then let it setup overnight and turn away excess. I like the added color and think a defect free surface makes the piece more useful (I am not good enough to make art!)

1727878516017.png

everyone likes different stuff and I like this :)
 
I typically fill cracks and voids with thickened colored epoxy
I agree with Erik and Henry Ford: I'd fill with thick epoxy colored with "any color you want as long as it's black". Then:
  • final turn (cut off black epoxy) and sand
  • shoot with a barrier/sealer and
  • fill / sand any imperfection or remaining crack with Ebony TimberMate further darkened with India Ink (otherwise it comes out a real dark gray)
  • barrier/ sealer again
  • sand to achieve an absolutely perfect surface
  • Apply final finish and rub out
The goal is to make the filled cracks part of the piece just like the wood. Black is the color of shadows and adds depth without calling attention.
 
I agree with Erik and Henry Ford: I'd fill with thick epoxy colored with "any color you want as long as it's black". Then:

The goal is to make the filled cracks part of the piece just like the wood. Black is the color of shadows and adds depth without calling attention.

For natural voids I personally don’t like bright, “unnatural” colors but of course many people do. I’m told such pieces can catch the eye and may be easier to sell.

Depending on the void, the length and width of the void, and the surrounding wood and figure, my favorite techniques are:
#1, either leave the void, or
#2, cut slivers of wood or bark, varying thickness, perhaps tapered on the ends. Place several in the void with glue, along with sawdust from the wood and/or darker sawdust from bark or some darker wood.

To me, these look better (and I turn only to please myself}

JKJ
 
I tend to favor a natural looking finish, softer sheen. Since you’re going to use Osmo for the finish, it seems you may too. Consider wet sanding with the planned finish, letting the dwarf fill for you and dry, then repeat until you get to the grit you want. I do this with maple and madrona burl that is getting an oil finish and it works well. I’ve used Osmo top finishes, but haven’t used them for wet sanding as of yet, it may require more finish than the Osmo instructions indicate, but should work. Alternatively, use poly or other finish as a base for wet sanding and use Osmo as the finish coat.
 
Personally, I don't think there is any place for plastic in woodturning.

One thing I haven’t seen mentioned much is the possible longterm effect of filling voids in wood with plastic, epoxy, or metals: as the wood naturally moves with environment (humidity and temperature), any rigid fill can break away from the wood in spots and even end up not even with the surface. This is can be a lot worse, of course for pieces that are filled when not quite dry, pieces made of certain less-stable types of wood, or pieces turned in a shop environment then brought into different environment, such as into a house. I’ve seen a few extreme cases over the years that didn’t look or didn’t feel good.

I disagree with any blanket statement of absolutely no place for plastic in woodturning. As illustrated in other threads, I like to turn certain plastics (cast acrylics) just as I do wood, for example the pic at the bottom of this post in thread 'Joe Div’ https://www.aawforum.org/community/threads/joe-div.23082/post-249570
I’ve done several pieces other pieces where I used pieces of colored acrylic as accents. I don’t have access to my photos at the moment or I’d post another picture or two.

JKJ
 
Back
Top