• July 2025 Turning Challenge: Turn a Multi-axis Weed Pot! (click here for details)
  • Congratulations to James Seyfried for "NE Red Oak II" being selected as Turning of the Week for July 21, 2025 (click here for details)
  • Welcome new registering member. Your username must be your real First and Last name (for example: John Doe). "Screen names" and "handles" are not allowed and your registration will be deleted if you don't use your real name. Also, do not use all caps nor all lower case.

Tool handles

Joined
Jan 28, 2022
Messages
150
Likes
115
Location
Ware, Hertfordshire, UK
I have a couple of thread chasers that I intend to make handles for. The tang is about 8-9mm wide and 5mm thick. My plan was to drill a 9mm hole in the handle and turn a 9mm diameter dowel. Split the dowel and sand it so that when placed either side of the tang, the result is more or less the size of the hole in the handle. Epoxy it in. Fit the ferrule. I appreciate I will need space to allow the epoxy to ooze out as it’s put together. Is there a better /simpler way?

The thread chasers don’t really require anything too robust but I planned on using the technique on a larger scraper.
 
Me, I'd just drill the hole at the smallest size that the tang will JUST fit in as snug as possible, Then I would:
-Center blank using hole (to tailstock end) and turn the handle on that axis, and turn down the ferrule seat until Ferrule will slip on with a nice snug fit (not too tight, but not loose either)
- Remove from lathe and apply finish of choice to handle,
-then I'd chuck handle in whatever suitable vise or holding fixture and seat ferrule in place FIRST ,
-mix your epoxy and drizzle in a bit (wrap rag around handle and tape to ferrule with masking tape so the over-run and squeezeout doesn't mess up your hard work) ,
- then drive in your handle, paying attention to any orientation (if your handle is designed to be one-way or ergonomic - I.E. a multi-axis) and you should be set once epoxy cures. (driving tool into handle, may require some kind of holding fixture to hold tool steel shank such as vice-grips or some such, so may wish to plan ahead for that too and have tools handy - especially if using 5-minute epoxy)
 
I can't recall having used the paper glue joint technique in a long grain / spindle orientation, but this technique would save you from having to sand away a fair amount of wood from your half round shims. My suggested lamination is:

1. shim stock
2. glue - PVA has been cost and functionally effective, for me
3. paper
4. glue
5. spacer stock the thickness of your tool
6. glue
7. paper
8. glue
9. shim stock

Clamp and let it dry over night, turn to desired diameter with the centers centered on the spacer stock, split the paper glue joints (I use a box cutter or sharp chisel), clean off any remaining paper with sandpaper or a scraper.

Good luck and I'd like to know the outcome and your opinion of the technique you choose.
 
Michael, the actual diameter needed to freely insert the tang would be the diagonal of the 5X9mm rectangle, or just over 10 mm. Often when we drill a hole for a square tang, we do as you describe and make an overly tight circle, allowing the corners to cut into the wood. This usually works fine. If you are going to use the filler dowel method, you might want to drill the full sized, freely inserted size hole.

As you probably know, one other method to make a hole for a rectangle of this size is to drill 2 holes of 5 mm next to each other. When making a mortise for a tenon, you would then chisel out the points of excess wood, though in this case, you might not have to.
 
I have a video up about making handles for square tanged tools, which for me is mostly scrapers. Make a 'sandwich' style handle. The center piece of the sandwich is the same thickness as the tang on your tool. Then the bread on either side can be what ever woods you want. I cut the tang hole out before glue up, and use the bandsaw to cut it out. Cut one side, then flip the piece over and make the same cut. This makes the cut centered in the blank. Adjust your fence out till you have the proper width for your tang. Most of the time, I don't need any glue to securely seat the handle.

robo hippy
 
A tip I was given is to make sure you drill the hole for the tang a slight bit longer than the tang. This allows the epoxy to ooze into the hole as opposed to moving out.
 
Is there a better /simpler way?
Your plan is elegant and effective simple it is not

i keep it simple
I rarely glue my handles on unless the tool gets loose then a few drops of thick CA will keep it in place.
for tanged tools i drill a hole the diameter of the tang about a 1/2” from the tool.
put The Ferrell on with a drop of thick CA. Then I put the tool in and bang the handle on a hard surface.
this usually seats the tool sufficiently to stay in place the life of the tool.

When seating the corners cut into the wood.
soft woods like walnut or sapeli conform to the tang nicely. Purple Heart will too but the tang won’t seat as deeply.


i turn handles between centers with the spur drive at the end. I often seat the tool with the spur waste on the cut it off with the bandsaw.
i don’t put finish on handles And usually don’t sand them
 
Last edited:
Such tool handles like this I fit the tool permanently into the wooden handle with an epoxy two pack glue like Araldyte, in this case the hole would be 9mm. I would only change this method if the tang was too short, it also suits some of my earlier DIY scrapers.
 
Another approach - router or chisel- 2 “halves” for the handle, rectangle in shape. Cut out for 1/2 the tang width each side, full length on both. Wood glue or epoxy the halves together. Turn the handle - I always cut for and attach ferrule 1st, then shape the handle, finish, mount the tool.

Depending on mounting method - epoxy or heat and hammer - the hole size varies as others described.
 
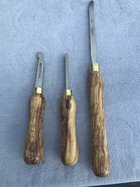
Results! A mix of all your suggestions. The tang on the box scraper tapered to a point so I drilled a square spindle blank, turned and fitted the ferrule (CA) then shaped the handle. I was a bit mean with the hole diameter (6mm full depth then 8mm half depth). But it seems firm. Held the blade and banged the handle on a firm surface. For the thread chasers I slotted a similar shorter blank on the bandsaw and made fillets the same thickness as the tang. Glued the fillets in ( the edges protruded but were turned off later) leaving a slot for the tang. Turned for the ferrule and glued it on. Turned to shape then glued the tang in the slot. A regular 60* live centre fitted the slot but I used a 4 jaw chuck on the butt end and gentle shaping cuts. Beech with 6-7 coats of finishing oil 2C1B2427-EDD6-457A-B427-3F96D5A5CC58.jpeg2C1B2427-EDD6-457A-B427-3F96D5A5CC58.jpeg
 
I have a video up about making handles for square tanged tools, which for me is mostly scrapers. Make a 'sandwich' style handle. The center piece of the sandwich is the same thickness as the tang on your tool. Then the bread on either side can be what ever woods you want. I cut the tang hole out before glue up, and use the bandsaw to cut it out. Cut one side, then flip the piece over and make the same cut. This makes the cut centered in the blank. Adjust your fence out till you have the proper width for your tang. Most of the time, I don't need any glue to securely seat the handle.

robo hippy
I’d love to watch this. Do you have a link handy?
 
Back
Top