My Trend Airshield was not in use for about three years. I bought it in mint condition but the battery was completely discharged. I decided to treat the battery as a new one since it was fully discharged so the first charge with the wall wart stock charger was about 12 hours. That was followed by running the airshield until the battery was almost discharged. So I charged it a second time for about 10 hours. I did the airshield rundown and battery recharge four times until I was confident the battery was stable. The problem with the stock wall wart charger is you never know when the battery is fully charged as there is no indication from the charger. I understand that is one reason why over charging with the stock charger can and has in some cases killed off a battery. What I found was although apparently fully charged the battery strength was weak. Air flow was OK but not as strong as it should be. The little flow tester with the tiny red ball that comes with new Airshield's would not move at all. Thus, there must be a better way to deal with charging Airshield batteries properly. Off to this forum I went, or perhaps sawmillcreek.com, I'm not sure but I believe it was here at AAW. The forum discussion is where I learned about a custom built battery charger. Pictures showed a "cradle" someone built and the after market charger that was used. The charger is available from Amazon https://www.amazon.com/gp/product/B001B8C2QA/ref=ppx_od_dt_b_asin_title_s00? ie=UTF8&psc=1.
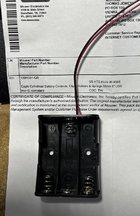
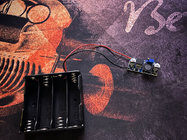
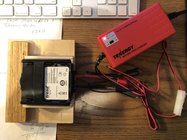
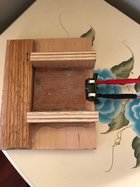
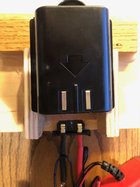
I decided to give it a go and after two failures I came up with what you see in my picture. I cannibalized a part from a Panasonic wireless phone no longer in use. The part has two terminals that are from spring steel and therefore "springie". They align perfectly with the terminals on the airshield battery. I show a picture of the terminals of the battery and the terminals in my cradle. They don't align in the picture but very much do so when the battery is turned upside down and placed in the cradle. I had to grind away some of the plastic housing with my dremel so it would fit flat as you see it in the picture. It conveniently has two screw holes on the back of the part that I used to attach it to my wood. Then I soldered leads from each terminal on the backside of the part with leads long enough to be available to the charger connectors. See pictures. I'm still in shock about the results and improved charging. It took less than two hours to a full charge and you know it is a full charge because the red charger light changes to green. The charger reduces charging output to a trickle charge, when the light turns to green, until you remove the battery from the charging cradle. The charger instructions state that one should use the 0.9a (left position) for charging the airshield stock battery. I did .. perfect results.
My custom cradle is crude but the charging it produces is fantastic. More fan power, no beeping caused by a weak battery because it is no longer weak and the little red ball in the air pressure testing device goes all the way to the top. What I don't know is how long the battery will provide good airflow in the Trend Air Shield. I'll test it to determine if it meets the manufacturers spec of 10 straight hours.
I was thinking about selling my Trend Air Shield when I first pulled it out of storage. Now I am reconsidering because of the amazing performance increase with my new charging cradle. I hope this post is helpful if you decide doing the same thing. And don't overlook the fact that should you buy other OEM batteries for your Trend Air Shield, this charging cradle will replace the OEM wall wart charger that in my opinion is almost useless.
I basically copied the “cradle” and charger combination from instructions and images of the other member who posted on the subject. I certainly don’t claim that mine is original, it wasn’t my idea but I happily plagiarized it. The one difference is the terminal part I used that was removed from a Panasonic wireless handset. If anyone plans to build this charger you have two working choices. Have fun.
Attachments
Last edited: