• We just finished moving the forums to a new hosting server. It looks like everything is functioning correctly but if you find a problem please report it in the Forum Technical Support Forum (click here) or email us at forum_moderator AT aawforum.org. Thanks!
  • Beware of Counterfeit Woodturning Tools (click here for details)
  • Johnathan Silwones is starting a new AAW chapter, Southern Alleghenies Woodturners, in Johnstown, PA. (click here for details)
  • Congratulations to Dave Roberts for "2 Hats" being selected as Turning of the Week for April 22, 2024 (click here for details)
  • Welcome new registering member. Your username must be your real First and Last name (for example: John Doe). "Screen names" and "handles" are not allowed and your registration will be deleted if you don't use your real name. Also, do not use all caps nor all lower case.

Turning 108 balusters for our new deck

Joined
May 22, 2017
Messages
100
Likes
130
Location
Lancaster, PA
This spring I tackled designing and turning 108 balusters for our new deck. This is no big deal to you professional turners, but for an amateur like me it was a big challenge, and it turned out to be a lot of fun too. Here's a short video I made late in the process. The deck is still being built, so I don't yet have any installation photos.
During the work I got two very helpful technical tips. First, from Mike Darlow: to beat vibration, instead of a steady rest, just grab the head end of the workpiece in a scroll chuck, rather than on a spur center - it worked! And from the guys in our club, rig up a full-length tool rest rather than moving the banjo several times - that worked too! The first one took 25 minutes to turn, by the end they were coming off the lathe every 10 minutes, and my skills had ticked up a lot. Take a look, see what you think -
View: https://youtu.be/vTwmeZ0JlgA
 
Last edited:
Joined
Nov 13, 2019
Messages
117
Likes
105
Location
IL.
Nice post John and nice work. I think it's great when members have the time and resources to post interesting and educational videos and examples of real life experiences on misc. woodturning topics. Helps anyone interested in learning and advancing their skills. THANKS for sharing.
 

Randy Anderson

Beta Tester
Beta Tester
Joined
May 25, 2019
Messages
840
Likes
1,259
Location
Eads, TN
Website
www.etsy.com
Good video and admire your courage to take on this many of the same item. I do very little spindle work and am terrible with a skew so a bit of encouragement here to give it another go.
 

Roger Wiegand

Beta Tester
Joined
Nov 27, 2018
Messages
793
Likes
930
Location
Wayland, MA
Website
www.carouselorgan.com
Great video! Thank you.

A key piece of advice I got early on for turning multiples was "they don't need to be the same, they only need to look the same". Saved me a ton of fretting and fussing over the years. Your method of establishing the key landmarks and then filling in the curves captures that nicely.
 

hockenbery

Forum MVP
Beta Tester
TOTW Team
Joined
Apr 27, 2004
Messages
8,638
Likes
4,977
Location
Lakeland, Florida
Website
www.hockenberywoodturning.com
Great video! Thank you.

A key piece of advice I got early on for turning multiples was "they don't need to be the same, they only need to look the same". Saved me a ton of fretting and fussing over the years. Your method of establishing the key landmarks and then filling in the curves captures that nicely.
I agree with one exception The heights of the elements need to be the same.
diameters and curves need to be close - look the same

a vee groove an 1/8” off will stand out in a line of posts.

a story board makes it easy to match element heights
also copy one post for the production run.
 
Joined
Sep 24, 2009
Messages
98
Likes
56
Location
Astoria, Oregon
Nice informative video...with one exception. Wearing long sleeves that close to the spinning spindle is inviting disaster if you're not paying attention just for a moment.
 
Joined
Jul 19, 2018
Messages
1,713
Likes
2,246
Location
Ponsford, MN
SpindleTurningInProgress-1.jpg
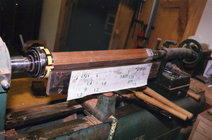
These 100 balusters were turned out of old growth red wood recycled from beer barrel 18' staves in about 2001. The details of the design were drawn with AutoCad then attached to the custom tool rest with double faced tape so all of the details could be quickly transferred or referred to. The chuck and the live center were fitted with non marring square adapters so there was never any need to premark any thing on the blank.
 
Joined
Nov 24, 2010
Messages
420
Likes
319
Location
Lexington, KY
[...] A key piece of advice I got early on for turning multiples was "they don't need to be the same, they only need to look the same". Saved me a ton of fretting and fussing over the years. Your method of establishing the key landmarks and then filling in the curves captures that nicely.

I agree with one exception The heights of the elements need to be the same.
diameters and curves need to be close - look the same
a vee groove an 1/8” off will stand out in a line of posts.
On teh whole -- "they don't need to be the same, they only need to look the same". Depending on the project, the key variables which require close similarity may differ. If the spindles are closely ranked parallel to one another -- such as with balusters on a porch -- matching of heights of elements is crucial, while curves ought to be similar. If, however, the spindles are further apart and/or at angles one to another -- such as in a chair -- "they don't need to be the same, they only need to look the same" applies. I do a lot of spindlework creating lattices in which similar spindles may be meet at a variety of angles one to another -- most often at 60*, but also 90* or 45* angles among others. In such cases, the alignment of angles can be as important as details of profiles, if not more so. Not every dimension/detail is equally crucial in any given project. Figure out which are the most important variables for the particular project, and concentrate replicating those accurately; the rest can be similar.
 
Joined
Jul 26, 2016
Messages
2,326
Likes
1,105
Location
Nebraska
I have worked on a number of balusters over the years in our town that has a large number of houses on the historical register, when they do renovations on these houses they usually want to maintain as much of the original character of the house. I usually do these in multiple steps marking the various transitions along the baluster with a pencil making duplicate cuts and measurements with a set of calipers as you progress through the stack of billets cut to length. Having a story board or a finished sample behind the work piece you can usually get pretty close by eye after you turn a quantity of them.
 
Joined
Feb 8, 2014
Messages
1,178
Likes
613
Location
Evanston, IL USA
Well done Mr. Kelsey.
On center finding:
When I was a spindle turner and making duplicates for the historic homes in our area I had numerous jigs for locating the centers of blanks, depending on the stock size. Each jig was essentially 3 small pieces of 3/4" plywood attached to each other to form a corner with the bottom piece made large enough to accommodate a clamp. For example, if I had a job requiring 2"X2" spindle stock, the back wall of the corner would be 2"X2", the side wall of the corner would be 2"X6", and the bottom piece would be 3"X6". The center of the 2"X2" back wall had a sharp screw point that protruded just enough to make the required dimple. I clamped the jig to the bench top with a stop block behind it and the slid each end the spindle smartly against the protruding screw. I made a new jig every time I got a sizable job that required a new size that I didn't have yet and had about a dozen jigs hanging around.
I hope my description made sense. The jigs have all been chucked in the bin since I got out of that line of turning, otherwise I would post a photo.
 
Back
Top