• July 2025 Turning Challenge: Turn a Multi-axis Weed Pot! (click here for details)
  • Congratulations to Kent Reisdorph for "Sugarberry Bowl" being selected as Turning of the Week for July 14, 2025 (click here for details)
  • Welcome new registering member. Your username must be your real First and Last name (for example: John Doe). "Screen names" and "handles" are not allowed and your registration will be deleted if you don't use your real name. Also, do not use all caps nor all lower case.

Turning a Travel Mug

Joined
Dec 14, 2018
Messages
17
Likes
11
Location
Murillo, Ontario
I sure hope someone out there can help me.....
I've been trying to make a travel mug from wood, having purchased the stainless steel insert and downloaded plans from Woodcraft. I've laminated oak and red heart to create a block 5" X 8" and turned it round on the lathe, creating a tenon on one end to hold my piece into the chuck.
My problem? Whenever I try to hollow out the 5-1/8" from the inside of the vessel, the chuck jaws do not hold the piece and it flies off. I have an exterior holding device but it's jaws are maximum of 3" (I used it to turn canes in a previous life) and the project that I'm working with now is 3-1/2"
How can I hold this piece properly on the lathe so that it spins true and doesn't fly off? I'm exasperated....
BTW, my experience on a lathe is minimal, I work at a Senior Centre with their lathe and chucks, but I do use my own chisels, preferring my Robert Sorby tools to those in our shop. I'm not against being another device to assist holding my project at the tailstock area while I hollow it out.
Suggestions? Ideas? Videos?
Thanks.
 
You might think of using a waste block glued to the base and make use of your faceplate if all else fails. Otherwise you might not be making the tenon properly. Does your chuck have straight or dovetail jaws? Does the tenon seat flush on top of the jaws. Im sure theres other details to consider but this comes up first.
 
Arthur,

Is the tenon on the base of your mug longer than the depth of the chuck jaws? This seems counterintuitive for the beginning turner but you want a tenon that is shorter than the height of your chuck jaws. If the tenon is too long an average tool catch will leverage the work piece from the chuck jaws as the tenon is bottomed out against the bottom of the chuck and this becomes a fulcrum point. You also want the tenon to be as close as possible to the diameter of the chuck jaws when it is in the closed position. If the tenon is larger in diameter the chuck jaws have a hard time gripping the tenon equally all the way around the circumference of the tenon as the jaws only contact the tenon firmly on 8-points compared to 360 degrees of contact. A large diameter drill bit can be used to hollow the mug without getting tool catches and then you can following up using lathe tools to smooth the interior of the mug.
 
That is big piece of wood for your first endgrain hollowing.

a tenon shaped to fit the jaws of your chuck will provide an excellent hold on endgrain.
The tops of the jaws should rest on a flat. The tenon should be a little shorter than the height of the jaws.

After mounting in the chuck, I would drill a depth hole 3/8 diameter of larger that matches the inserts depth.

the endgrain is easily hollowed by cutting from the center to the sidewall with a gouge or a hollowing tool. Each cut should take no more than 1/4” cut. Stop the cut at the correct diameter for the opening.
The sides don’t need to be clean since the insert will cover it.
 
That's huge travel mug! Ever heard of a steady rest? What chuck and what kind of jaws? Dovetail jaws hold quite well. The tenon needs to be very cleanly cut and the shoulder come to a very sharp intersection with the tenon. What kind of hollowing tool are you using?
 
You might think of using a waste block glued to the base and make use of your faceplate if all else fails. Otherwise you might not be making the tenon properly. Does your chuck have straight or dovetail jaws? Does the tenon seat flush on top of the jaws. Im sure theres other details to consider but this comes up first.

Hi Gary - thanks for the response. I started with a waste block to turn my project to about 3-1/2", then created the tenon on the tailstock end. I then removed the waste block, turned the project around so that the tenon is within the jaws of the dovetail chuck, and then began hollowing out the other end, but with nothing to hold the tail stock so the project flies off. The tenon appears to be flush against the chuck, but the weight at the other end appears to be the biggest problem
 
Arthur,

Is the tenon on the base of your mug longer than the depth of the chuck jaws? This seems counterintuitive for the beginning turner but you want a tenon that is shorter than the height of your chuck jaws. If the tenon is too long an average tool catch will leverage the work piece from the chuck jaws as the tenon is bottomed out against the bottom of the chuck and this becomes a fulcrum point. You also want the tenon to be as close as possible to the diameter of the chuck jaws when it is in the closed position. If the tenon is larger in diameter the chuck jaws have a hard time gripping the tenon equally all the way around the circumference of the tenon as the jaws only contact the tenon firmly on 8-points compared to 360 degrees of contact. A large diameter drill bit can be used to hollow the mug without getting tool catches and then you can following up using lathe tools to smooth the interior of the mug.

Hi Mike - appreciate your assistance to my problem.
Yes, my tenon is about 3/4" long while the jaws are about 1/2". I make the tenon a little longer so that I have room to part it off when necessary. I do make my tenons larger than the minimum of chuck jaws but perhaps the next one will be made smaller and I can determine if there is a difference.
I tried using a 2-18" forstner bit to initially start the hollowing procedure, but it doesn't really make a difference - once I start hollowing with my Sorby Turnmaster bit, watch it cuz it's going to fly off!!
 
The tenon on the end of your work piece needs to be shorter than the depth of your chuck jaws or it will quickly come out of the jaws if it is not supported on the tailstock end. Shorten the tenon and most of your issues will be eliminated.
 
The tenon on the end of your work piece needs to be shorter than the depth of your chuck jaws or it will quickly come out of the jaws if it is not supported on the tailstock end. Shorten the tenon and most of your issues will be eliminated.


Thanks, Mike - I will try that!! Seems like a too-easy solution, though!! :>))
 
Arthur,

You can have an extended tenon to allow working around the mount, all you need to do is cut a step in the last 1/4 or 3/8 of inch on the bottom of your extended tenon so it does not bottom out against the jaws. Another technique is to use a sharp parting tool to push into the top of your mug and define the wall thickness going down into the wood billet. As the parting tool cuts into the wood the pressure of the tool is pushing straight into the chuck jaws reducing the chance of a catch. A good sharp Forstner bit will also put an equally applied force against the chuck jaws preventing the potential catch. Using a drill chuck mounted in the tailstock makes quick work of small hollow vessels like mugs, pepper grinders, boxes etc. After using the Forstner bit you can clean up the interior surface with sharp lathe tools using a shearing cut. A small diameter hollow vessel with tall walls presents more obstacles than a large diameter bowl which requires different tools and techniques to complete the turning. There are a number of YouTube videos that cover box making on the lathe, most of the tools and techniques will fit the bill for turning a mug.
 
I think what I need to figure out is how to use that Jacob's chuck, forstner bit and my bit extension to do a lot of the hollowing, then finish it off with my Sorby tools. I will see what happens in the next couple of days and post my results!
 
Arthur,

A Forstner bit can heat up quickly when turning at too high of speed, when I turned on a lathe that could not slow down far enough for the size of Forstner bit being used I had to re-sharpen the cutting edge more often depending on the type of wood being turned. Hard woods can start to burn quickly with a larger diameter Forstner bit turning at a higher speed this will dull the cutting edge quickly. There are several YouTube videos that describe the proper method in re-sharpening the cutting edge on a dull Forstner bit, do it wrong and you will mess up the cutting profile. Pretty easy once you have done It a few times I use a Dremel tool with a flat grinding wheel to touch up the cutting edge on the dull bits I use.
 
That is big piece of wood for your first endgrain hollowing.

a tenon shaped to fit the jaws of your chuck will provide an excellent hold on endgrain.
The tops of the jaws should rest on a flat. The tenon should be a little shorter than the height of the jaws.

After mounting in the chuck, I would drill a depth hole 3/8 diameter of larger that matches the inserts depth.

the endgrain is easily hollowed by cutting from the center to the sidewall with a gouge or a hollowing tool. Each cut should take no more than 1/4” cut. Stop the cut at the correct diameter for the opening.
The sides don’t need to be clean since the insert will cover it.

Thanks for the response, but I guess it's a bit too technical for this rookie!
 
Arthur,

A Forstner bit can heat up quickly when turning at too high of speed, when I turned on a lathe that could not slow down far enough for the size of Forstner bit being used I had to re-sharpen the cutting edge more often depending on the type of wood being turned. Hard woods can start to burn quickly with a larger diameter Forstner bit turning at a higher speed this will dull the cutting edge quickly. There are several YouTube videos that describe the proper method in re-sharpening the cutting edge on a dull Forstner bit, do it wrong and you will mess up the cutting profile. Pretty easy once you have done It a few times I use a Dremel tool with a flat grinding wheel to touch up the cutting edge on the dull bits I use.

Well, here's what happened today - first, I tried the Forstner bit in the Jacobs chuck on the lathe - it worked ok and I drilled a hole with a 2" bit about 1-1/2" deep. I tried to use and extension and drill deeper, but the bit kept coming loose from the extension - those two Allen screws didn't want to hold it. I then tried the bit in the drill press, but the same thing happened - the Allen screws didn't hold the bit to the extension.
Next, as suggested, I made my tenon smaller - not quite as small as suggested but probably from 3-1/2" where it was to 2" now, and then I continued to try to hollow it out. And it doesn't fly off anymore!! I'm pleased with that, but it's a long process to hollow out from 1-1/2" to where I need to be at 5-1/4"! I'm going to ask for help at my Senior Center tomorrow to see if I can resolve the issue of the bit extension not holding the Forstner bit. Otherwise, I will hollow out, scrape, hollow some more, scrape some more....and get a stiff neck peering into the hole!
Thanks, everyone for your help!!
 
Arthur, drilling a 2-inch hole into end grain with a Forstner bit involves a lot of torque and the slippage you experienced is common. One way around this is to do the job in several stages starting with a much smaller bit and then one or more intermediately sized bits before finishing with the largest. Before doing this, however, I first make shallow cuts with the same bits working from largest to smallest. These need only be quarter inch deep or so and provide registration for starting each new larger bit in the main hollowing process.
 
Dennis is spot on with using several sized bits to drill out end grain openings on hard wood, I had to use that process on some hickory wood tools I made several years ago. You can use some regular wood auger bits to hog out the wood in the center cuts if they work better just don't drill too deep or you will go through the bottom of your mug.
 
Dennis is spot on with using several sized bits to drill out end grain openings on hard wood, I had to use that process on some hickory wood tools I made several years ago. You can use some regular wood auger bits to hog out the wood in the center cuts if they work better just don't drill too deep or you will go through the bottom of your mug.

Thanks again, guys. So, today's plan will be to start drilling with a 3/4" bit and extension, then 1", 1-1/4", 1-1/2", 1-3/4" and finally 21/8". I'm not sure if all of these steps are required but in any case it will be good practice for me!
 
All good suggestions, remember for deep holes, clear the swarf (dust, shavings) often as they can get behind the head of the bit, fill up the hole and lock the bit into the blank. Found this out on my first pepper mill blank.
 
Arthur,

Make sure you make a starting cut with the larger bits in the wood blank first or you wont have any wood to keep the drill bits centered later on. A short depth cut with each size of drill bit provides a reference to start the drill bit later on and keep it running straight. The center point on a drill bit helps it go in the correct direction without any wood in the center a bit can tend to wonder off in the direction of the softer wood.
 
Arthur, all of these hints are right on, but I would suggest that you go to AAW web site and search for a chapter near you. Going to a meeting will introduce you to many helpful turners. You might find a member that could work with you as a mentor. Many clubs also have beginning turner classes that could be helpful.
 
Arthur, all of these hints are right on, but I would suggest that you go to AAW web site and search for a chapter near you. Going to a meeting will introduce you to many helpful turners. You might find a member that could work with you as a mentor. Many clubs also have beginning turner classes that could be helpful.


All helpful ideas, guys, but it appears that the hint that worked the best was to reduce the size of my tendon close to be the minimum size of the chuck. Since I did that, I had zero fly-offs! So I presume that to be the top hint, but certainly all ideas were great, and I thank y'all for your help because I was clearly frustrated and about to give up on this project, despite the fact that I have bought 6 inserts!
Mike, I would love to visit/belong to an AAW Chapter nearby. Unfortunately I am in northern Ontario, Canada, and my nearest AAW Chapter is in Minneapolis, MN, 350 miles away. The closest Canadian Chapter is in Saskatoon, Saskatchewan, almost 700 miles away and on snowy highways!!
Yesterday I began the steps with Forstner bits, starting with 3/4" which worked well. Stepped up to 1" but I think this bit was well-worn and it didn't get a bite, despite efforts to sharpen it. Stepped up to 1-1/4" and it did fine also. When I tried the 1-1/2" I had to hold my project in the vise for the drill press and then bolt the vise onto the drill press table. But it worked and I then had a boring of 1-1/2" by 5-1/4" deep. WOW!!
Back to the lathe with my Turnmaster cutters and almost have the inside completed, but my neck got too sore peering into the cavity to see how it was coming!! Home for an Advil and hopefully it will be completed today, although we don't have a finishing area at the Senior Center so I need to bring it home and finish it here in my craft room. When done, I shall post a picture or two!
Couldn't have done it without your help and for that I am grateful!
 
I have one other hint to offer when using Forstner bits to hollow end grain pieces using a single bit or a series of bits of increasing sizes. Unless you are drilling a through-hole, when you get done, you are left with a more or less flat bottom with a tiny hole in the middle caused by the spurs of the bits. If your project requires a smooth bottom, you then have to cut deeper using some other method to eliminate the spur hole and smooth the bottom. Depending on the available tools and your skill, it may be difficult to start the bottom cut without a starting hole in the center, and the spur hole usually will be too small to qualify as a starting hole.

My hint is to invest in a “sacrificial” Forstner bit the same size as one of the bits to be used in the hollowing process and grind off the spur. For economy’s sake, it can be of smallish size but big enough to produce a satisfactory starting hole. Then, follow the smallest-bit to largest-bit hollowing procedure that I described in my previous post above, drilling in until the points of the respective spurs almost reach the desired bottom of the piece. Bits with spurs are used for this. After drilling with a normal bit the same size as the “sacrificial” bit, use the latter to extend the hole to the desired bottom of the piece. My personal "sacrificial" bit is a 5/8-inch bit.
 
A new set of good quality Forstner bits will make life a lot easier when working on deep hollow vessels.
You picked a difficult project which can be frustrating for any woodturner if they end up with a stubborn wood blank and the tools that dont cooperate. You learned a lot during this project hopefully your next project is more enjoyable.


So true, Mike, but it appeared so easy in the AAW magazine that I bought 4 inserts to assist with shipping costs! And carbide-tipped Forstner bits 1", 1-1/2" and 2-1/8" (or similar) have been added to my Christmas Wish List!
Not much gonna get done today......big dump of snow in my yard overnight, schools closed, Senior Center closed....good day to relax my neck muscles!!
 
All helpful ideas, guys, but it appears that the hint that worked the best was to reduce the size of my tendon close to be the minimum size of the chuck. Since I did that, I had zero fly-offs! So I presume that to be the top hint, but certainly all ideas were great, and I thank y'all for your help because I was clearly frustrated and about to give up on this project, despite the fact that I have bought 6 inserts!
Mike, I would love to visit/belong to an AAW Chapter nearby. Unfortunately I am in northern Ontario, Canada, and my nearest AAW Chapter is in Minneapolis, MN, 350 miles away. The closest Canadian Chapter is in Saskatoon, Saskatchewan, almost 700 miles away and on snowy highways!!
Yesterday I began the steps with Forstner bits, starting with 3/4" which worked well. Stepped up to 1" but I think this bit was well-worn and it didn't get a bite, despite efforts to sharpen it. Stepped up to 1-1/4" and it did fine also. When I tried the 1-1/2" I had to hold my project in the vise for the drill press and then bolt the vise onto the drill press table. But it worked and I then had a boring of 1-1/2" by 5-1/4" deep. WOW!!
Back to the lathe with my Turnmaster cutters and almost have the inside completed, but my neck got too sore peering into the cavity to see how it was coming!! Home for an Advil and hopefully it will be completed today, although we don't have a finishing area at the Senior Center so I need to bring it home and finish it here in my craft room. When done, I shall post a picture or two!
Couldn't have done it without your help and for that I am grateful!
Duluth/Superior has an AAW affiliated club that would surely cut the travel time in half
 
Instead of spending all those bucks on expensive carbide take a look at Colt Maxicut bits. The do not clog if speed is in the 4 to 500 range because they create chips instead of ribbons. Also helpful is to blow air into the hole as you make the cut to clear chips and cool the bit. By doing this you will reduce the necessity of clearing the hole by removing the bit.
 
Instead of spending all those bucks on expensive carbide take a look at Colt Maxicut bits. The do not clog if speed is in the 4 to 500 range because they create chips instead of ribbons. Also helpful is to blow air into the hole as you make the cut to clear chips and cool the bit. By doing this you will reduce the necessity of clearing the hole by removing the bit.

I would like to add an additional comment about the Colt Maxicut Forstner bits ... they have what they call a RotaStop precision coupling so that their extension shaft will maintain precision alignment and unlike set screws there is no chance of slipping or coming loose.

When using a Forstner bit keep the speed low, use only light pressure, back the bit out frequently, and blow out the chips. If the bit gets hot then it indicates that it is dull or you are applying too much pressure. If the bit turns blue that means that it is toast ... so don't let that happen. Sharpen the bits as soon as they show signs of not cutting well.

I would never use a 2" Forstner bit because of the huge torque. I also have severe heartburn about the idea of drilling with progressively larger Forstner bits because of the lack of a center reference point. I think that it would be much easier if you drilled a smaller hole. You could use a one inch twist drill instead of a Forstner bit then use a spindle gouge or a small diameter carbide cutter such as the type made by Hunter.

I would recommend getting the help of another woodturner. You can go to the following link to search for other woodturners in your area. Enter Canada for country and Ontario for location and "P0" the first two digits of your postal code. I found a total of five AAW members. I don't know how close they might be, but hopefully there's somebody within reasonable distance.

https://www.woodturner.org/search/custom.asp?id=1517

As others have said the tenon absolutely must be shorter than the jaw height and a crisp corner to sit on top of the jaws is essential. Never part off the tenon at the chuck ... instead reverse the piece using a jam chuck to drive the turning and use tailstock support to hold the tenon. Then you can finish turning the bottom of the mug.
 
Just an additional note on large diameter forstner bits the torque applied to the morse taper will be more than it can stand and it will spin and ruin it self and the tailstock. If you still want to use the large bits position the tool rest off the end of the blank and clamp a large vise grip on the shank of the the bit such that it will ride along the tool rest.
 
On
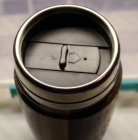
Well, it's not perfect but I'm certainly pleased with it!!!
Cost of materials about $23
Cost of labor about $300
Cost of materials, labor and frustration? About $1,200!

looking pretty good

The first one is always the hardest - You need to make 4 more

One of the tips for new turners is to make 5-10 of the same object.
The first one takes the longest and is often not nearly as good looking as the 3rd or 4th
In the first one you are learning: how to hold it in the lathe, What not to do, what tools to use, what areas to turn first and so on....
When you get to the 3rd and 4th you are mostly concerned with form and surface.

One of the best things I did was to make 20 hollow ball Christmas ornaments around 1992 after reading an article by bob Rosand in Wood Magazine - didn’t even know what AAW was then.
I got pretty good at them after the 3rd or 4th. But the most amazing thing happened - my Bowls started looking better - shaping the balls improved my tool control, eye for curves, and my body movement to turn curves.
 
Last edited:
Grinding a flat on the shaft of the Forstner bit (for the set screws to register against) couldn't hurt either.
I like that idea but remember that I'm working at a Senior Center with their lathe, drill press, etc, but with my own turning tools. I have flattened a small place on my own bit extension to help hold the small screws - helps a bit but not a whole lot....good idea, though...
 
On


looking pretty good

The first one is always the hardest - You need to make 4 more

One of the tips for new turners is to make 5-10 of the same object.
The first one takes the longest and is often not nearly as good looking as the 3rd or 4th
In the first one you are learning: how to hold it in the lathe, What not to do, what tools to use, what areas to turn first and so on....
When you get to the 3rd and 4th you are mostly concerned with form and surface.

One of the best things I did was to make 20 hollow ball Christmas ornaments around 1992 after reading an article by bob Rosand in Wood Magazine - didn’t even know what AAW was then.
I got pretty good at them after the 3rd or 4th. But the most amazing thing happened - my Bowls started looking better - shaping the balls improved my tool control, eye for curves, and my body movement to turn curves.

I think I'm gonna look for Christmas ornaments/decorations to do next and give myself a break from travel mugs for a week or so.....I did do a glue-up this morning for my next one, but it will take a bit of cutting and gluing before being lathe-ready...now to search AAW for Christmas ideas...:>))
 
now to search AAW for Christmas ideas...:

If you are an AAW member the November 2019 Fundamentals has a number of ornament articles.

@john lucas has one article on ornament that don’t need hollowing.

I have done a few of those in the Larry Hassiak article. Larry is in our local club.
These are split turnings hollowed with a gouge.


I’ve done hundreds similar to the ones in the Michael Gibson article. Here are a few


Box elder ball paduk finial
F00D625A-518F-4A06-8DD7-1B48BF3D7D24.jpeg
Holly ball ink design by a Sherry Painted maple finial 4A96C380-F4AB-413F-835C-44E1A26FBB53.jpeg


Holly ball ink design by sherry painted maple finials E6426315-675A-4E24-8044-8FBA2D467C85.jpeg
 
Last edited:
Back
Top