• Beware of Counterfeit Woodturning Tools (click here for details)
  • Johnathan Silwones is starting a new AAW chapter, Southern Alleghenies Woodturners, in Johnstown, PA. (click here for details)
  • Congratulations to Paul May for "Checkerboard (ver 3.0)" being selected as Turning of the Week for March 25, 2024 (click here for details)
  • Welcome new registering member. Your username must be your real First and Last name (for example: John Doe). "Screen names" and "handles" are not allowed and your registration will be deleted if you don't use your real name. Also, do not use all caps nor all lower case.

Using Laser Engravers to Embellish Turnings

Joined
May 5, 2017
Messages
26
Likes
14
Location
Richmond, BC, Canada
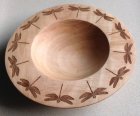
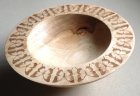
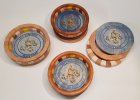
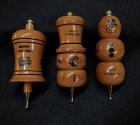
For the past couple of years I've been using my laser engraver to do my signatures and engrave Beads Of Courage logos on other turners BOC boxes. Lately I've been experimenting with using the laser to embellish rims of bowls and platters either alone or in conjunction with other colouring and/or embellishing techniques. My last few experiments have been to use the 3D mode of the laser to create textures for engraving onto work pieces. The big challenges are precise positioning of the engravings and dealing with curved surfaces.

Is anyone else using a CO2 laser to embellish their turnings and care to start a discussion on techniques or successful/failed experiments?
 
Last edited:

RichColvin

Super Moderator
Staff member
OTI Member
Joined
Mar 13, 2016
Messages
667
Likes
497
Location
Marysville, OH
Website
www.colvintools.com
Steve,

Please post what equipment you use.

Kind regards,
Rich
 
Joined
May 5, 2017
Messages
26
Likes
14
Location
Richmond, BC, Canada
Hi Rich,

I have an older 30W Epilog Helix with an 18" x 24" bed. I also have the rotary adapter that replaces the y-axis with a rotary axis for doing cylindrical work. I have both 2" and 4" lenses but mostly use the 4" to increase depth of field when engraving slightly curved surfaces. It also allows me to focus further away so that the workpiece doesn't foul the lens carriage when engraving into recessed workpieces such as inside bowls or platters.

At work I have unlimited access to an 80W Trotec Speedy 400 with a 2" lens and 2' x 3' bed but no rotary. Part of my job is to provide laser engraver training to the design students who use the laser.

I also have a part time side gig installing, training and servicing Epilog lasers for the local Epilog distributor.
 
Joined
Aug 14, 2009
Messages
2,030
Likes
1,119
Location
Peoria, Illinois
I had an old ULS laser, but has since crapped out. When I did bowl rims, I would measure the outside diameter of the bowl, then engrave a circle on a piece of plywood on the bed. Then with a small square, I would align the bowl rim to the engraved circle on the plywood.
 

Attachments

  • IMG_0392.jpg
    IMG_0392.jpg
    424.9 KB · Views: 87
  • IMG_0395.jpg
    IMG_0395.jpg
    372.6 KB · Views: 84
Joined
May 5, 2017
Messages
26
Likes
14
Location
Richmond, BC, Canada
I used a couple of ULS's at my previous job. They were not treated very nicely but seemed to stand up to the abuse regardless.

When I do bowl rims I engrave before hollowing in case I mess up and need to turn it off and try again. Before engraving I put a very small dimple in the centre of the turning to use as a target for the laser's pointer. When engraving, I set the laser's home position to the centre dimple and tell the engraver to center my artwork at the home position. I can usually get it centered within a half to quarter millimeter which is pretty good considering the size of the dot on the laser's pointer. After engraving the turning goes back onto the lathe for the rest of the turning. The workpiece never leaves the chuck.

I'm just about to engrave another platter rim tomorrow using that technique but I'm going to engrave a deep .5mm dot in the centre of the turning to use as a target for the live centre when it goes back on the lathe to see if I can get a better match between the artwork and platter edge by either more accurate remounting or re-turning the edge relative to the engraved artwork centre. I'll post before and after engraving photos.

Engraved Platter 01.jpg
 
Last edited:
Joined
Jun 16, 2004
Messages
1,224
Likes
1,134
Location
Colorado Springs, CO
Some newer design laser engravers have a 3D auto-focus feature for curved surfaces, and a built in camera for registration and centering your design over the piece. I've been looking at a relatively low-cost one called Glowforge for a while but haven't pulled the trigger yet. The one big downside to this model's design is that the laser tube has to be replaced after a year or two of active use, and it can only be done at their Seattle factory.
 
Joined
Aug 14, 2009
Messages
2,030
Likes
1,119
Location
Peoria, Illinois
Some newer design laser engravers have a 3D auto-focus feature for curved surfaces, and a built in camera for registration and centering your design over the piece. I've been looking at a relatively low-cost one called Glowforge for a while but haven't pulled the trigger yet. The one big downside to this model's design is that the laser tube has to be replaced after a year or two of active use, and it can only be done at their Seattle factory.
The best thing about glow forge is their marketing. The rest is a very basic, slow machine. You can get full size lasers with real engraving speeds for not much more. https://www.automationtechnologiesinc.com/products-page/entry-level-machine/60wlaser-machine/
 
Joined
May 5, 2017
Messages
26
Likes
14
Location
Richmond, BC, Canada
Here are some photos of a platter engraving that I'm working on. It is turned from air dried London Plane that's been sitting around for at least 15 years. It's about 9.5 inches in diameter. The rim was airbrushed with several coats of dye followed by a few coats of poly and then waxed and buffed with clear shoe polish. Finishing first allows for any vapor stains from the engraving process to be easily cleaned off and also allows me to infill the engraving with ink and wipe off the excess ink.

The engraved texture is a pattern of 3D triangles using the laser's 3D engraving mode. 3D engraving delivers higher power to the darker shades of the artwork and less power to the lighter shaded areas.

The first photo is what the rim looked like prior to laser engraving. The bottom and centre of the platter have not been turned but a recess has been turned in the bowl area for re-chucking to turn the back prior to hollowing.

RP1.jpg

Photo 2 shows the engraving in process.

RP2.jpg

Photos 3 and 4 show the finished engraving. The engraving was done in 3 lower power passes in part to minimize vapor staining but also because I've learned from experiment that the texture is sharper and better defined than if it was done in one high powered pass. Note that there is minimal colour change in the engraving. Not all woods go dark when engraved.

RP3.jpg RP4.jpg

Photos 5 and 6 show the engraved area after infilling with black India ink. The pinstripes were especially fun but prefinishing helped a lot.

RP5.jpg RP6.jpg

I was fairly happy with the centering of the engraving. When I put it back on the lathe and spun it up to re-buff the finished area I noted that there was only about 1 quarter millimeter of runout on the engraved pinstripe. The engraving is not centered perfectly between the inner and outer edges of the rim but that will be corrected when I hollow the centre.
 
Joined
Dec 5, 2015
Messages
724
Likes
342
Location
Seattle, WA
For my CNC milling machine I have s 4 watt diode laser head. These heads complete with power supply, etc cost around $300. The laser head mounts to the mill on a homemade bracket almost like a regular cutterhead. The engraving speed is relatively slow compared to higher power dedicated laser engravers, it still does a very good job with high accuracy positioning of the laser beam. The machine has a rotary 4th axis so contoured surface engraving is possible.

Similar diode laser heads are offered as an option on the CNC routers sold by Rockler and Woodcraft.

I don't have specific laser programming software. The design is programmed as if it was a regular milling job on metal. Using a text editor's search/replace function to search for M8 (coolant on) that's replaced with an M code to turn the laser on using a spare relay in the CNC control. Likewise, M9 (coolant off) is replaced with code to turn the laser off. There's no option to vary laser power, that's done by varying the speed of the beam movement.

I'll find some examples on one of my other computers and post, this computer is fairly new so no laser'ing on it.
 
Joined
Dec 5, 2015
Messages
724
Likes
342
Location
Seattle, WA
Here's the only picture I could find of my laser work. The others are probably on my last computer.

This one appears to be on a flat piece, it could have been done on a 3D contoured surface though.

The coloring is done with fine tip acrylic pens. The engraving is only an inch square so the imperfections in the coloring don't show at
that scale.

Celtic capture.JPG
 
Joined
May 5, 2017
Messages
26
Likes
14
Location
Richmond, BC, Canada
Doug, did you use any sort of finish or sealer after engraving to prevent the ink from bleeding? I generally pre-finish before engraving and sometimes apply a sealer before colouring. Great design, by the way!
 
Joined
Dec 5, 2015
Messages
724
Likes
342
Location
Seattle, WA
Steve, I've used Deft spray can lacquer over the acrylic. Seems to prevent any bleeding. When using the pens the burned lines tend to prevent bleeding between colors, I must have read that hint somewhere regarding pyrography.

The design is not mine, it was from online public domain Celtic art. To go from a raster to CAD vector DXF format for programming I use Cutting Shop from Arbor Image. I bought the software years ago when I was receiving crude pencil sketches from customers drawn on graph paper. Cutting Shops does a much better job than the graphic art converters in that it generates easily editable large arcs segments as opposed to the thousands of very short line segments like Inkscape and others.
 
Joined
May 5, 2017
Messages
26
Likes
14
Location
Richmond, BC, Canada
I've been using that technique for anything that I want to colour infill. I also make use of transfer tape, which is really just masking paper that you can get in various widths up to about 4 feet wide. I put it on the surface before engraving and engrave through it. Doesn't stop bleeding but allows me to infill engraved areas with paints that may not easily wipe off the surface. It can be a pain to "weed" off all of the leftover paper bits if there is a lot of text or complex artwork. You can get wide rolls of transfer tape from any place that supplies sign making supplies.

Artwork prep with the lasers I use is a bit different that what you are doing. The Epilog, Trotec and Universal lasers all think they are printers so you just need to install a printer driver and you can send artwork to the laser from any application that can print. I joke that I could print an Excel spreadsheet on the side of a wine glass if I wanted. Engraving bitmap objects is no issue although cut lines do need to be vector objects with line widths less than .004". I mostly use CorelDraw but am being forced to learn Adobe Illustrator as that is what is used by the students at the design school I work at. I've had folks send me artwork in PDF files which seem to work well directly from the PDF reader as the PDF format seems to preserve the vector cut lines.
 
Joined
Dec 5, 2015
Messages
724
Likes
342
Location
Seattle, WA
Steve, transfer tape.... I'm not sure my 4 watt laser would burn through that and still mark the work piece.

That's nice the lasers act as printers. Older CNC machines couldn't handle super large files, my first machine 30 some years ago only had 16K memory. The newer machines essentially have unlimited memory like PC's. We still need vector files to program them and even with the best raster to vector software there's still some file editing needed. The software has a hard time with line crossings.

With our Washington State lock down I might get to the shop and do some CNC woodturning. It's been a couple years since I used the laser. For the last month I've been frantically trying to clean out 30 years of business use of the shop since we're tearing it down to build rental units. After 4 months of dickering with the city to get building permits that's all come to a screaming halt.
 

brian horais

Beta Tester
TOTW Team
Joined
Dec 20, 2014
Messages
249
Likes
1,844
Location
Knoxville, TN
Website
www.horais.com
Steve, I got involved with laser engraving from the low-cost CNC end. I'm using a Genmitsu 3018 Pro CNC machine with a 2500mw laser head attachment. Pretty low power compared to some of the postings above! So far I have been doing some experimentation by importing JPG images into the Lightburn software. My first real use has been to integrate CNC engraving and laser burning for some commemorative segmented bowls for an upcoming reunion next year. I've been using this project to keep me sane these past few weeks. I don't normally do repetitive turnings, but the CNC/laser setup enable me to generate 15 of these bowls with cutouts and engraving.
 

Attachments

  • building toys 1a.jpg
    building toys 1a.jpg
    459.2 KB · Views: 35
Joined
Oct 23, 2018
Messages
242
Likes
126
Location
Midland, TX
I just have a little Neje3500 that I use for small stuff. I use it for branding things I make and just a little fun stuff. Here are some of the little things I use it for.
 

Attachments

  • 20191130_161424.jpg
    20191130_161424.jpg
    542.2 KB · Views: 44
  • 20191019_230439.jpg
    20191019_230439.jpg
    817.1 KB · Views: 41
  • 20191102_183711.jpg
    20191102_183711.jpg
    504.2 KB · Views: 42
Joined
Oct 23, 2018
Messages
242
Likes
126
Location
Midland, TX
Nicely done Bobby. Is it a challenge to get uniform burn intensity on the curved wooden objects?
As long as it doesn't hard curve around Brian. I forget who it is, but someone does make a rotary jig for it. I don't have one. When I do an engraving on a curved item, I just watch how much the laser changes when it trial runs around the outside edge. If it gets too out of focus then it probably won't burn very well on the edge.
 

brian horais

Beta Tester
TOTW Team
Joined
Dec 20, 2014
Messages
249
Likes
1,844
Location
Knoxville, TN
Website
www.horais.com
As long as it doesn't hard curve around Brian. I forget who it is, but someone does make a rotary jig for it. I don't have one. When I do an engraving on a curved item, I just watch how much the laser changes when it trial runs around the outside edge. If it gets too out of focus then it probably won't burn very well on the edge.
Thanks Bobby - good advice, I'll give it a try
 
Joined
Jul 26, 2015
Messages
328
Likes
429
Location
Hot Springs, AR
was just gifted a Laserpecker LP1 a few days ago. simple setup, easy to use. was able to quickly mount on the lathe and add signatures/logo's to the bottom of my work. will be mounting it on a post so I can put in on the banjo. Works well for pens. will experiment with larger images on curved surfaces soon. I'll update on what I find.
 
Joined
Feb 12, 2018
Messages
411
Likes
249
Location
Millington, TN
was just gifted a Laserpecker LP1 a few days ago. simple setup, easy to use. was able to quickly mount on the lathe and add signatures/logo's to the bottom of my work. will be mounting it on a post so I can put in on the banjo. Works well for pens. will experiment with larger images on curved surfaces soon. I'll update on what I find.
Nice gift. Post some pics of your engraving work when you have time.
 

Roger Wiegand

Beta Tester
Joined
Nov 27, 2018
Messages
789
Likes
914
Location
Wayland, MA
Website
www.carouselorgan.com
I've been playing some with laser engraving and then filling the engraving with colored epoxy. I may have posted this picture before. It's fun to do, need to figure out how to avoid having the epoxy warp the plate-- when I turn off the excess resin I end up with thick and thin spots because the plate is no longer flat. (this is in very well equilibrated, dry wood.) Perhaps a different resin would work better.

Laser is an Epilog Mini 24, 40 watt. Adobe Illustrator for the design work.

IMG_2863.jpeg
 
Joined
Feb 12, 2018
Messages
411
Likes
249
Location
Millington, TN
I've been playing some with laser engraving and then filling the engraving with colored epoxy. I may have posted this picture before. It's fun to do, need to figure out how to avoid having the epoxy warp the plate-- when I turn off the excess resin I end up with thick and thin spots because the plate is no longer flat. (this is in very well equilibrated, dry wood.) Perhaps a different resin would work better.

Laser is an Epilog Mini 24, 40 watt. Adobe Illustrator for the design work.
Have you tried painting in the design after having applyed a finish to fill-in the pores? This way it would only take a light sanding to remove any excess paint.
 
Joined
Jun 16, 2004
Messages
1,224
Likes
1,134
Location
Colorado Springs, CO
What's worked for me is to put a coat or two of varnish on the finished piece first. After the varnish is cured, lase your design into the wood, cutting through the varnish, then fill it with a colorant, quickly wiping off the excess. The varnish left around your lased design will provide a barrier. Stay away from using dyes...too aggressive, and will seep into surrounding (un-lased) areas. Acrylic paint works best.
David_4a.jpg TK_BayfieldPair_1b.jpg 2015_TK_ColorColo_1a.jpg YoYo5a.jpg
 
Last edited:
Joined
Jun 16, 2004
Messages
1,224
Likes
1,134
Location
Colorado Springs, CO
Ed - what kind of colorant do you like for an application of such ( incredible) detail? Those are truly impressive.
T
Thanks...the absolute best acrylic color agent I've found is Pebeo Fantasy Prisme. Outside-the-lines paint wipes off easy and never bleeds into un-lased areas. For larger area coverage, the prism effect is pretty cool as well. You may be able to find it at your local Hobby Lobby or Michaels. Here's a link to the online supplier I use: Blink Art Supplies
TK_Purgatory_7b.jpg 2015_TK_FlyingCamel_dye1a.jpg 2015_TK_RD1_1f.jpg 2015_TK_RD1_24e.jpg 2015_TK_RD1_48d.jpg RD1_20lot_1f.jpg
 
Last edited:
Joined
Jun 16, 2004
Messages
1,224
Likes
1,134
Location
Colorado Springs, CO
Thanks for that video, Ed. What is that syringe-like applicator and where can I get some? Thanks.
A syringe would work equally as well, but what I use in the video are these use-once-and-toss applicators...much cheaper: Disposable Plastic Transfer Pipettes

BTW, if you decide to give this prism-acrylic a try, be aware that it'll take about two days to fully cure. And when it is completely dry, it will have a mat look. All of the finished pieces pictured here have a coat of clear epoxy resin over the paint to gloss it up.
Ash_2015_9d.jpg Maple_2015_1b.jpg Maple_2015_47a.jpg Ash_2015_11f.jpg
 
Last edited:
Back
Top