• Beware of Counterfeit Woodturning Tools (click here for details)
  • Johnathan Silwones is starting a new AAW chapter, Southern Alleghenies Woodturners, in Johnstown, PA. (click here for details)
  • Congratulations to Keven Jesequel for "Big Leaf Maple" being selected as Turning of the Week for April 15, 2024 (click here for details)
  • Welcome new registering member. Your username must be your real First and Last name (for example: John Doe). "Screen names" and "handles" are not allowed and your registration will be deleted if you don't use your real name. Also, do not use all caps nor all lower case.

Using Technology with your Hollowing System

Emiliano Achaval

Administrator
Staff member
Beta Tester
TOTW Team
Joined
Dec 14, 2015
Messages
3,315
Likes
4,267
Location
Maui, Hawaii
Website
hawaiiankoaturner.com
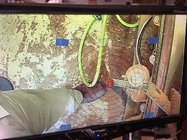
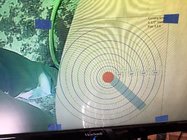
I'm always interested in learning new things, try new tools. Founding the AAW chapter club here on the Island was mostly for selfish reasons. I wanted to know more. A club member came to show me the complete Trent Bosch hollowing system. I put a rough turned urn on my Stubby 1000, and we had some fun. I was sold within 10 seconds on the visualizer system!! I almost ordered it right then and there. But I remembered Alan Z talking about using Vmix for hollowing. So, I put my credit card back in my wallet and called my friend and mentor, Alan. I'm happy I did!! I had already installed one of my spare Logitech C920 cameras with a 1/4 screw where the laser goes on my Lyle Jamieson system. I had Vmix running and my extended monitor sitting on top of the headstock of the Stubby. I had not the perfect green screen, but a piece good enough. I tried to follow the instructions given by Alan during a webinar. But I could not do it all. We did a Zoom call, and within 15 minutes, Alan had the F1 key configured to do magic. You put the green screen below the cutter, press the F1 key and that sets a motion of 4 actions. The first one is a picture taken of the cutter. Then the picture is put into an overlay. So, let's say you are hollowing and need to move the cutter. You move it, put the green screen, press the F1 key, and you are ready to go. All in under 30 seconds. Simply amazing. I already had everything that I needed, the camera, monitor and computer. I do not have to draw on the screen. I have a picture of the cutter with different thicknesses for different projects. To know more about it, you can watch Alan's webinar:
View: https://youtu.be/uWhOBNFKmGY

The Vmix hollowing system talk starts at about 50 minutes. You can also contact Alan if you have any questions and or if you need help.
 

Dave Landers

Beta Tester
Joined
Dec 1, 2014
Messages
811
Likes
2,487
Location
Estes Park, CO
Website
dlwoodturning.com
A couple months ago, I added a composite video capture card to my Visualizer camera, been using green screen w/ vmix ever since. I like it way better than drawing on the screen. A good upgrade to the visualizer, and since I already have a computer and vmix at the lathe, it only cost me the extra $15 for the capture card.
 
Joined
Feb 26, 2019
Messages
1,822
Likes
1,421
Location
Lebanon, Missouri
That is definitely a great method, and for demonstrators a great tool. It does require a computer to be used and does not provide wall thickness guidelines. Demonstrators have a computer as part of the system, but many turners do not. I'm sure there is a fairly simple way to get wall thickness guidelines into the pick with the tool so they show up on the screen. I use a non-computer system - camera signal through a signal conditioner to a standard old vga input monitor. I made templates printed on clear transparency sheet so no drawing is required. The sheet is taped to the screen, see pics below. Its a method for those without a computer tied to the system.
 

Attachments

  • IMG_2176_med.JPG
    IMG_2176_med.JPG
    374 KB · Views: 43
  • IMG_2177_med.JPG
    IMG_2177_med.JPG
    430 KB · Views: 43

Emiliano Achaval

Administrator
Staff member
Beta Tester
TOTW Team
Joined
Dec 14, 2015
Messages
3,315
Likes
4,267
Location
Maui, Hawaii
Website
hawaiiankoaturner.com
That is definitely a great method, and for demonstrators a great tool. It does require a computer to be used and does not provide wall thickness guidelines. Demonstrators have a computer as part of the system, but many turners do not. I'm sure there is a fairly simple way to get wall thickness guidelines into the pick with the tool so they show up on the screen. I use a non-computer system - camera signal through a signal conditioner to a standard old vga input monitor. I made templates printed on clear transparency sheet so no drawing is required. The sheet is taped to the screen, see pics below. Its a method for those without a computer tied to the system.
My method provides a thickness gauge. Watch Alan's video to understand more about it. I started with an old ipad and an endoscope camera, what we call the redneck approach.
 
Joined
Feb 26, 2019
Messages
1,822
Likes
1,421
Location
Lebanon, Missouri
Can you tell me the time in the vid where guidelines are shown? Its a long vid, and I skimmed it but did not see a reference to them, may have missed it.
 

Dave Landers

Beta Tester
Joined
Dec 1, 2014
Messages
811
Likes
2,487
Location
Estes Park, CO
Website
dlwoodturning.com
Yeah, Alan's videos are long and somewhat rambling at times. The whole hollowing thing starts at about 50 min. You can see the thickness things at around 1:18.
The gist is that we have created thickness guides out of colored foam that fit over the cutter - mine have a red band at 1/8" and blue at 1/4" from the cutter edge. One for each different cutter size/shape. The rest of the "structure" to hold that up and around the cutter is green foam. A little magnet sticks it to the cutter. Another sheet of green foam held behind it makes a green screen.
Take a snapshot, key the snapshot to the green background (so the green disappears), overlays it over the live camera image, and give it some transparency. I'm left with an image of the cutter plus my red and blue bands around the cutter, overlaid over the live image.
 
Joined
Feb 26, 2019
Messages
1,822
Likes
1,421
Location
Lebanon, Missouri
I dont know much about green screen, but I’m thinking lines could be printed on a green piece of paper, place the paper under the cutter, snap the pic and do your thing to make green disappear, and you have the cutter with lines drawn around it. No foam cutting or magnets etc., similar to the “target” drawing I posted above.
 

Emiliano Achaval

Administrator
Staff member
Beta Tester
TOTW Team
Joined
Dec 14, 2015
Messages
3,315
Likes
4,267
Location
Maui, Hawaii
Website
hawaiiankoaturner.com
A couple months ago, I added a composite video capture card to my Visualizer camera, been using green screen w/ vmix ever since. I like it way better than drawing on the screen. A good upgrade to the visualizer, and since I already have a computer and vmix at the lathe, it only cost me the extra $15 for the capture card.
Using the visualizer with my good friend Wayne Omura gave me an understanding of how the system works. It is a very good option for those that do not have Vmix, or other programs like it. A lot of turners also like the plug and play ease of the Visualizer. I can see why you decided to improve it, a picture of the cutter works much better, and not having to draw on the screen is a plus.
 

Emiliano Achaval

Administrator
Staff member
Beta Tester
TOTW Team
Joined
Dec 14, 2015
Messages
3,315
Likes
4,267
Location
Maui, Hawaii
Website
hawaiiankoaturner.com
I dont know much about green screen, but I’m thinking lines could be printed on a green piece of paper, place the paper under the cutter, snap the pic and do your thing to make green disappear, and you have the cutter with lines drawn around it. No foam cutting or magnets etc., similar to the “target” drawing I posted above.
That could work... But, having the foam on the screen, one solid circle, has been working well for me. I like your circles with measurements, good idea.
 

Dave Landers

Beta Tester
Joined
Dec 1, 2014
Messages
811
Likes
2,487
Location
Estes Park, CO
Website
dlwoodturning.com
I dont know much about green screen, but I’m thinking lines could be printed on a green piece of paper, place the paper under the cutter, snap the pic and do your thing to make green disappear, and you have the cutter with lines drawn around it. No foam cutting or magnets etc., similar to the “target” drawing I posted above.
That would work as well. Before I saw Alan do this, I was planning to make transparency sheets with lines on them to tape on my visualizer screen.
 

Roger Wiegand

Beta Tester
Joined
Nov 27, 2018
Messages
793
Likes
929
Location
Wayland, MA
Website
www.carouselorgan.com
I may be a curmudgeon, but it seems like a lot of technology to replace an 89 cent sharpie! The "draw on the screen" method takes what, 10 seconds? Trent sells a template (or you could easily make one) that gives you the thickness without having to invoke a computer.
 
Joined
Feb 26, 2019
Messages
1,822
Likes
1,421
Location
Lebanon, Missouri
@Emiliano Achaval @Dave Landers It is common for the camera to move a bit and need realigned to the tool tip. I suspect one needs to occasionally check that the tool overlay is aligned with the actual tool? Realign the camera as needed?


I may be a curmudgeon, but it seems like a lot of technology to replace an 89 cent sharpie! The "draw on the screen" method takes what, 10 seconds? Trent sells a template (or you could easily make one) that gives you the thickness without having to invoke a computer.
While I agree with you I did invoke a pc and printer to make my templates. I see this tech as a real improvement for online demonstrators, all of whom I have seen have multiple cameras and use vmix or similar. If I used a pc for my camera system, and many non demonstrators do, I would use it, but I dont plan to add a pc just for this.
 

Dave Landers

Beta Tester
Joined
Dec 1, 2014
Messages
811
Likes
2,487
Location
Estes Park, CO
Website
dlwoodturning.com
@Emiliano Achaval @Dave Landers It is common for the camera to move a bit and need realigned to the tool tip. I suspect one needs to occasionally check that the tool overlay is aligned with the actual tool? Realign the camera as needed?
The camera shouldn't move while you're turning. If it does move, something's not right - a loose attachment or something too flexy.

I did have one camera that would bounce out of alignment. It turned out to be a bad camera assembly (the little sensor probably wasn't attached firmly inside the camera tube). A phone call/email and Trent took care of that for me. But it did take some experimenting and etc to narrow it down to the camera itself, as there's a lot of joints between the camera and the tool that could come loose, etc.

So after that, I do always glance at the image alignment when I take the tool out to blow out chips or whatever.
 
Joined
Feb 26, 2019
Messages
1,822
Likes
1,421
Location
Lebanon, Missouri
The camera shouldn't move while you're turning. If it does move, something's not right - a loose attachment or something too flexy.
When the cutter gets into a knot or something it can get kicked, chatter, vibrate etc, so a perfectly good mount can still move a bit. I can get too aggressive hogging the inner part as well. It doesnt move with light finish cuts at wall thickness. So, the overlay image would move with the camera, and realigning the camera is the way to address it?
 

Dave Landers

Beta Tester
Joined
Dec 1, 2014
Messages
811
Likes
2,487
Location
Estes Park, CO
Website
dlwoodturning.com
When the cutter gets into a knot or something it can get kicked, chatter, vibrate etc, so a perfectly good mount can still move a bit. I can get too aggressive hogging the inner part as well. It doesnt move with light finish cuts at wall thickness. So, the overlay image would move with the camera, and realigning the camera is the way to address it?
In that case, either re-align the camera to match its image, or re-do the overlay image. For me, that's putting on the foam thickness gagues, and hitting a button on the laptop.
 
Joined
Jun 6, 2018
Messages
1,954
Likes
1,000
Location
La Grange, IL
Since so many people are now bringing laptops into their workshops I am wondering if folks are encountering problems with dust on these machines?
 
Joined
May 31, 2019
Messages
291
Likes
360
Location
Highland, MI
I may be a curmudgeon, but it seems like a lot of technology to replace an 89 cent sharpie! The "draw on the screen" method takes what, 10 seconds? Trent sells a template (or you could easily make one) that gives you the thickness without having to invoke a computer.
I'm with Roger. I don't really have a problem drawing on the plastic overlay on my monitor, though I could see going with the computer to save time if I was a production turner. FWIW, I was intrigued by the idea, but after retiring from 35 years as an electronics tech/ IT manager/ network janitor at a large video production facility, I've lost interest in computers as a hobby. But then, I've turned into such a techno-heathen that my smart phone is from 2017(!!!), I'd still be running Windows XT if I could, and I don't even have a Facebook account.

Later edit: Geez, call me the techno-grouch. I didn't mean to sound so negative. It's a great idea and I salute who ever worked it out. I thought about trying to do something similar with a dedicated Arduino to keep my laptop out of the dust, but it's beyond my code writing capabilities and I'd rather spend my learning time on the lathe. Plus, stopping to mark new tools or positions on the screen makes me move around a little more, so I don't stiffen up and get sore as quickly.
I hate arthritis...
 
Last edited:

Emiliano Achaval

Administrator
Staff member
Beta Tester
TOTW Team
Joined
Dec 14, 2015
Messages
3,315
Likes
4,267
Location
Maui, Hawaii
Website
hawaiiankoaturner.com
I may be a curmudgeon, but it seems like a lot of technology to replace an 89 cent sharpie! The "draw on the screen" method takes what, 10 seconds? Trent sells a template (or you could easily make one) that gives you the thickness without having to invoke a computer.
Trent sells his system for $625 plus shipping. I already had everything that I needed. I just did demo IRD number 67 of the Covid era. I have paid off my investment several times over.
 

Emiliano Achaval

Administrator
Staff member
Beta Tester
TOTW Team
Joined
Dec 14, 2015
Messages
3,315
Likes
4,267
Location
Maui, Hawaii
Website
hawaiiankoaturner.com
The camera shouldn't move while you're turning. If it does move, something's not right - a loose attachment or something too flexy.

I did have one camera that would bounce out of alignment. It turned out to be a bad camera assembly (the little sensor probably wasn't attached firmly inside the camera tube). A phone call/email and Trent took care of that for me. But it did take some experimenting and etc to narrow it down to the camera itself, as there's a lot of joints between the camera and the tool that could come loose, etc.

So after that, I do always glance at the image alignment when I take the tool out to blow out chips or whatever.
If the camera moves, I do not care. I take a picture of the cutter in the right position. While the cutter is inside the vessel that's what you use, the overlay picture. When you bring it out, if the camera moved, you a double picture. We all know what happens if the laser arm accidentally moves, You go right through the side.
 

Emiliano Achaval

Administrator
Staff member
Beta Tester
TOTW Team
Joined
Dec 14, 2015
Messages
3,315
Likes
4,267
Location
Maui, Hawaii
Website
hawaiiankoaturner.com
I'm with Roger. I don't really have a problem drawing on the plastic overlay on my monitor, though I could see going with the computer to save time if I was a production turner. FWIW, I was intrigued by the idea, but after retiring from 35 years as an electronics tech/ IT manager/ network janitor at a large video production facility, I've lost interest in computers as a hobby. But then, I've turned into such a techno-heathen that my smart phone is from 2017(!!!), I'd still be running Windows XT if I could, and I don't even have a Facebook account.

Later edit: Geez, call me the techno-grouch. I didn't mean to sound so negative. It's a great idea and I salute who ever worked it out. I thought about trying to do something similar with a dedicated Arduino to keep my laptop out of the dust, but it's beyond my code writing capabilities and I'd rather spend my learning time on the lathe. Plus, stopping to mark new tools or positions on the screen makes me move around a little more, so I don't stiffen up and get sore as quickly.
I hate arthritis...
You are right, I'm an almost professional turner. Vmix helps me make my urns way faster. I sell my urns for @1000 each. My last Koa hollow form was done in 2 hours. Sold it for $2500. Vmix is not for the weekend warrior woodturner unless you have Vmix already on your PC. Whatever I can use to make my job easier I will do it. My post was intended to show what technology can do for those that have an interest in technology.
 

Roger Wiegand

Beta Tester
Joined
Nov 27, 2018
Messages
793
Likes
929
Location
Wayland, MA
Website
www.carouselorgan.com
Trent sells his system for $625 plus shipping. I already had everything that I needed. I just did demo IRD number 67 of the Covid era. I have paid off my investment several times over.
I converted the laser to a camera system for under $100 using all new parts. The thickness gauge aid I referred to that Trent sells is $12, but you could easily make your own.

I looked at Vmix for demos and opted not to take on the added complexity of that system. To be honest it was probably the thought of re-introducing a PC into my life after having fully escaped them after I retired that really tipped the scales for me :rolleyes:. We opted instead to go the ATEM Mini Pro route instead, and it has worked well for us. Certainly if you have it and know how to use it, Vmix is a great solution.
 
Back
Top