• We just finished moving the forums to a new hosting server. It looks like everything is functioning correctly but if you find a problem please report it in the Forum Technical Support Forum (click here) or email us at forum_moderator AT aawforum.org. Thanks!
  • Beware of Counterfeit Woodturning Tools (click here for details)
  • Johnathan Silwones is starting a new AAW chapter, Southern Alleghenies Woodturners, in Johnstown, PA. (click here for details)
  • Congratulations to Dave Roberts for "2 Hats" being selected as Turning of the Week for April 22, 2024 (click here for details)
  • Welcome new registering member. Your username must be your real First and Last name (for example: John Doe). "Screen names" and "handles" are not allowed and your registration will be deleted if you don't use your real name. Also, do not use all caps nor all lower case.

Vacuum Chuck Adapter...

Joined
May 9, 2023
Messages
91
Likes
55
Location
Baltimore, MD
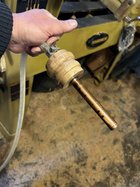
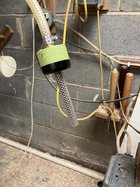
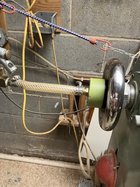
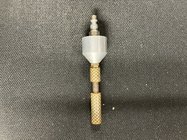
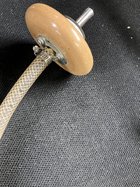
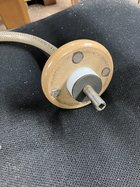
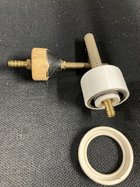
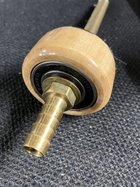
Does anyone have a source or video on how to make their own vacuum chuck adapter? I have the Oneway vacuum chucks themselves, the gast pump, hosing...but what I don't have for my new lathe is an adapter to connect it to the outboard spindle.

I recently purchased one of the Nebula lathes and didn't really consider it would be a problem to find a vacuum adapter for the outboard spindle. Unfortunately, Teknatool decided to use a M28x3 LH spindle for the outboard and nobody, and I do mean nobody makes either a vacuum adapter or a spindle adapter for it to one of the conventional sizes. Even Teknatool says not only are they not making a vacuum adapter they're not evening going to be offering a spindle adapter to one of the more common sizes. I found a company who is willing to mill me a 'one off' spindle adapter but that's $265 alone plus I'll still have to purchase another company's vacuum adapter. So to that end...does anyone have any spiffy (i.e. easy) plans by which I can fabricate my own? THANKS...
 

hockenbery

Forum MVP
Beta Tester
TOTW Team
Joined
Apr 27, 2004
Messages
8,642
Likes
4,982
Location
Lakeland, Florida
Website
www.hockenberywoodturning.com
If you have the ONEWAY adapter - I’ve rigged a few wooden adapters for demos. One I remember was for an old style jet that had the little cylinder where the handwheel belonged. We just turned tight fits then wrapped the ONEWAY adapter end with teflon tap and screwed the adapter on ( have a filter going into the pump but no tape came through)
It works fin3 for a demo and you could finish a few bowls while….

At a fraction of your quote-
There are several all thread vacuum adapters. Have to check that the all thread would go through the spindle.
Simple but a minor pain to set up.
You cut the all thread to you spindle length. There are seals on each end and the outboard end spins.
The inboard seal allows chucks to be screwed on.
Found this one. Just shows outboard end
IMG_1059.jpeg
This shows the whole kit you would cut off the right side that sticks out
IMG_1060.jpeg
 
Last edited:

Tom Gall

TOTW Team
Joined
Feb 20, 2013
Messages
965
Likes
1,776
Location
Hillsborough, NJ
@John Grace Stay tuned...
Questions: 1) Is your spindle hollow? 2) If so, do you know the ID of your spindle? 3) Do you have a steel/metal hand wheel?

I have two different types of homemade rotary unions. Both use the spindle as the vacuum tube. No rods or tubes needed.
 
Last edited:
Joined
Jul 18, 2018
Messages
1,074
Likes
1,762
Location
Baltimore, MD
I made my own following instructions in Doc Green’s book Fixtures and Chucks for Woodturning. He has instructions for making the adapter for various lathes, though not yours, although I’m sure it would be easy to adapt from what he shows. I’d photograph the pages, but think I’d be violating copyrights. In any event, it’s a book I’ve found packed with other useful info, so worth buying. B7FB6060-4954-4CA3-9B26-AC21FA0D6C53.jpeg
 
Joined
Feb 28, 2021
Messages
1,226
Likes
1,075
Location
Roulette, PA
Website
www.reallyruralwoodworks.com
I’d photograph the pages, but think I’d be violating copyrights. In any event, it’s a book I’ve found packed with other useful info, so worth buying.
May be helpful to others to locate the book if you can check the back or inside cover pages for the ISBN Number... Far easier to find books that way than by trying to keyword search.. Just a suggestion..
 
Joined
Jul 18, 2018
Messages
1,074
Likes
1,762
Location
Baltimore, MD
May be helpful to others to locate the book if you can check the back or inside cover pages for the ISBN Number... Far easier to find books that way than by trying to keyword search.. Just a suggestion..
here it is Brian, if this is helpful. I just did a quick title search on eBay and about 18 copies available there and on Amazon, with used as low as $11 (plus $4 for shipping). I’m sure more searching (Powell’s, etc. will turn up more).
,15ED0EB3-4409-4DC6-8F8E-AA26B82C5432.jpeg
 
Last edited:
Joined
Jul 20, 2008
Messages
52
Likes
600
Location
Bremerton WA
May be helpful to others to locate the book if you can check the back or inside cover pages for the ISBN Number... Far easier to find books that way than by trying to keyword search.. Just a suggestion..

I made my own following instructions in Doc Green’s book Fixtures and Chucks for Woodturning. He has instructions for making the adapter for various lathes, though not yours, although I’m sure it would be easy to adapt from what he shows. I’d photograph the pages, but think I’d be violating copyrights. In any event, it’s a book I’ve found packed with other useful info, so worth buying. View attachment 60074
It's also available on Doc Green's website at https://www.docgreenwoodturner.com/rotaryadapter.html
 
Joined
Jul 18, 2018
Messages
1,074
Likes
1,762
Location
Baltimore, MD
Here’s mine made to his design. Mine only has one sealed bearing and I’ve been using it for several years with no sign of leakage. I use an o-ring to seal it against the hand wheel. I bought a package of about six when I made it, figuring they’d flatten out and need to replaced over time. Still on o-ring #1. He mentions providing strain relief. I did something similar to his, but instead of a bolt and wing nut, I just use a spring clamp. Makes installing and removing take no time at all.
 

Attachments

  • 8CAFAFC5-592E-4CB1-95E0-34D247D1B5D6.jpeg
    8CAFAFC5-592E-4CB1-95E0-34D247D1B5D6.jpeg
    348.4 KB · Views: 25
  • FEB42544-DC0B-42E9-B197-41241010D986.jpeg
    FEB42544-DC0B-42E9-B197-41241010D986.jpeg
    503.1 KB · Views: 25
Joined
May 9, 2023
Messages
91
Likes
55
Location
Baltimore, MD
@John Grace Stay tuned...
Questions: 1) Is your spindle hollow? 2) If so, do you know the ID of your spindle? 3) Do you have a steel/metal hand wheel?

I have two different types of homemade rotary unions. Both use the spindle as the vacuum tube. No rods or tubes needed.
Spindle is hollow, spindle ID is approximately 15.75mm, hand wheel is metal.
 
Joined
May 4, 2010
Messages
2,449
Likes
1,877
Location
Bozeman, MT
Do a search on this forum, too. I believe this has come up before, but possibly years ago. At that time, lots of people were making their own.
 

Tom Gall

TOTW Team
Joined
Feb 20, 2013
Messages
965
Likes
1,776
Location
Hillsborough, NJ
@John Grace This diagram by Carl Ford should give you a starting point. Your spindle ID should allow you to use a short piece (2-3") of lamp rod (or other tubing covered with vinyl (or other tubing) - just slides in & slides out. Minor adjustments can be made by adding layers of tape or even sanding. Or devise a way to add a couple of O rings. For my mini lathe (small spindle ID) I made a prototype rotary adapter using magnets to attach to the handwheel.
I'll try to add some photos from my phone ... no promises!
Untitled 2.png
 
Last edited:

Tom Gall

TOTW Team
Joined
Feb 20, 2013
Messages
965
Likes
1,776
Location
Hillsborough, NJ
Photos… maybe ? OK they posted.
#1& #2 - Made from Dymondwood (resin infused wood) Tape is covering a hairline crack ... not pretty but works great.
#3 - E-Z Vac Adapter - my first rotary union in 1994. My version works better - runs truer.
#4 - Prototype for mini lathe with magnets to attach to hand wheel. MDF (must be well sealed - as for all wood types)
 

Attachments

  • IMG_0068.jpeg
    IMG_0068.jpeg
    469.5 KB · Views: 20
  • IMG_0070.jpeg
    IMG_0070.jpeg
    557.6 KB · Views: 19
  • IMG_0073.jpeg
    IMG_0073.jpeg
    919.5 KB · Views: 20
  • IMG_0075.jpeg
    IMG_0075.jpeg
    823.1 KB · Views: 20
Last edited:

Tom Gall

TOTW Team
Joined
Feb 20, 2013
Messages
965
Likes
1,776
Location
Hillsborough, NJ
A few more.
#4 - Shows the magnets, a nylon spacer to adapt to the handwheel, foam washer to seal against spindle, metal item fits in spindle to center the whole contraption.
#5 - A few others (not finished) that were made for a vacuum chucking workshop.
#6 - Close up showing bearing and brass fittings.
 

Attachments

  • IMG_0076.jpeg
    IMG_0076.jpeg
    687.6 KB · Views: 10
  • IMG_0077.jpeg
    IMG_0077.jpeg
    796.8 KB · Views: 10
  • IMG_0079.jpeg
    IMG_0079.jpeg
    524.2 KB · Views: 10
Last edited:
Joined
Aug 26, 2006
Messages
656
Likes
558
Location
Hampton Roads Virginia
It all depends in what you have in your "20 year can". That's the old coffee can full of non throwawayable parts and pieces collected over the years...
These look similar to most of the others. The bearing is a 6001LU, but I believe any sealed bearing will work. In this case, the threads on the brass compression fittings needed just a bit of filing, some pipe dope and a little clamp action to press fit into the bearing. The bearing interface is really the heart of the system, the rest is just adapting the bearing to the lathe.
The first two pics are for a Powermatic 3520. Slides into the hand wheel side and is held in by friction. The plastic is cutting board scrap. The 3rd and 4th pic are for a Jet 1642, made spur of the moment, texturing/coloring optional...again, held in by friction
Some things to consider, plan the order of operations to maintain concentricity of the bearing pocket and the pipe (or tenon).
I ground a small cutter so the o-rings would have a perfect, snug fitting, round bottom groove and quickly found out O-rings like square, flat bottom grooves... My experience anyway, ymmv as the saying goes.

D755CE63-11F9-4E87-9ADB-5BAEA8462BAE.jpegAD3A0054-9965-41D6-93B6-B4DDB7BC1E43.jpegE3A0B501-C192-4C86-8497-E776255E5BA1.jpeg764F7A83-6184-4DB3-96AA-3C0AF18F64C2.jpeg
 
Joined
May 9, 2023
Messages
91
Likes
55
Location
Baltimore, MD
Thank you for all of the excellent ideas, suggestions, and thoughts on my problem. Painful as it may be to the wallet...I ended up going with the most expensive solution (...of course it's the most expensive) as it fits my vision for how I want it to work. Again, thank you one and all.
 
Back
Top