-
It's time to cast your vote in the December 2025 Turning Challenge. (click here for details) -
Congratulations to Pat White for "Sicilian Mosaic" being selected as Turning of the Week for December 29, 2025 (click here for details) -
Welcome new registering member. Your username must be your real First and Last name (for example: John Doe). "Screen names" and "handles" are not allowed and your registration will be deleted if you don't use your real name. Also, do not use all caps nor all lower case.
You are using an out of date browser. It may not display this or other websites correctly.
You should upgrade or use an alternative browser.
You should upgrade or use an alternative browser.
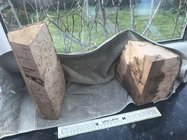
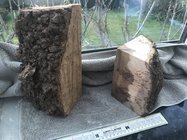
What can I do with these?!
- Thread starter Michael Beswick
- Start date
What kind of things do you like to turn? You could make some small bowls, pocket emptiers, boxes, handles, etc… Just about anything. If you get overwhelmed, feel free to send them my way 
Small lidded boxes (or awesome lids/pulls for other boxes/vessels)
Bottle stoppers
Pens
Small bowls
Ring holders
Ear rings, pendants, etc.
There's a lot of potential there. Nice looking pieces.
Bottle stoppers
Pens
Small bowls
Ring holders
Ear rings, pendants, etc.
There's a lot of potential there. Nice looking pieces.
- Joined
- Apr 27, 2004
- Messages
- 9,309
- Likes
- 6,081
- Location
- Lakeland, Florida
- Website
- www.hockenberywoodturning.com
Couple of nice natural edge hollow forms
the tall thin one is a bunch of ornament balls that would be terrific with padauk finials
the tall thin one is a bunch of ornament balls that would be terrific with padauk finials
Could you explain a bit more? My biggest difficulty in Woodturning is “seeing” potential. In comparison the technical aspects of actual turning are easier. The final irony is that I have a good eye for when I make something that doesn’t look “right”!Couple of nice natural edge hollow forms
the tall thin one is a bunch of ornament balls that would be terrific with padauk finials
- Joined
- Apr 27, 2004
- Messages
- 9,309
- Likes
- 6,081
- Location
- Lakeland, Florida
- Website
- www.hockenberywoodturning.com
after a while you will Like start seeing forms inside the blanks. Drawing on the sided of the blanks is a good way to see what might be.Could you explain a bit more? My biggest difficulty in Woodturning is “seeing” potential. In comparison the technical aspects of actual turning are easier. The final irony is that I have a good eye for when I make something that doesn’t look “right”!
sketch on the sides to see what form fits in the slope. you can also let the form extend beyond the slope and gave a void opening.
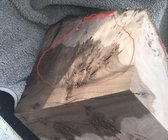
walnut burl
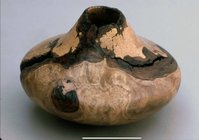 Maple burl.
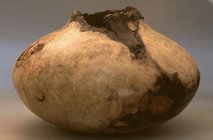
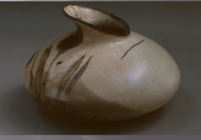
the curve on the tops of your burls gives the opportunity for a curved pitcher lip like this
Last edited:
- Joined
- Apr 27, 2004
- Messages
- 9,309
- Likes
- 6,081
- Location
- Lakeland, Florida
- Website
- www.hockenberywoodturning.com
Could you explain a bit more? My biggest difficulty in Woodturning is “seeing” potential. In comparison the technical aspects of actual turning are easier. The final irony is that I have a good eye for when I make something that doesn’t look “right”!
This is a box elder hollow ball with padauk finials
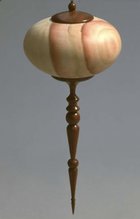
you might get 4 balls from this piece. i Can turn and hollow 4 ornament balls from a spindle held in a chuck.
I had to work up to that. That 4th one is hanging out there. i don’t use a steady rest since I can make a hollow ball in the time it would take to set up my steady rest. Turning & hollowing 2 ornament balls from a spindle is pretty easy. there is a 1/2“ waste between balls And an inch + for the tenon and cutting the ball at the tenon.
you can save the waste putting each ball on a waste block. Again too much work for something I want to finish quickly.
measure and skketch. Be sure you have a 2.5-3” round. I can’t get a full appreciation for what is in this piece. It may not have a 2.5” ball
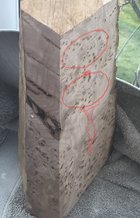
sketch on the sides to see what form fits in the slope. you can also let the form extend beyond the slope and gave a void opening.
Wow! Thank you very much. I'm now sitting here with my crayon-borrowed from my granddaughter!measure and skketch. Be sure you have a 2.5-3” round. I can’t get a full appreciation for what is in this piece. It may not have a 2.5” ball
Show us progress pics please.Wow! Thank you very much. I'm now sitting here with my crayon-borrowed from my granddaughter!
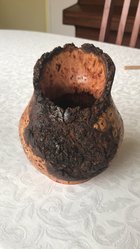
Progress so far: as the blank was out of balance I used a faceplate. Parting it off will make it look dumpy so I’ll need to camouflage the screw holes! On the back face I’ve left a partial flat as to remove it would remove more of the bark on the opposite face. Home made hollowing rig (with CZ carbide Pro Hogger at the business end).
It’s never going to be a beautiful (thin) as some of the photos that have been posted but it is a first attempt. It’s also nice to use the tools I made. Pace is slow but steady though I confess that the initial cuts to the outside were a bit “white knuckle” as the speed was slow to minimise vibration!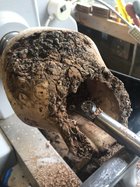
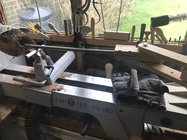
It’s never going to be a beautiful (thin) as some of the photos that have been posted but it is a first attempt. It’s also nice to use the tools I made. Pace is slow but steady though I confess that the initial cuts to the outside were a bit “white knuckle” as the speed was slow to minimise vibration!


Ring box or salt box, dish?
Just an ornamental vessel! I'm gaining confidence so I'm going for thinner walls!
Huh! It doesn’t “get” to me! My imagination said a hollow form- the reality is a vase.
Trying to decide what I’d do differently. The initial blank was irregular so I knew I’d be cutting air/wood/air so I opted for a face plate and a steadying live centre (3/4” cylindrical having drilled a hole). The balance was found using a live centre in both head and tail stock. Face plate centred from this. Shaped the exterior. Then I used a Forsner bit to create the starting point for hollowing. Because the end/top was bark and at a slope I was concerned that if I got the angle wrong with the hollowing tool the edge of the opening would catch the tool I made it a generous =too big size. Cleaning up the hole made it bigger still. Hollowing tool and jig worked well keeping the shaft central so fears of catching the tool were misplaced. I couldn’t go too deep due to the face plate screws. Although this is not visible from outside it creates an impression of bulk. Finally the bottom half of the exterior is too straight/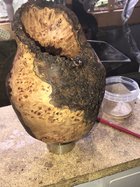 flat-it’s needs to be curved. Finally the oil darkened the piece- it was prettier without. All a tribute to my inexperience!
I’m thinking of replacing the face plate screws with shorter and re-shaping the exterior to a more rounded shape. An alternative would be to use a glue block the same diameter as the faceplate (for Centreing) with that attached to the faceplate-as the weight/imbalance of the piece is now much less. Yet another option would be to turn a spigot to put it in the chuck.
I’ve done enough damage for today so I’ll leave it till tomorrow.
Trying to decide what I’d do differently. The initial blank was irregular so I knew I’d be cutting air/wood/air so I opted for a face plate and a steadying live centre (3/4” cylindrical having drilled a hole). The balance was found using a live centre in both head and tail stock. Face plate centred from this. Shaped the exterior. Then I used a Forsner bit to create the starting point for hollowing. Because the end/top was bark and at a slope I was concerned that if I got the angle wrong with the hollowing tool the edge of the opening would catch the tool I made it a generous =too big size. Cleaning up the hole made it bigger still. Hollowing tool and jig worked well keeping the shaft central so fears of catching the tool were misplaced. I couldn’t go too deep due to the face plate screws. Although this is not visible from outside it creates an impression of bulk. Finally the bottom half of the exterior is too straight/
 flat-it’s needs to be curved. Finally the oil darkened the piece- it was prettier without. All a tribute to my inexperience!
I’m thinking of replacing the face plate screws with shorter and re-shaping the exterior to a more rounded shape. An alternative would be to use a glue block the same diameter as the faceplate (for Centreing) with that attached to the faceplate-as the weight/imbalance of the piece is now much less. Yet another option would be to turn a spigot to put it in the chuck.
I’ve done enough damage for today so I’ll leave it till tomorrow.
Keep it up, Michael! The form is starting to take shape. Imo, I think the color achieved is fine, but I understand the frustration with it darkening. If you’re going to put it back on the lathe, then you have nothing to worry about, as you can just turn away the surface. Careful with shorter screws in your faceplate, as you may end up exposing some of the longer screw holes. If that’s not a concern, then go for it!
I think a good design option would be take the neck in a bit, so there is more of an exaggerated cove on the outside. Your walls appear thick enough to do so. And reshaping the bottom could work as well. Depending on your faceplate and/or screw position, you might even be able to get away with a narrow foot that terminates in between the position of the screws. See the following image from Ellsworth’s book:
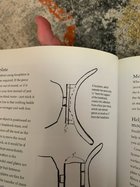
I think a good design option would be take the neck in a bit, so there is more of an exaggerated cove on the outside. Your walls appear thick enough to do so. And reshaping the bottom could work as well. Depending on your faceplate and/or screw position, you might even be able to get away with a narrow foot that terminates in between the position of the screws. See the following image from Ellsworth’s book:

Last edited:
Thanks for your encouragement. I had a look at the page in the Elsworth book. I have put in shorter screws and will live with the holes in the base (glue and sawdust!). The neck is actually one of the thinnest parts, so limited scope for more curve. However the base can be rounded off much more sharply -so the finished article is shorter and rounder.
Well at the end of the day, just put them on shelf till you do find something to make. I do this often, its part of having comprehensive stash to meet whatever you want to do in the future, wood banking 
Looks pretty cool! I think the color turned out great as well. Great job.
- Joined
- Apr 27, 2004
- Messages
- 9,309
- Likes
- 6,081
- Location
- Lakeland, Florida
- Website
- www.hockenberywoodturning.com
one thing I do when exploring forms is to place the piece where I see it often During the day.think I need more practice in the “design and seeing what it will look like”.
as I look at it I think through various changes to the shape
I visualize
What if I curved the base in more
What if I widened the form
What if I flared the rim more
What if I raised/lowered the wide part
………
i carry these answers to the lathe and the next form has some of these features
i repeat this process. Over time forms evolve keeping what I like and moving away from what I don’t like.
Great looking piece!How it turned (ouch) out! Wife likes it and thinks it’s fun! I think I need more practice in the “design and seeing what it will look like”.View attachment 51261View attachment 51261
Looks great to me!
Thanks for your support. The more I practice the better I should get! A mate who is a gardener gave me several small (6” diameter) logs. I pva’d the ends but will also try turning a bit “green “. Not as pretty as the burl but it was free!!
Michael,
I took like the finished vessel. The craft is always a learning process, as is any good endeavor & worth the time.
I took like the finished vessel. The craft is always a learning process, as is any good endeavor & worth the time.
Google images is the best place to go for creative inspiration.

