• We just finished moving the forums to a new hosting server. It looks like everything is functioning correctly but if you find a problem please report it in the Forum Technical Support Forum (click here) or email us at forum_moderator AT aawforum.org. Thanks!
  • Beware of Counterfeit Woodturning Tools (click here for details)
  • Johnathan Silwones is starting a new AAW chapter, Southern Alleghenies Woodturners, in Johnstown, PA. (click here for details)
  • Congratulations to Dave Roberts for "2 Hats" being selected as Turning of the Week for April 22, 2024 (click here for details)
  • Welcome new registering member. Your username must be your real First and Last name (for example: John Doe). "Screen names" and "handles" are not allowed and your registration will be deleted if you don't use your real name. Also, do not use all caps nor all lower case.

Getting a flat spot for installing a faceplate......

odie

TOTW Team
Joined
Dec 22, 2006
Messages
7,116
Likes
9,818
Location
Panning for Montana gold, with Betsy, the mule!
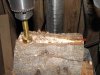
On bowl blocks, I've been using my 6x48 belt sander to get an initial flat spot for faceplate mounting. I can get a 10" section of the wood flat, and then turn it over to get as much as 20". My lathe swing is 16", so this is satisfactory for my purposes.

.....there is one problem with this, though......

I have to sand a rather large surface area of the bowl block, even though I may only install a 4" or 6" faceplate.

I'm wondering how many other methods of getting a small flat spot on the bowl block you are using.

Hand held planer?

Disc sander?

Mallet and chisel?


What works for you?

ooc
 
Joined
Nov 7, 2005
Messages
882
Likes
2
Location
Wimberley, Texas
Could use a router and a"planing" frame. Did that for some things years ago but have forgotten the specific application. I usually start bowls between centers.
 
Joined
May 13, 2007
Messages
201
Likes
3
When starting to turn bowls, I did use a faceplate for the initial mounting, but start just about all bowls between centers now using a large 2 prong drive in the chuck.

When mounting to a faceplate, I did not try to get a true flat spot. I would just mount the faceplate to the chainsawn surface, or in some cases, the split surface. Fairly long #10 sheetmetal screws were used for mounting. To improve the contact between the faceplate and the blank, I kept small wedges on hand, and would slip them in the gaps between the faceplate and the blank prior to tightening the screws. Actually, by using different thickness wedges, some adjustment of the grain pattern could be acomplished.


I use a mallet and chisel to knock enough bark off the blank to ensure good contact with the tailstock center or drive spurs.

Later,
Dale M
 

odie

TOTW Team
Joined
Dec 22, 2006
Messages
7,116
Likes
9,818
Location
Panning for Montana gold, with Betsy, the mule!
For my purposes, I'd rather use a faceplate (with a revolving center in the tailstock).

Anyone tried a hand held power planer? If that would suit my purposes, I'd purchase one for just this application......but, don't want to spend the money unless I know it would work........?

ooc
 

odie

TOTW Team
Joined
Dec 22, 2006
Messages
7,116
Likes
9,818
Location
Panning for Montana gold, with Betsy, the mule!
Could use a router and a"planing" frame. Did that for some things years ago but have forgotten the specific application. I usually start bowls between centers.

This is a possible idea to explore.

Currently toying with the idea of boring into the block with a 6" 50 or 80gt coarse disc.......just an idea, at this point.

ooc
 

Steve Worcester

Admin Emeritus
Joined
Apr 9, 2004
Messages
2,693
Likes
96
Location
Plano, Texas
Website
www.turningwood.com
Turn it between centers. I can't imagine doing it any other way.:)

John

You beat me too it. I would recommend the John Jordan article from about 2 issues ago in the AAW journal. It shows how to turn between centers and then put it on a faceplate (with little modification you could put it in a chuck.)
 
Last edited:

odie

TOTW Team
Joined
Dec 22, 2006
Messages
7,116
Likes
9,818
Location
Panning for Montana gold, with Betsy, the mule!
I can appreciate that others are doing things differently, but I'm not looking to turn a specific series of blocks any other way, than mounting a faceplate.

If there is any input on the subject, I'd appreciate your input......but, for this particular purpose, I wish to have a flat spot on an irregular surface for mounting a faceplate. If anyone has done this with success, I'm hoping to get your thoughts on that.

thanks

ooc
 

Donna Banfield

TOTW Team
Joined
May 19, 2004
Messages
511
Likes
1,351
Location
Derry, NH
You could try an angle grinder with a lancelot blade. It will not give you a smooth surface, but flat enough for a face plate. I've done that in the past.

But I'm in the other camp. I mount everything between centers, up to 18 inches in diameter. As long as it's green, I can drive a 2-spur drive center into the wood parallel with the grain, and pick the blank up (off the workshop floor or bench) by that drive spur, and mount it in my headstock. That's how I test whether I've driven the spur deep enough.
 

odie

TOTW Team
Joined
Dec 22, 2006
Messages
7,116
Likes
9,818
Location
Panning for Montana gold, with Betsy, the mule!
You could try an angle grinder with a lancelot blade. It will not give you a smooth surface, but flat enough for a face plate. I've done that in the past.

But I'm in the other camp. I mount everything between centers, up to 18 inches in diameter. As long as it's green, I can drive a 2-spur drive center into the wood parallel with the grain, and pick the blank up (off the workshop floor or bench) by that drive spur, and mount it in my headstock. That's how I test whether I've driven the spur deep enough.

That's a method I'd not considered, Donna......

Rough surface is ok......It's "flat" that I'm looking to achieve......

Thanks for your input.

ooc
 
Joined
Mar 5, 2005
Messages
194
Likes
3
Location
Lake Seminole, Georgia
I usually start out between centers to give more flexibility in positioning the wood if needed, and then do the following to install a faceplate.
If I want to start straight out with a faceplate (and to conserve wood), I use a bi-metal hole saw to cut out a 3" or 3 1/2" diameter by 1 1/2" thick, round waste block of Oak or other waste hardwood. Then create a flat spot using a 3" or 3 1/2" Forstner bit, then glue/clamp the waste block to the wood using Titebond Original.
This can eat up some time letting the Titebond dry, but I have not had one come loose. Plus you can always be ahead of the game some by having one glued up and ready to go wile another is drying.
 
Joined
Aug 14, 2007
Messages
5,488
Likes
2,838
Location
Eugene, OR
Do you have a drill press? For a smaller face plate, like 3 inches, a 3 inch or 3 1/4 inch bit does the job perfectly. If you need a larger one, like for 6 inches, use a smaller bit, set the depth stop, and drill the center one first, then the outer ring ones. I don't use a face plate any more except on bowls that are 18 inches and more. I prefer to drill a recess with the proper sized (as close as possible to the diameter of my chuck jaws) about 1/4 to 3/8 inch deep and expand into that.

robo hippy
 

odie

TOTW Team
Joined
Dec 22, 2006
Messages
7,116
Likes
9,818
Location
Panning for Montana gold, with Betsy, the mule!
Do you have a drill press? For a smaller face plate, like 3 inches, a 3 inch or 3 1/4 inch bit does the job perfectly. If you need a larger one, like for 6 inches, use a smaller bit, set the depth stop, and drill the center one first, then the outer ring ones. I don't use a face plate any more except on bowls that are 18 inches and more. I prefer to drill a recess with the proper sized (as close as possible to the diameter of my chuck jaws) about 1/4 to 3/8 inch deep and expand into that.

robo hippy

Are you talking about a Forstner style bit like Gil Jones, robo?

This sounds like it may work for my purposes, and am checking on it.

thanks

ooc
 

odie

TOTW Team
Joined
Dec 22, 2006
Messages
7,116
Likes
9,818
Location
Panning for Montana gold, with Betsy, the mule!
I agree with Richard, Dale, John, Steve, Dona, and Gil -- turn it between centers. It's so easy that I can't imagine messing with anything else. It does not matter if using a faceplate or scroll chuck -- it's the same way to start in either case.

Bill......

Thanks, but all of you are second guessing the purpose of what I'm trying to do. I wish to use a faceplate for the job I have in mind, and I'm checking to see if anyone has experience, or suggestions to accomplish the particular goal.

I do not wish to turn it between centers.

ooc
 
Joined
May 16, 2005
Messages
3,540
Likes
15
Are you talking about a Forstner style bit like Gil Jones, robo?

This sounds like it may work for my purposes, and am checking on it.

Works well enough, that's for sure. If you're good with the chainsaw, a hand plane is more than enough. I use two, a scrub and a block. Of course, I'm a pin chuck guy myself.

Put your blank on a movable backer. Plywood ok. Wedge for the surface you want with sticky wedges, and move the whole apparatus under the press.
 

Attachments

  • Forstner-Flat.jpg
    Forstner-Flat.jpg
    60.6 KB · Views: 70
Joined
Oct 2, 2006
Messages
1,049
Likes
35
Location
Tallahassee FL
Accepting that you don't wish to turn between centers,

If the flat spot is NOT part of the final design, wedges should be sufficient for alignment.

If the flat spot IS part of the final design, use the above on the other side, and turn a flat spot on the tailstock side; then re-mount on the new flat spot. I've done something like this for a bowl turned from a very broad (vertically) tree root. First bowl I ever made, actually.

But I prefer between centers now.
 

odie

TOTW Team
Joined
Dec 22, 2006
Messages
7,116
Likes
9,818
Location
Panning for Montana gold, with Betsy, the mule!
Works well enough, that's for sure. If you're good with the chainsaw, a hand plane is more than enough. I use two, a scrub and a block. Of course, I'm a pin chuck guy myself.

Put your blank on a movable backer. Plywood ok. Wedge for the surface you want with sticky wedges, and move the whole apparatus under the press.

Thanks MM......

More food for thought.

.....and, thanks for the pic.

ooc
 
Joined
Apr 29, 2004
Messages
576
Likes
2
Location
Hanover, VA
Website
www.abhats.com
I tried using a wide chisel to get a flat spot in the middle of logs when making natural edge bowls (and I haven't used my tailstock in well over four years). That didn't work as well as I wanted so I picked up a DeWalt power planer that was on sale several years back. This one works very well, but is noisy - almost as loud as my old oil less air compressor! The depth of cut is easy to change and I've used it for several other things, just not inside the house (it sprays wood chips really, really well!).
 

hockenbery

Forum MVP
Beta Tester
TOTW Team
Joined
Apr 27, 2004
Messages
8,638
Likes
4,978
Location
Lakeland, Florida
Website
www.hockenberywoodturning.com
A slight concave works better for me than a flat.

the outer edge of the faceplate makes solid contact. no wobble.
and a concave is so easy to do. flats are hard to make.
were all turners use the lathe to make the mount.

I start the bowl or hollow form between centers.
line up the grain turn the tenon for the faceplate with a slight concave down to the tail center. I make the tenon 1/4 inch longer than the screws as the open up the wood a bit more than their length.

I usually leave the nub in place an use it to help center the face plate.
it will fit inside the spindles with the face plate seated.

for a quick mount bowl relying on the blank cut for grain I'll use a screw center in my chuck and the tail stock for initial support. this is a great first mount for a bowl class as the students can get to turning with a solid set up.

Happy turning
al
 
Joined
Dec 22, 2006
Messages
73
Likes
1
Location
Grimes, Iowa
Website
www.scrollsaws.com
Thanks, but all of you are second guessing the purpose of what I'm trying to do. I wish to use a faceplate for the job I have in mind, and I'm checking to see if anyone has experience, or suggestions to accomplish the particular goal.

I do not wish to turn it between centers.

ooc

Then why don't you explain what it is you are trying to do. To be so broad as to say you want to flatten a spot I think so far there have been many very good solutions. With no more specific information than you have given I do not see any way someone will happen to give you a solution for your specific use that only you know what it is.
 

john lucas

AAW Forum Expert
Joined
Apr 26, 2004
Messages
8,337
Likes
3,595
Location
Cookeville, TN
I now turn everything between centers. It gives you so many more options on aligning the bowl. This was thanks to John Jordan for showing us that many years ago.
If I plan to use a faceplate I either turn a tenon to the exact diameter of the faceplate so that it center it, or I turn a divot or rebate that exactly fits it. Some of my faceplates have a hole all the way through the threaded portion. I can turn a shallow tenon that fits this and it also aligns the faceplate.
In the early days I used tried different methods. I have used the Safe-T-planer that fits in the drill press. It is surprisingly safe even though it looks like an accident waiting to happen. You can't take big cuts however so if your blank needs a lot of trueing it might take several passes.
I have used and angle grinder with different cutters. It throws shavings everywhere and can be dangerous with certain cutters.
I've used large Forestnet bits. They do work but the abrasive nature or bark dulls them rather quickly and since I use them for other things I quit using them to cut through the bark to make a flat spot.
 
Joined
Jul 9, 2007
Messages
44
Likes
1
Location
Texas
I can appreciate that others are doing things differently, but I'm not looking to turn a specific series of blocks any other way, than mounting a faceplate.

If there is any input on the subject, I'd appreciate your input......but, for this particular purpose, I wish to have a flat spot on an irregular surface for mounting a faceplate. If anyone has done this with success, I'm hoping to get your thoughts on that.

thanks

ooc

I used a powered hand held planer to get a flat spot for face plate mounting the mesquite I turn for several years. It worked quite well if the surface was not too far from being flat enough already and I had a way to hold the log steady. Now, I will sometimes grind the surface down close to flat using an electric chain saw. Probably the second reason I don't use the planer much for this anymore for this operation is the larger and more powerfull lathe I now have makes starting between centers before mounting the face plate much easier.

Charlie M
 

odie

TOTW Team
Joined
Dec 22, 2006
Messages
7,116
Likes
9,818
Location
Panning for Montana gold, with Betsy, the mule!
Then why don't you explain what it is you are trying to do. To be so broad as to say you want to flatten a spot I think so far there have been many very good solutions. With no more specific information than you have given I do not see any way someone will happen to give you a solution for your specific use that only you know what it is.

Rick......

What I'm trying to do is get a good flat spot for solidly mounting a faceplate.....a pretty simple concept, and mounting a faceplate is something that is a fairly common thing for woodturners to do.

I very much appreciate the input from those who are staying on point and offering suggestions and prior experiences. I believe I have made effort to acknowledge those who have done so.

Michael Mills.......an interesting way of doing it, thanks for the suggestion.....:D

Thank you.....even to those who don't understand why I might want to mount a faceplate. (lol!)

ooc
 
Joined
Jun 9, 2004
Messages
1,223
Likes
49
Location
Haslett, Michigan
Planer

I tried using a wide chisel to get a flat spot in the middle of logs when making natural edge bowls (and I haven't used my tailstock in well over four years). That didn't work as well as I wanted so I picked up a DeWalt power planer that was on sale several years back. This one works very well, but is noisy - almost as loud as my old oil less air compressor! The depth of cut is easy to change and I've used it for several other things, just not inside the house (it sprays wood chips really, really well!).

I used a Bosch electric hand planer to knock down a chain sawn piece that wouldn't fit under my 6" depth band saw. (now have a diff one with a riser and not an issue). But I hooked the planer port expelling chips to my shop vac and chips NOT as issue with that set up. Gretch
 
Joined
Nov 7, 2005
Messages
882
Likes
2
Location
Wimberley, Texas
Or you could combine Michael's suggestion and mine. Use Michael's attached 1x4's as the "planer box" to support the router (with a long, shop made base plate of course).
 
Joined
Dec 6, 2006
Messages
194
Likes
0
Location
Camillus, NY
Getting a Flat Spot for Installing a Face Plate

Odie - I occasionally turn brown mallee burls and I like to put just a small flat on the natural bottom, which is reasonably parallel to the opposite saw cut side. I then attach a glue block which I chuck and I then hollow out the top side, making bowls, dishes, etc. I like the wonderfully knobby exterior of mallee burls, and want to preserve as much of it as possible. It makes for a great conversation item. The glue block could just as easily be your face plate.

To place the flat on the rounded side I simply strap the burl to the vertical member of an L-shaped carrier, and band saw the flat, parallel to the opposite side. You can then easily control the size of the flat as well as the thickness of the blank.

One man's opinion. Tried to answer your original question!!!!

Jerry
 
Joined
Mar 26, 2008
Messages
4
Likes
0
Odie, if I want to use a faceplate I use a Forstner bit as suggested by Robo. I will adjust the blank to get the grain orientation the way I want. I have a Delta midi so my faceplate is only 3". Make sure the blank is clamped securely and use a slow speed. A 3" bit can send a rough blank into orbit. DAMHIKT.

Tom Collins
 
Joined
Mar 5, 2005
Messages
194
Likes
3
Location
Lake Seminole, Georgia
Odie,
In reference to my response to your AAW forum question, where I use a Forstner bit to create a flat spot, onto which I glue a piece of waste wood so I can mount a faceplate without disturbing any of the original wood (or use as a chuck tenon).
I purchased three large (to me) Forstner bits on Amazon and Woodcraft [3", 3 1/4", 3 1/2"]. They may not be made of the finest steels (?), but so far they perform very well, and the price was affordable, for me.
Here are the URLs to see the 3” and 3 1/4” bits at Amazon, and the 3 1/2” bit at Woodcraft.

3” Forstner Bit
http://www.amazon.com/MLCS-9245-Dia...ref=sr_1_6?ie=UTF8&s=hi&qid=1258433146&sr=1-6

3 1/4” Forstner Bit
http://www.amazon.com/MLCS-9249-Dia...ref=sr_1_9?ie=UTF8&s=hi&qid=1258433146&sr=1-9

3 1/2” Forstner Bit
http://www.woodcraft.com/Product/2020431/2778/3-12-Forstner-Bit.aspx

Cheers,
Gil Jones
 
Last edited:

hockenbery

Forum MVP
Beta Tester
TOTW Team
Joined
Apr 27, 2004
Messages
8,638
Likes
4,978
Location
Lakeland, Florida
Website
www.hockenberywoodturning.com
odie,

If you have to do it off the lathe you can get good results using a chain saw to make a planning cut.

with the face of the log you want flat facing up and held in place (gravity and shims usually work). a notched log works great.
Hold the saw level and swing the saw back and forth lowering it half a tooth level each swing so that the teeth plane off the a level surface.

With a bit of practice this makes a level flat space that will be fairly clean.
Put your faceplate on and push on opposite sides. if it doesn't rock screw it on. if it rocks practice some more with the saw or remove the high spot with some other tool.

I use face plates a lot but make all my mounts on the lathe between centers.
The best mounts are slightly concave with continuous contact along the edge of the faceplate never a chance of a high spot.

Happy turning,
Al
 
Joined
May 4, 2005
Messages
203
Likes
1
Location
Derby, Kansas, USA
Flat Spot

Guess if I wanted a flat spot on a harvested bowl blank, I would create same by mounting between Centers. Locate the tailstock center at the place you want the center of the face plate. Rough turn your flat spot around the tailstock center. Then use a chisel to remove the nub left around the center.

You would have a flat spot of the the size you want. You would have a center spot to center the faceplate, from the nub.

You already have the equipment. No purchase necessary.

When you do one of these, I think all of us would like a picture of two with the process and end result. Perhaps you have the making of an article for the journal.

John
 
Joined
Sep 8, 2006
Messages
270
Likes
1
Location
SoCal
Odie, I've use the Forstner bit on a drill press approach that Robo mentioned. I don't have any bits as big as my 3" faceplates, but a half dozen or so "punches" with a 2" bit will give me beaucoup room for the faceplate. I've also used a handheld power planer to establish a flat spot. (Or a nearly flat spot. I also have used wedges to handle any gaps.)

Has anybody mentioned turning between centers yet? :rolleyes: :p
 
Joined
Mar 1, 2007
Messages
105
Likes
0
Location
Maryland
Personally, I'd put it between centers, but as an alternative, here are some thoughts.

1. Place on sand bags to secure and position, then flatten with a radial arm saw as if you where cutting a dado.

2. If small enough, send it through a thickness or regular planner.

3. Build a crib jig for a router or skill saw and shave down the area. A variation of #1.

4. Build a tenon cutting jig for your band saw, screw the piece to it, and cut the flat.

Just a few ideas, not necessarily good ones.

Aaron
 

odie

TOTW Team
Joined
Dec 22, 2006
Messages
7,116
Likes
9,818
Location
Panning for Montana gold, with Betsy, the mule!
Odie,
In reference to my response to your AAW forum question, where I use a Forstner bit to create a flat spot, onto which I glue a piece of waste wood so I can mount a faceplate without disturbing any of the original wood (or use as a chuck tenon).
I purchased three large (to me) Forstner bits on Amazon and Woodcraft [3", 3 1/4", 3 1/2"]. They may not be made of the finest steels (?), but so far they perform very well, and the price was affordable, for me.
Here are the URLs to see the 3” and 3 1/4” bits at Amazon, and the 3 1/2” bit at Woodcraft.

3” Forstner Bit
http://www.amazon.com/MLCS-9245-Dia...ref=sr_1_6?ie=UTF8&s=hi&qid=1258433146&sr=1-6

3 1/4” Forstner Bit
http://www.amazon.com/MLCS-9249-Dia...ref=sr_1_9?ie=UTF8&s=hi&qid=1258433146&sr=1-9

3 1/2” Forstner Bit
http://www.woodcraft.com/Product/2020431/2778/3-12-Forstner-Bit.aspx

Cheers,
Gil Jones

Thanks to all who've made suggestions up to this point.

Gil......thanks for the links. I ran a search at woodcraft the other day and didn't get a hit on that 3 1/2" forstner bit.....must have typed wrong! I have an account there, so this is a good place to purchase for me.

I think this is the way I'll go, and see how this works out for me. Thank you very much for the links, because I thought woodcraft didn't have one.

I think this will make a great alternative for me to turning between centers......especially for very unbalanced wood chunks that need something more substantial than the spur center.

ooc

Also, thanks to robo hippy for first suggesting the forstner bit.
 
Last edited:
Joined
Jun 9, 2004
Messages
1,223
Likes
49
Location
Haslett, Michigan
3 1/2" forstner

Thanks to all who've made suggestions up to this point.

Gil......thanks for the links. I ran a search at woodcraft the other day and didn't get a hit on that 3 1/2" forstner bit.....must have typed wrong! I have an account there, so this is a good place to purchase for me.

Also, thanks to robo hippy for first suggesting the forstner bit.

Odie-That one from Woodcraft looks like length not diameter of cutting edge, based on all the rest that were on that page. Gretch
 

odie

TOTW Team
Joined
Dec 22, 2006
Messages
7,116
Likes
9,818
Location
Panning for Montana gold, with Betsy, the mule!
Odie-That one from Woodcraft looks like length not diameter of cutting edge, based on all the rest that were on that page. Gretch

Thanks for the "heads up", Gretch......

You know.......it looks like they used the same photo for all the forstner sizes, so I think that's a "stock" photo. I can see how it would be misleading.

I copied and pasted the following from the information given:

•Bits larger than 1" have "saw-toothed" edges to keep the larger cutting edge cool while boring
•Bits 2-1/8" dia. and less are 3-1/2" long with 3/8" shank
•Bits 2-1/4" dia. and larger are 6" long with 1/2" shanks

ooc
 
Joined
Mar 5, 2005
Messages
194
Likes
3
Location
Lake Seminole, Georgia
Odie and Gretch,
I agree that the picture is not the real bit. I did order the 3 1/2" bit using the product number in that link, and received a 3 1/2" diameter Forstner bit that is about 6" long, a substantial chunk of steel.
 
Joined
Aug 14, 2007
Messages
5,488
Likes
2,838
Location
Eugene, OR
Just a warning on using the big Forstner bits, they can grab a smaller lighter blank and twirl it around. I have used clamps to hold them down. I did get my 3 1/4 inch forstner bits at Woodcraft.

If you want to use a radial arm saw, they do make a planing bit for them, I guess it is some thing like a forstner bit.

robo hippy
 
Back
Top