• We just finished moving the forums to a new hosting server. It looks like everything is functioning correctly but if you find a problem please report it in the Forum Technical Support Forum (click here) or email us at forum_moderator AT aawforum.org. Thanks!
  • Beware of Counterfeit Woodturning Tools (click here for details)
  • Johnathan Silwones is starting a new AAW chapter, Southern Alleghenies Woodturners, in Johnstown, PA. (click here for details)
  • Congratulations to Dave Roberts for "2 Hats" being selected as Turning of the Week for April 22, 2024 (click here for details)
  • Welcome new registering member. Your username must be your real First and Last name (for example: John Doe). "Screen names" and "handles" are not allowed and your registration will be deleted if you don't use your real name. Also, do not use all caps nor all lower case.
Protect the Queen
Michael Anderson

Protect the Queen

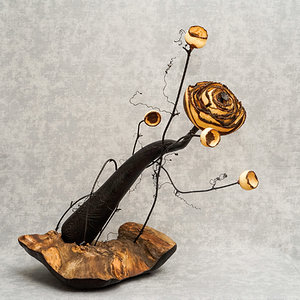
Redbud burl, Bradford Pear, Silver Maple, Gaboon Ebony, and Cat Greenbrier. Many folks inspired me to create this piece, a few of significant note: Mike Mahoney's nested bowls (particularly his Giant Clam piece) helped me figure out my main flower. Ron Campbell's and Heather Marusiak's recent turn-cut-reassemble works gave me the idea for my flower's stem. David Sengel's thorned vessels inspired my little protector flowers. This was extremely challenging for me, and tested about every skill I've gained so far on this woodturning journey. 21.5" tall, 20" deep, and 12" wide. More info below.
I'm participating in my first symposium next week in Louisville, and I wanted to push myself and make something special for the instant gallery. This is my largest and most involved piece by a longshot. I mounted the main flower at a pretty steep angle so that it appears to be moving and searching for something. The piece is pretty three-dimensional, and I tried to photograph it the best I could. There are a lot of different components, 15 of which are turned:
  • The Redbud bowls are the most significant. The main flower consists of 9 bowls of increasing size turned from individual burls. I turned them thin and let them warp so that they appear as irregular petals. Redbud has an amazing contrast between the sapwood and heartwood, and the burl warps significantly. Together, I think the "nest" looks like a disturbing wilting flower that's searching for something. I turned 4 additional bowls to serve as protector/soldier flowers to guard the queen as she searches for whatever.
  • Cat Greenbrier made for some nice defensive stems, and also gave me the flexibility to wrap and twist around the main flower. I coated the stems in black lacquer and epoxied them to the base and flowers, as well as at every contact point. The twisted tendrils add some interesting shapes, and remind me of little feelers searching the perimeter for danger.
  • The main flower's stem is hollow, with the exception of a 3'ish section where it's very narrow. This was a challenging component, but was fun to figure out. I turned a long Bradford Pear spindle, and then cut it apart into several pieces. I then reassembled the pieces and epoxied them together, before sanding the curves smooth. Afterward, I carved "grain" lines along the length of the stem, and textured the entire surface with a fine ball burr. The whole stem is ebonized via India ink.
  • The "stamen" of the flower is a little piece of Gaboon Ebony that I turned and carved. It serves an aesthetic purpose, but is also functional as it is epoxied to an oak dowel that runs through the flower and attaches to the stem.
  • The Silver Maple base was a very challenging component that I almost scrapped. Thankfully, I slept on that decision, and decided to keep it in the end. I wanted something with a weathered, gnarly appearance to match the rest of the scene. Silver Maple has so many colors present, especially on the bark side, and the little burl eyes are fun and interesting. The wild topography also gave me placement options for attaching the greenbrier stems. It took a lot of work to get the base to look just right, including wirebrushing the top, and hand-carving, sanding, charring, and wirebrushing the bottom. I added three little Birch plug feet underneath to stabilize the base.
Anyway, I could drone on and on about the process, but I'll stop there. I'm happy to answer any questions, and if you read this description, congrats and thank you! This piece has been my turning life the past couple of weeks, so I can't help but word vomit :p I'll post some additional photos in a separate reply below.
 
Last edited:
Some additional views and detail shots:
IN4MShR.jpeg
fdZIKwP.jpeg

Q0T70v4.jpeg

7rjKqJK.jpeg
 
That piece should be able to compete with anything that anyone else brings for artwork. Very nice and detailed. I wondered what you were gong to do with all those little bowls.
 

Media information

Category
Member Galleries
Added by
Michael Anderson
Date added
View count
960
Comment count
18
Rating
0.00 star(s) 0 ratings

Image metadata

Device
SONY ILCE-7M2
Exposure time
1/60 second(s)
ISO
1000
Filename
_DSC6020.jpg
File size
767.3 KB
Date taken
Sat, 27 May 2023 6:42 PM
Dimensions
1800px x 1800px

Share this media

Back
Top