• We just finished moving the forums to a new hosting server. It looks like everything is functioning correctly but if you find a problem please report it in the Forum Technical Support Forum (click here) or email us at forum_moderator AT aawforum.org. Thanks!
  • Beware of Counterfeit Woodturning Tools (click here for details)
  • Johnathan Silwones is starting a new AAW chapter, Southern Alleghenies Woodturners, in Johnstown, PA. (click here for details)
  • Congratulations to Dave Roberts for "2 Hats" being selected as Turning of the Week for April 22, 2024 (click here for details)
  • Welcome new registering member. Your username must be your real First and Last name (for example: John Doe). "Screen names" and "handles" are not allowed and your registration will be deleted if you don't use your real name. Also, do not use all caps nor all lower case.

How to quickly sharpen bandsaw blades without removing them

Joined
Mar 22, 2023
Messages
152
Likes
317
Location
Strasburg, VA
I have two bandsaws, an old Powermatic 14” and a used Rikon 18”, for preparing bowl blanks and other lathe related projects.

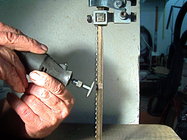
A while back I searched the internet for ways to sharpen bandsaw blades that didn’t require removing the blade from the saw. Using a flat cutting disk on a Dremel and carefully touching the top of each tooth was the most promising and certainly has proven to be the most effective method for me.

But it’s time consuming and requires power equipment. I still wondered if there was a method to do so without taking off the blade and without using power equipment.

I couldn’t find any online, so I sat and stared at my bandsaw and cogitated and ruminated and pondered.

Then I came up with this idea.

UNPLUG THE SAW.

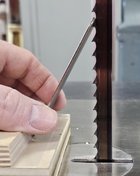
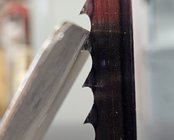
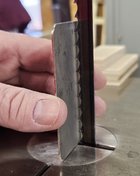
Hold a diamond card up to and parallel with the top edge of the teeth on the band saw blade, push it against that surface, and simply rotate the blade backwards using the upper wheel. Repeat until sharp. I used a 400 grit diamond credit card file.

For me it works, as well as for everyone else who has commented on the quick video I made. (My little channel isn’t monetized and won’t be, so I’m not trying to drive traffic there for hits. I just think this is a good idea.)

If you see any serious problems with this idea, please let me know.

 
Joined
Mar 22, 2023
Messages
152
Likes
317
Location
Strasburg, VA
My opinion is that this will change the geometry since the diamond stone actually falls over the tooth and into the gullet. I don't think 5-6 minutes is fast.
I was just trying to be honest. It takes me ten to twenty minutes to hit each tooth individually with a disk on my Dremel, longer if I remove the blade.

Regardless, it does work for me, and everyone who has responded on the video was well pleased with this method. Many of them claim it only takes several passes. When I made that video I was trying to sharpen a badly degraded blade.
 
Joined
Mar 22, 2023
Messages
152
Likes
317
Location
Strasburg, VA
Don't use a diamond stone, just an oil stone held to minter gauge to keep it at 90 and turn blade backwards with plug removed. I found three times around worked ok. This was done with timberwolf blades.
Great advice, thank you. I received multiple oil stones with a Rikon lathe I picked up a while ago. I’ll try that and compare the results with my diamond cards. (The diamond cards are flexible which makes them spring back a bit after each tooth.)
 
Joined
Oct 25, 2020
Messages
233
Likes
195
Location
Minneapolis, MN
I've used a version of Bob's method for years using the fine side of a hardware store double grit oil stone, knowing I'll only get a couple times of doing it before I've changed the hook geometry to the point where my okay-at-best result method finally kills the blade I'm keeping on life support.

But Brian's diamond card method, and Richard's comment, got me thinking about a slightly different version of Brian's method. It will involve a jig, though. But I'm now inspired to cobble together an idea today. I'll post my result later.
 

john lucas

AAW Forum Expert
Joined
Apr 26, 2004
Messages
8,337
Likes
3,595
Location
Cookeville, TN
I did some experiments one day. Rotating the blade backwards by hand with a carborundum stone us fast and works really well. We call this jointing the teeth when sharpening a bandsaw. On tge bandsaw this does two things. It refreshes the edge and makes all the teeth the same height.
I used my demel and a chainsaw sharpening diamond hone and hit each gullet in the direction it faces. That makes the blade cut very aggressively and on my 152" blade takes a while. The cut was very ragged.
After doing all the gullets I jointed the blade again with the stone and it cut much less aggressive but left a far smoother cut.
I find the stone jointing method is really all you need most of the time. I buy my blades locally for $12 so when they get dull I toss them. I only joint them when I'm down to my last blade and cant get to my blade guy when he is open.
I only buy cheap blades because cutting green wood sooner or later you get a catch and damage a blade. Would hate to do that with a $30 blade. My blade guy runs a saw sharpening service abd is wonderful but he is thinking of retiring so I just started looking into building my own blades and silver soldering them.
 
Joined
Aug 14, 2007
Messages
5,491
Likes
2,841
Location
Eugene, OR
Well, I did try the turn the blade backwards and hold a diamond card against it, and my results were far less than satisfactory. I know when sharpening our chainsaw blades, all of that is done in the gullet. I would think the same should apply to the bandsaw teeth. On my big saw, with teeth 3/4 inch apart, not a problem. With my small saw, with 3 tpi, I don't have any file that small. Maybe some carbide bits in a dremmel.

John, the only times I have blades and catching problems, it is with a very uneven blank which does not sit flat, and rocks as I am cutting. I have lost a blade or three to that. Not a problem any more, but that is what my big bandsaw is for, cutting slabs with parallel sides. My little saw has 1/2 inch blades, and they are the thicker ones, but I don't know the geometry numbers. My supplier, which I am lucky to have in town, has my choices on file, so I just call and tell them I need new blades.

robo hippy
 
Joined
Oct 25, 2020
Messages
233
Likes
195
Location
Minneapolis, MN
(Warning #1- long text, several photos, have fun! Warning #2- cardiac implant patients be careful, I describe using strong magnets.)

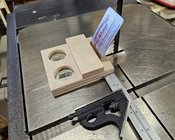
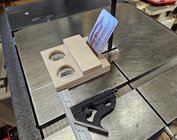
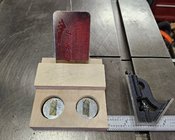
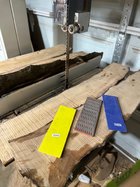
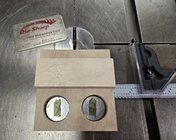
Okay, I made a little jig and it's based on using a 600 grit (mesh) DMT credit card diamond hone. The dimensions of the jig are not critical other than being at least twice the width of the diamond hone. Because I had these really strong, salvaged 1+" magnets (maybe rare earth, they're strong! Check home imp. stores, midwest Menard's stores carry similar), I used them to secure the jig to the saw table, using a forstner bit to within 1/8" of drilling through the 3/4" plywood, secured in place with a drop of hot melt glue. No magnets? Leave the jig long enough to permit clamping to the table. Because I have a roll, I lined the hone shelf and stop block with UHMW slick tape to make the hone slide easier left to right. I have a small pencil tick centered on the leading edge of the hone shelf to center the jig on the blade. I use a combo. square in the miter gauge slot to assure the jig is square to the blade. Slide the jig to or away from the blade until the hone angle sits flat on back of the tooth (non-gullet side).

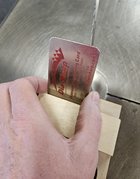
To use it, I'll UNPLUG THE SAW and sit on a stool on the right side of the saw, looking into the action where the hone rests on the back of the tooth. The jig and hone are square to the blade and held in position (magnets for mine, maybe a clamp of some sort for yours) to keep the hone at the same angle to the blade. With your left hand move the hone left to right across each tooth an equal number of times (3-5 strokes?), and with your right hand advance the blade up/backward to the next tooth. Put a Sharpie mark on the blade at your first tooth to reference the start/stop point of the blade length. As John described, I can also hold the hone vertical and square to the blade, turning the blade backward to clean up (joint) the tooth tips. All hone contact pressure is light on the blade. I think if I do this regularly before the blade goes noticeably dull, I can maintain a sharp blade and extend its life. (This is a new 3tpi 1/2" blade, so I won't be trying my new jig yet.)

More photos in the next message...
1000004576.jpg
1000004572.jpg
1000004573.jpg
1000004574.jpg
 
Last edited:
Joined
Oct 25, 2020
Messages
233
Likes
195
Location
Minneapolis, MN
Stu- now I learn this? Oh well, next time.

I always started with a 3/8" drill bit, followed by a 3lb sledge, to disable those old spinners.
 
Joined
Mar 22, 2023
Messages
152
Likes
317
Location
Strasburg, VA
(Warning #1- long text, several photos, have fun! Warning #2- cardiac implant patients be careful, I describe using stong magnets.)

Okay, I made a little jig and it's based on using a 600 grit (mesh) DMT credit card diamond hone. The dimensions of the jig are not critical other than being at least twice the width of the diamond hone. Because I had these really strong, salvaged 1+" magnets (maybe rare earth, they're strong! Check home imp. stores, midwest Menard's stores carry similar), I used them to secure the jig to the saw table, using a forstner bit to within 1/8" of drilling through the 3/4" plywood, secured in place with a drop of hot melt glue. No magnets? Leave the jig long enough to permit clamping to the table. Because I have a roll, I lined the hone shelf and stop block with UHMW slick tape to make the hone slide easier left to right. I have a small pencil tick centered on the leading edge of the hone shelf to center the jig on the blade. I use a combo. square in the miter gauge slot to assure the jig is square to the blade. Slide the jig to or away from the blade until the hone angle sits flat on back of the tooth (non-gullet side).

To use it, I'll UNPLUG THE SAW and sit on a stool on the right side of the saw, looking into the action where the hone rests on the back of the tooth. The jig and hone are square to the blade and held in position (magnets for mine, maybe a clamp of some sort for yours) to keep the hone at the same angle to the blade. With your left hand move the hone left to right across each tooth an equal number of times (3-5 strokes?), and with your right hand advance the blade up/backward to the next tooth. Put a Sharpie mark on the blade at your first tooth to reference the start/stop point of the blade length. As John described, I can also hold the hone vertical and square to the blade, turning the blade backward to clean up (joint) the tooth tips. All hone contact pressure is light on the blade. I think if I do this regularly before the blade goes noticeably dull, I can maintain a sharp blade and extend its life. (This is a new 3tpi 1/2" blade, so I won't be trying my new jig yet.)

More photos in the next message...
View attachment 59570
View attachment 59571
View attachment 59572
View attachment 59573
Brilliant!
 
Joined
Oct 25, 2020
Messages
233
Likes
195
Location
Minneapolis, MN
Brian, if it works, it's thanks to you! I didn't think I was going to do something like this when I woke up this morning. Then I ready your post, and Richard's, and brilliance was born!

If it's a failure, I was never here. Ha!
 
Joined
Feb 12, 2018
Messages
411
Likes
249
Location
Millington, TN
Joined
Feb 16, 2008
Messages
125
Likes
79
Location
Norristown, pa
Steve, on your last photo hold the card to blade make sure it at 90 degrees to blade (ie my use of miter gauge to hold it) other wise you have a chance to get one set of teeth sharper than the other. Caused blade cutting more to one side on my first attempt.
 
Joined
Oct 25, 2020
Messages
233
Likes
195
Location
Minneapolis, MN
Understood, Bob. I set it by eye to be 90 degrees, then held it there as I shifted my body with my phone to get the photo... I do like the miter gauge idea though, thanks for that.

I'm seeing my photos on a computer screen for the first time (I built my posting on my phone), and in my 2nd to last shot the hone is not resting fully on the tooth back, no contact right at the cutting edge. Having a light behind the blade may also be helpful to make sure the hone is in full contact.

Karl, you do make a valid point, and my experience in the past verifies that you'll never get it back to like-new condition. As a pure hobbyist, I'm just hoping for a bit of extra life for non-critical cutting before I trash it. If my shop life was a money-making effort, I'd build new blades, too. I don't see an effective way for a hobby woodworker to re-set bandsaw blade teeth (if it's even possible given hardened teeth on some blades), unlike a carbon steel hand saw that can have its teeth re-set (unlike the cheap modern disposable hand saws and their induction hardened teeth). Jointing the band from the sides would only adjust set by removing material from the teeth, narrowing the blade kerf and leading to binding problems. (Want cake, have cake, eat cake...?) I just looked at your link from a couple years ago about brazing new bands. Interesting, thanks for posting that.
 
Joined
Oct 13, 2016
Messages
1,067
Likes
1,551
Location
Rainy River District Ontario Canada
I use just standard quality bandsaw blades, and I will sharpen it once or twice in it's life, the bending and straightening of that blade will lead to metal fatigue over time and I have to replace the band when cracks develop or the band breaks.

The saw is used to just cut small pieces of raw log wood, large pieces I use my chainsaw on.

Sharpening does take a few minutes, all this is for a hobby as most here do I think, so I use my Dremel with the cutoff disk on it and sharpen the tip of every tooth, on my 14" saw with riser that makes for a good 300 teeth I have to touch on.

It does take less than 10 minutes to do this, and I find this not bothersome to do once or twice a year, yes I do not use the saw a lot, like I said just for smaller lumps of wood usually.

I have shown this picture of how I sharpen the band, on Sawmill Creek, and later here, sharpened like this for better than 25 years, the wide. set band is not for nice smooth cuts, but just to remove the excess parts of a blank, so just sharp is all it takes.

I will start at the weld of the band and do 4 or 5 teeth at the time and move the band, and again, goes pretty quick and the band is sharp again.

sharpening.jpg
 

Jim McLain

Artist
Joined
Apr 7, 2011
Messages
252
Likes
1,706
Location
Socorro, New Mexico
Website
www.lucadecor.com
I have two bandsaws, an old Powermatic 14” and a used Rikon 18”, for preparing bowl blanks and other lathe related projects.

A while back I searched the internet for ways to sharpen bandsaw blades that didn’t require removing the blade from the saw. Using a flat cutting disk on a Dremel and carefully touching the top of each tooth was the most promising and certainly has proven to be the most effective method for me.

But it’s time consuming and requires power equipment. I still wondered if there was a method to do so without taking off the blade and without using power equipment.

I couldn’t find any online, so I sat and stared at my bandsaw and cogitated and ruminated and pondered.

Then I came up with this idea.

UNPLUG THE SAW.

Hold a diamond card up to and parallel with the top edge of the teeth on the band saw blade, push it against that surface, and simply rotate the blade backwards using the upper wheel. Repeat until sharp. I used a 400 grit diamond credit card file.

For me it works, as well as for everyone else who has commented on the quick video I made. (My little channel isn’t monetized and won’t be, so I’m not trying to drive traffic there for hits. I just think this is a good idea.)

If you see any serious problems with this idea, please let me know.
Brian - I tried this method today and it worked. I was a complete skeptic when I started. Tried it on a dull Highland Hardware green wood blade and the quality of the cut was improved dramatically. Thanks
 
Joined
Mar 22, 2023
Messages
152
Likes
317
Location
Strasburg, VA
Brian - I tried this method today and it worked. I was a complete skeptic when I started. Tried it on a dull Highland Hardware green wood blade and the quality of the cut was improved dramatically. Thanks
Great. Frankly I was skeptical too when I first tried it. I didn’t expect much, but it does work.

This YouTuber also did a quick illustration of this method, based on my video, starting at 26:35 into the video. The replies from those who tried it are very positive.
 
Last edited:
Joined
Feb 12, 2018
Messages
411
Likes
249
Location
Millington, TN
Karl, you do make a valid point, and my experience in the past verifies that you'll never get it back to like-new condition. As a pure hobbyist, I'm just hoping for a bit of extra life for non-critical cutting before I trash it. If my shop life was a money-making effort, I'd build new blades, too. I don't see an effective way for a hobby woodworker to re-set bandsaw blade teeth (if it's even possible given hardened teeth on some blades), unlike a carbon steel hand saw that can have its teeth re-set (unlike the cheap modern disposable hand saws and their induction hardened teeth). Jointing the band from the sides would only adjust set by removing material from the teeth, narrowing the blade kerf and leading to binding problems. (Want cake, have cake, eat cake...?) I just looked at your link from a couple years ago about brazing new bands. Interesting, thanks for posting that.
Steve, My bandsaw uses 133 inches bands so at 4TPI that amounted to 532 teeth to sharpen. At first I tried using a Dremel like Leo, but this was taking me far too long. It was about the time that I discovered how important blade set is for cutting circular blanks from green wood. Pushing wood thru a bandsaw blade that‘s not quite sharp with the right set for the job is one of the biggest causes of bandsaw lacerations & amputations. This Is what finally pushed me to learn to braze new blades from coil stock. Getting a new 133“ blade for $6 to & $7 is icing on the cake because, like most, this is my hobby so I try to save money whenever possible. Granted your mileage may differ depending on available coil stock on eBay and how careful you are with brazing.

Glad to hear using a card is simpler that using a Dremel so I’ll keep that in mind in case I need a quick fix before getting another blade made.
 
Joined
Mar 22, 2023
Messages
152
Likes
317
Location
Strasburg, VA
I had only tried this method on my old 14” Powermatic bandsaw blades up this now. Tonight I was resawing a 5” thick 24” long Bradford pear branch on my 18” Rikon and the resaw blade was getting difficult to cut with. So I pulled out some course, fine and extra fine diamond files I got with a used lathe a while back and ran the blade around several times on each.

IMG_8941.jpeg

It definitely made a huge difference. I was able to finish resawing this branch without difficulty.
 
Joined
Nov 15, 2020
Messages
450
Likes
309
Location
Huntington, VT
Jointing the blade as described works up to a point, so that the gullet and back of the blade form a sharp line rather than a dull roundover. The problem is that it eliminates the clearance angle needed for efficient cutting and generates more heat in the cut. When the land at the back of the blade gets too large cutting will suffer. You would have to do a lot of jointing before the hook angle or set changes appreciably.

I used to run a thickness planer with an onboard grinder. The sharpening process involved jointing with a stone in a screw-fed holder as the blades were running, then grinding a clearance angle almost up to the edge, leaving a land of a few thousandths. If you have jointed your bandsaw blade several times and it doesn't cut freely, try going back over the blade with a small grinder and re-establishing the original clearance angle almost up to the sharp point.
 
Last edited:
Back
Top