- Joined
- Oct 7, 2009
- Messages
- 128
- Likes
- 16
Hello all
Does anyone have any lathed turned clocks they would like to share photos of??? Thanks.
Does anyone have any lathed turned clocks they would like to share photos of??? Thanks.

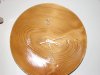
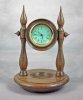
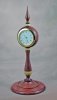
John here is one I turned a couple of months ago. I am going to make more but had a 2 X 12 piece of pine that I didn't think turned out to bad. I have some walnut and maple that I am going to try along with some different patterns.
Charles you can get clock faces from Klockit as well as Woodcraft.
I have a question. When I ordered some clock movements the other day they mention on item in the clock description. I don't know what it means. It says Max Dial Thickness: 1/8" I know what the shaft size is and the clock dimensions but I don't know what this is. does anyone else know.
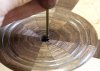
I built this tool to be able to measure the thickness of my clock face. I just took a coat hanger and bent it 90 degrees. I scribed some marks in steps 1/8" from the inside of the bent area. Then it's just a matter of putting this in the hole, pulling up and check to see how thick it is. Turn away more wood until you get the thickness you want. In this example the face is 1/4" thick.
John T.,
There are 12 segments which means that each side of each segment is cut at 15 degrees. Thus each segment has a 30 degree included angle, multiplied by 12 segments equals 360 degrees, a circle.
Hello all
Does anyone have any lathed turned clocks they would like to share photos of??? Thanks.
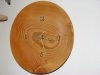
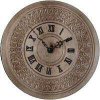
Here is mine clock, it is turned as a dish with chip carvings.
The clock is made from norwegian birch and it is 400 mm in diameter.
Then how do you fill them??

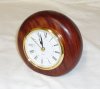
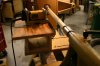
John are you talking about the diamond shapes in the Mahagony clock. Those are done using a router with a 90 degree V bit. I use the indexing wheel to index at 12 points. I have a table platform that mounts on my lathe banjo. The router sits on this. I rig up a stop to control the depth of cut and then just make 12 cuts. I glue square stock in the V and then just turn away all the wood that sticks up.
This is a photo of my rig. In this shot I'm using it to flute a spindle but the same rig is used for the diamond cuts. If you use a round bit you get round ends, a straight bit leaves square inserts and the V bit leaves pointed or diamond shaped cuts.
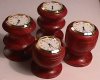
I made a bunch of these last year. I am relatively new to turning, (I am used to working in clay) so please bear with me. I had fun with them though. I do have close ups available on my website if you would like to contact me directly. Not sure if this helps.
Bruce