• Beware of Counterfeit Woodturning Tools (click here for details)
  • Johnathan Silwones is starting a new AAW chapter, Southern Alleghenies Woodturners, in Johnstown, PA. (click here for details)
  • Congratulations to Peter Jacobson for "Red Winged Burl Bowl" being selected as Turning of the Week for April 29, 2024 (click here for details)
  • Welcome new registering member. Your username must be your real First and Last name (for example: John Doe). "Screen names" and "handles" are not allowed and your registration will be deleted if you don't use your real name. Also, do not use all caps nor all lower case.

Pressure vs. vacuum to fill voids?

Joined
Jan 17, 2019
Messages
5
Likes
3
Location
Toronto, Ontario
Hello, all,

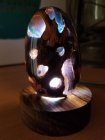
I would like to fill voids with epoxy – things like a knarly root ball, or wood with a lot of cracks in it, or a banksia pod. I'd like to submerse the item in epoxy to produce something that is ultimately solid, which I can then turn. (I currently have West system two-part epoxy. If that's not a good choice for this type of project, I'm happy to try something different next time. I'm just starting out with this, West happened to be the first thing I tried.)

To get rid of all the air inside voids like this, which would be better: a pressure pot, or a vacuum chamber? I have neither, so I'm trying to figure out which to invest in. I've been reading all the posts I can find on this topic, but the answer is not clear; lots of answers say "use a pressure pot or a vacuum chamber..." My question is which one is better for this particular use, and why?

So far, I've learned (among other things)
- pressure doesn't eliminate the air, just makes the bubbles invisible;
- a vacuum will bring bubbles to the surface;
- vacuum might take too long, if the set time is short.

If it turns out that a vacuum chamber is better:
I have a compressor, but not a vacuum pump. I'm guessing I can't use a shop vac... ;-) Could the compressor be used to create the vacuum without permanent modification?

Thanks for any advice!
--
anastasia
 
Joined
Feb 26, 2019
Messages
1,827
Likes
1,427
Location
Lebanon, Missouri
Im interested in the responses. Yes compressed air can be used to generate vacuum by the venturi effect. It is very inefficient. Depends on the compressor size whether you can run one. Ok for 1 or 2 uses a year but if you plan to do much a vacuum pump is the way to go.
 

Roger Wiegand

Beta Tester
Joined
Nov 27, 2018
Messages
794
Likes
932
Location
Wayland, MA
Website
www.carouselorgan.com
Haven't worked on wood yet, but over the decades have degassed thousands (tens of thousands?) of things in the lab, Always used vacuum, not even sure how pressure might work theoretically. If there were an exit path for the gas then I suppose you could use pressure to squeeze a liquid through a piece of wood, but an immersed piece with no escape path, I don't understand how it would work. It would be fine for a surface treatment.

I have to admit I don't know how the impregnation process works. I'm imagining a process where you infuse the monomer into the wood and then catalyze polymerization once the wood is saturated. That wouldn't work with epoxy chemistry, so maybe it's different.
 
Joined
Sep 12, 2017
Messages
902
Likes
1,097
Location
Marietta, Georgia
Haven't worked on wood yet, but over the decades have degassed thousands (tens of thousands?) of things in the lab, Always used vacuum, not even sure how pressure might work theoretically. If there were an exit path for the gas then I suppose you could use pressure to squeeze a liquid through a piece of wood, but an immersed piece with no escape path, I don't understand how it would work. It would be fine for a surface treatment.

I have to admit I don't know how the impregnation process works. I'm imagining a process where you infuse the monomer into the wood and then catalyze polymerization once the wood is saturated. That wouldn't work with epoxy chemistry, so maybe it's different.
Impregnation works by drawing a vacuum on the piece submerged in polymer until it quits bubbling, then releasing the vacuum and allowing the piece to pull the polymer in for an equal amount of time. After that its baked to cure the polymer in the wood. Wood has to be 100% dry or the residual moisture will drive the resin back out of the wood as it bakes.
 
Joined
Jul 5, 2016
Messages
469
Likes
244
Location
San Antonio, TX
I haven’t done it myself either, but from what I know vacuum is used to stabilize the wood and fill porous woods. Some wood need to be stabilized before casting with resin or the resin will show as small specs in the wood.

the pressure pot is to reduce the size of the air bubbles when casting. Some products like liquid diamond doesn’t require pressure pot and could be an alternative for casting.
 
Joined
Feb 26, 2019
Messages
1,827
Likes
1,427
Location
Lebanon, Missouri
No experience, but research has revealed:

> stabilization is very different from filling voids, typically uses vac and then bake. Does not fill empty space - voids

> Fill voids with epoxy - typically done with pressure because pressure can be built quickly, in seconds, and epoxy set times are not an issue. Vac takes minutes, depends on open air in chamber, pipe/fitting sizes, pump size.

> vac epoxy - set time and viscosity are important. Not only does it take time to create the vac, it takes time for bubbles to transfer to the surface and pop. I think these variables are why pressure is more typically used - set time and viscosity do not factor in nearly as much allowing many more epoxy product choice.

Most pressure chambers will work for vac. If you end up wanting to stabilize also, requiring a vac pump, you could then try it with epoxy.
 
Joined
Jul 26, 2016
Messages
2,326
Likes
1,105
Location
Nebraska
A common practice when open pour casting of epoxy is to use a torch or heat gun across the surface of the epoxy to heat the air bubbles suspended in the epoxy which causes them to expand, rise and burst. Now if you can just come up with a way to do that while it is in the vacuum chamber.
 
Joined
Jan 14, 2013
Messages
59
Likes
124
Location
North Georgia
Website
hogmountainwoodworks.com
I mainly use the vacuum chamber for stabilization, which does not fill the voids as described above, and the pressure pot for filling voids with resins.

If you use vacuum- only use it long enough to pull bubbles to the surface and that's it. Vacuum will make any trapped bubbles larger in your casting. I've used vacuum on liquid diamonds just to pull out the bubbles from mixing but then just let it cure at normal atmospheric pressure. If it's small enough to go in my pressure pot I use alumilite clear. I get less bubbles in the pressure pot than I did from liquid diamonds curing on it's own with pinecones and similar small items for pens. If the bubble can't find it's way to the surface it's trapped in a vacuum setting. In a pressure pot it doesn't matter, every bubble gets squeezed.

If it's too big for a pressure pot seal it up with aluminum duct tape and pour it into the voids with a thin, long curing resin.
 
Joined
Feb 8, 2014
Messages
1,178
Likes
613
Location
Evanston, IL USA
I have been messing around with this myself lately-- and I do mean "messing". I have used the West System, and other epoxies including Alumilite Clear Cast. The problem I have with epoxy is that it ends up too brittle and chips out a lot in turning. I have done some work in the pressure pot for things that fit, and some pours in larger pieces using plumbers putty and foil to keep the stuff in place-- I'm surprised Bill hasn't chimed in yet, I got that last idea from him.

Lately I have been using Alumilite Urethane Clear Slow
https://www.alumilite.com/products/casting-resins/rigid/alumilite-clear-slow. If you need bubble free as you described with banksia pod, you should use a pressure pot. I have been pouring molds lately for pine cones using short pieces of PVC pipe, or paper cups, or whatever I can find to hold them.

If you already have a compressor then you are halfway there in terms of tool purchases-- pressure pots are way less expensive than vacuum systems.
You can learn a lot on Youtube. I like this guy, Zac Higgins: https://www.youtube.com/channel/UCaiEQvv5CgXjk1qN7qevQUQ.

Here is a link to an earlier epoxy discussion in this forum: http://www.aawforum.org/community/index.php?threads/epoxy-question.14227/#post-144902
 
Last edited:
Joined
Aug 14, 2019
Messages
73
Likes
381
Location
Apache Junction, AZ
I do a lot of resin/wood projects, and I always use a pressure pot. I've recently gotten a vacuum chamber and pump and am now experimenting with stabilizing wood. Others have already said it, so you don;t really need my 0.02, but vacuum is to draw resin into dry, porous or punky wood and really doesn't work well for regular epoxy/resin. (BTW, it's not the same resin as 2 part resin, it's a heat activated resin or hardener... Cactus Juice is the "go to" for the stabilizing part.) For my big pours, I primarily use Alumilite Clear Slow, which pretty much requires a pressure pot. Even if you do all the normal things to keep bubbles from forming during stirring, the exothermic reaction which causes the resin to cure will still form bubbles. Plus if you use non-stabilized wood, the air trapped in the wood could escape, also causing bubbles in your resin projects. Alumilite was pretty much created for turners,and turns beautifully, especially if using a negative rake. What I like about Alumilite is I can pour it, put it in the pot, and remove it from the pot within 2 hours. It's not fully cured for turning yet, but I can demold it quickly, and pour the next thing.

I've recently tried Liquid Diamonds, and it cuts absolutely amazing on the lathe. It is also a much thinner viscosity than Alumilite, and gets into every nook and cranny beautifully. They claim you don't need a pressure pot, but since I have one, I use it anways. Only real downside to Liquid Diamonds over Alumilite is it takes 12 hours in the pot before I can demold it.
 
Joined
Feb 8, 2014
Messages
1,178
Likes
613
Location
Evanston, IL USA
I've recently tried Liquid Diamonds, and it cuts absolutely amazing on the lathe. It is also a much thinner viscosity than Alumilite, and gets into every nook and cranny beautifully. They claim you don't need a pressure pot, but since I have one, I use it anways. Only real downside to Liquid Diamonds over Alumilite is it takes 12 hours in the pot before I can demold it.

It is interesting to note that you find that Liqiud Diamonds cuts so well. I have not tried it, but other epoxies I have tried chip out a lot compared to the urethane Alumilite, which turns well for me. The slower cure time wouldn't bother me, especially since you find that it is good at filling the tight spots.
 
Joined
Aug 14, 2019
Messages
73
Likes
381
Location
Apache Junction, AZ
It is interesting to note that you find that Liqiud Diamonds cuts so well. I have not tried it, but other epoxies I have tried chip out a lot compared to the urethane Alumilite, which turns well for me. The slower cure time wouldn't bother me, especially since you find that it is good at filling the tight spots.

Even Alumilite will chip if you're too aggressive, or your blank has corners, and you need to round it out. I did 2 Liquid Diamond projects this past weekend (images in the forum gallery), and not a single chip. I even deliberately got very aggressive with it so try and determine the limit, but it never chipped once. Ribbons all the way...

I've used Alumilite, TotalBoat, West Coast, SuperClear Glass 2.0, and now Liquid Diamonds. I now limit myself to just the Alumilite, and I do believe I'll be doing much more Liquid Diamonds too.
 
Joined
Feb 8, 2014
Messages
1,178
Likes
613
Location
Evanston, IL USA
Even Alumilite will chip if you're too aggressive, or your blank has corners, and you need to round it out. I did 2 Liquid Diamond projects this past weekend (images in the forum gallery), and not a single chip. I even deliberately got very aggressive with it so try and determine the limit, but it never chipped once. Ribbons all the way...

I've used Alumilite, TotalBoat, West Coast, SuperClear Glass 2.0, and now Liquid Diamonds. I now limit myself to just the Alumilite, and I do believe I'll be doing much more Liquid Diamonds too.

Thanks Joe, What basis will determine which product you'll use?
 
Joined
Feb 26, 2019
Messages
1,827
Likes
1,427
Location
Lebanon, Missouri
Joe, for a resin project what do you do for the final finish? Not a full "cast" piece, but say wood chunks surrounded by resin, where both resin and wood are exposed when completed.
 
Joined
Aug 14, 2019
Messages
73
Likes
381
Location
Apache Junction, AZ
Joe, for a resin project what do you do for the final finish? Not a full "cast" piece, but say wood chunks surrounded by resin, where both resin and wood are exposed when completed.

I typically dry sand from 80 grit to 400, then apply a coat of Myland's Sanding Sealer, then I use Yorkshire Grit paste (which supposedly is the same as sanding up to 1000 grit), then Yorkshire Grit Microfine Abrasive paste. I then run it through the 3 wheel Beal system (Tripoli, White Diamond, high speed buffing with Carnuba Wax). This is if it's a wood/resin blank where the resin is opaque. If it's going to be clear (such as an egg), then I dry sand from 80 to 3000, then wet sand 3000 to 12000 for a crystal clear resin, but it still goes through the Beal 2 wheel system.
 
Joined
Feb 8, 2014
Messages
1,178
Likes
613
Location
Evanston, IL USA
I typically dry sand from 80 grit to 400, then apply a coat of Myland's Sanding Sealer, then I use Yorkshire Grit paste (which supposedly is the same as sanding up to 1000 grit), then Yorkshire Grit Microfine Abrasive paste. I then run it through the 3 wheel Beal system (Tripoli, White Diamond, high speed buffing with Carnuba Wax). This is if it's a wood/resin blank where the resin is opaque. If it's going to be clear (such as an egg), then I dry sand from 80 to 3000, then wet sand 3000 to 12000 for a crystal clear resin, but it still goes through the Beal 2 wheel system.

Whoa Joe, you might be sorry you got into this...

When you say "egg" I assume you mean something like the piece you are holding up in the gallery?
And for those pieces, what do you use for a mold container?
I have been messing around with attempting to get parts, like pine cones, centered in a mold, but it's really difficult when resin goes in and the pine cone wants to float.
Thanks,
Tom
 
Joined
Aug 14, 2019
Messages
73
Likes
381
Location
Apache Junction, AZ
Whoa Joe, you might be sorry you got into this...

When you say "egg" I assume you mean something like the piece you are holding up in the gallery?
And for those pieces, what do you use for a mold container?
I have been messing around with attempting to get parts, like pine cones, centered in a mold, but it's really difficult when resin goes in and the pine cone wants to float.
Thanks,
Tom

Yes, that is precisely what I mean. They're my variation of the Dragon Eggs that BensWorx makes. I don't do the fancy landscapes that he does, I usually embed a figurine, or something else within the mold. Getting them centered is an exercise in frustration, especially because of the slanted cups. Oh, yeah, the cups. I use plastic 32 ounce movie theater cups for my molds. What makes that challenging is the slant of the cup. I have the precise measurements written down somewhere, of course I don't remember where at the moment. But the bottom is much narrower than the top. So to make a pure cylinder or even an egg, you cut away a lot of material. The other challenging aspect is the bump in the middle of the bottom of the cup. Some are ridged, but I found some that have only a bump. So I pour a small amount of resin to just cover the hump, and let it set, resulting in a flat and level top where I can place my wood base down in it. Too soon, one end dips into the really soft resin. Offsetting your centered prop. Do it too late, bonding won't be as strong. I'm going to try using paper drinking cups. They're coated inside for hot & cold drinks, and all the ones I've researched have a flat bottom, and the size difference of the top & bottom isn't as extreme. BTW, another thing I've learned is the reason these projects come out of these molds so easily, thus making the cups reusable is that slant. I've tried in straight cylinder molds (pvc pipe, plastic bottles with the tops cut off, etc...) but none of them pop out as easily as the cup. Most times I have to cut it off. I believe the exothermic reaction of the curing resin heats the container just enough to warp the middle, and suck it in basically.

I've also had very little luck with super glue in holding my props down when I do the big pour. Of course, truth be told, I'm an impatient fellow and I tend to overdue things a wee bit. My control of super glue is almost non-existent. When something calls for a very small dab of super glue, I usually end up dousing the whole thing. Superglue will show up in resin as an ice like or crystal coating. Unless that's the look you're going for, it's distracting in the end piece. You can best see that in the Micky Mouse thing I made. All around his feet and legs... There are benefits to it, as I said if it's the look you're going for. You can see that in the Ice Dragon piece. All those ice like crystals are dabs of super glue before pouring the main pour. A happy accident...

And finally, I purchased a 3x3x6 HDPE mold from Lizard Blanks. Of course you end up with a block that you'll have to round off on the lathe, but it is much easier to cut a 3x3x1 square block instead of a 2.8" tapering round block for the base. Of course I have to pour the item sideways instead of standing upright, but with proper preparation on the base, such as affixing props, that isn't much of a challenge. I've been using J-B Weld 5 minute epoxy instead of superglue. Still can't just glop it on there, but I don't have to be as meticulous. I have been experimenting with painting my wooden base with black acrylic paint, then when that's dry, mixing Chameleon Color Shifting flakes with some J-B Weld and painting my block. That sets in 5 minutes, but full cure is an hour. If I want to put in a prop, I just set it in the wet epoxy.

Next up on my list of things to try is cholla wood. Living in Arizona, it's everywhere. That's also why I started looking into wood stabilization. I've used raw cholla in some other projects (see included cholla light I tried making) but I've never been happy with it's feel. I'm hoping stabilizing it will help.
 

Attachments

  • chollaLight.jpg
    chollaLight.jpg
    37.3 KB · Views: 31
Back
Top