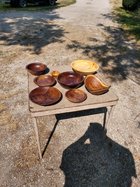
In the interest of speeding up the process of curing/drying the danish oil I've set some bowls out in the sun. Is this a waste of time or will it help/damage? I want to turn the tenon off with vacuum and don't want to draw the finish through. I figure to bring them in at night and put them back out tomorrow maybe longer?
Attachments
Last edited: