• Beware of Counterfeit Woodturning Tools (click here for details)
  • Johnathan Silwones is starting a new AAW chapter, Southern Alleghenies Woodturners, in Johnstown, PA. (click here for details)
  • Congratulations to Peter Jacobson for "Red Winged Burl Bowl" being selected as Turning of the Week for April 29, 2024 (click here for details)
  • Welcome new registering member. Your username must be your real First and Last name (for example: John Doe). "Screen names" and "handles" are not allowed and your registration will be deleted if you don't use your real name. Also, do not use all caps nor all lower case.

Putting bowls in the sun a waste of time?

hockenbery

Forum MVP
Beta Tester
TOTW Team
Joined
Apr 27, 2004
Messages
8,652
Likes
5,014
Location
Lakeland, Florida
Website
www.hockenberywoodturning.com
What are the 'cons' of finishing on the lathe?

I like to finish several pieces at the same time. A lot easier, quicker, and better quality when I finish 3-5 pieces together.
1 set up, 1 clean up. If I’m buffing they all go through the Tripoli, white diamond, carnuba.
I do all the signatures at the same time too.

Also really hard for me not to leave streaks when finishing on the lathe.
 

Tom Gall

TOTW Team
Joined
Feb 20, 2013
Messages
976
Likes
1,808
Location
Hillsborough, NJ
Trying to be fair, not contrary--What are the 'cons' of finishing on the lathe? To be contrary to the 'cons'. ;)

Here are a couple that occur to me:
1. Makes a mess of the lathe​
2. Applying finish with a turning/windmilling piece, in the area where all the sanding dust was generated, increases the nibs​
3. Ties up the lathe while the finish dries​
4. When you later have to remove the tenon, you've got to blend the finish together between the first and last sections​
2 episodes of finish work instead of just one, less efficient​
1. Not if you put down an old cloth or cardboard to cover the bed ways. Besides, have you seen some of the photos of people's lathes?
I've seen cleaner garbage trucks. :) After 27 yrs. my lathe is still relatively clean.
2. Slow speed or stationary - no 'windmilling' involved. What, no dust collector or filters? Unless you apply your finish in a separate room
or building your entire shop will have some floating dust. If you use an oil finish and wipe it off dust nibs are of little consequence.
3. Remove the piece and/or chuck w/piece to another area for drying. Does not tie up the lathe.
4. I've never had that problem. When I remove the tenon I only work on the foot/bottom and decorate. Unless you want to re-design
the shape of your bowl there is no 'blending' involved.
 
Joined
Dec 29, 2022
Messages
835
Likes
814
Location
West Central, IL
1. Not if you put down an old cloth or cardboard to cover the bed ways. Besides, have you seen some of the photos of people's lathes?
I've seen cleaner garbage trucks. :) After 27 yrs. my lathe is still relatively clean.
2. Slow speed or stationary - no 'windmilling' involved. What, no dust collector or filters? Unless you apply your finish in a separate room
or building your entire shop will have some floating dust. If you use an oil finish and wipe it off dust nibs are of little consequence.
3. Remove the piece and/or chuck w/piece to another area for drying. Does not tie up the lathe.
4. I've never had that problem. When I remove the tenon I only work on the foot/bottom and decorate. Unless you want to re-design
the shape of your bowl there is no 'blending' involved.
1. I use one of those large disposable pads for incontinence that people put on their beds. Pretty absorbent and the back side is waterproof so nothing gets on the ways. Also provides a small amount of cushion if I were to drop something. Big bag of them doesn't cost too much. 2' x 3', 50 of them under $20 and one will last a long time.
 
Joined
Oct 13, 2016
Messages
1,074
Likes
1,575
Location
Rainy River District Ontario Canada
I basically add the finishing oil on the turnings off of the lathe, it is for me easier to wipe on the oil inside and outside of the turning and let it sit for 10 to 20 minutes and wipe it all down, then set it on 3 pencils and let it cure for a day or two before I add another coat, I do all this out of the shops I would get dust etc on the turning while it sits in the shop, I never leave it on the lathe, as I probably will be turning and/or sanding again.

As for the original question, it depends of course on what finish has been put on the turning, some might cure a little faster if set out in the sun (when it is warm outside not in the winter).

But then again, the sun will be warming/heating more on one side than the other, or inside and not on the lower area, I can imagine the wood warping because of that,............., I would think it is better to not put it in the sun, jus IMO.
 
Joined
Jul 19, 2018
Messages
1,715
Likes
2,254
Location
Ponsford, MN
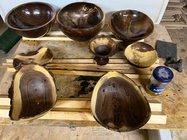
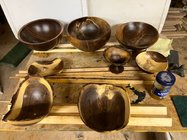
As for the original question like Leo said the sun will not heat the piece evenly. Curing DO I think is best done out of the sun inside with an even temperature and at least 2 days between applications. Each application needs time to cure before the next application. The 2 photos below show 6 bowls in the background on the 3rd coat and the 2 in the foreground are on their first coat after sitting for about 1 hour. The second photo is after they all have been wiped down. In both photos I tried to position the bowls with the end grain areas visible because that is the area that will absorb the most oil. After a few days the 6 - 3 coat bowls should be ready for wax. The glass jar has some DO in it and a 1" foam brush with it's handle cut off to fit in the jar so I can use the brush until it wears out and I never have to clean it.

IMG_0325.jpgIMG_0327.jpg
 
Joined
Dec 29, 2022
Messages
835
Likes
814
Location
West Central, IL
What brand are you using?

The "watco" brand instructions state-
1. Use on dry wood etc..

2.Shake container thoroughly etc..

3. Flood surface using brush or cloth, applying additional finish to areas that absorb all of the liquid. Allow to penetrate for 15 minutes.

4. Reapply, allowing an additional 15 minutes penetration. Wipe surface completely dry. Ready for use in 8 - 10 hours.

5. If a topcoat such as a polyurethane is desired, allow Watco Danish Oil to dry for 72 hours before applying.

#3 is mainly why I did it the way I did. But I'm open to trying other brands but this is a really easy finish to apply and several people use it.
 
Joined
Jul 19, 2018
Messages
1,715
Likes
2,254
Location
Ponsford, MN
What brand are you using?

The "watco" brand instructions state-
1. Use on dry wood etc..

2.Shake container thoroughly etc..

3. Flood surface using brush or cloth, applying additional finish to areas that absorb all of the liquid. Allow to penetrate for 15 minutes.

4. Reapply, allowing an additional 15 minutes penetration. Wipe surface completely dry. Ready for use in 8 - 10 hours.

5. If a topcoat such as a polyurethane is desired, allow Watco Danish Oil to dry for 72 hours before applying.

#3 is mainly why I did it the way I did. But I'm open to trying other brands but this is a really easy finish to apply and several people use it.
I am using Watco and have been for more then 40 years and the directions on the can have changed but the best way to apply it has not. You have already seen that you can't flood it enough to stop that penetration in one application. The #4 is a joke that will truly never be much of a finish in 8 to 10 hours.
 
Joined
Dec 29, 2022
Messages
835
Likes
814
Location
West Central, IL
I am using Watco and have been for more then 40 years and the directions on the can have changed but the best way to apply it has not. You have already seen that you can't flood it enough to stop that penetration in one application. The #4 is a joke that will truly never be much of a finish in 8 to 10 hours.
Forty years? That's a good track record for use. You'd think they might have changed the formula over that period of time to keep up with the various laws of chemical manufacture? I would hope that they would put the best use instructions on the can so it will be around for another 40 years. I doubt I will be though.
 
Joined
Feb 26, 2019
Messages
1,827
Likes
1,427
Location
Lebanon, Missouri
Leaving tenons on, finish (wipe on type) on the lathe:
> finish is applied off the lathe, allowed to soak, add more, etc. whatever length of time one wants. If the finish gets too thick/sets up on the piece, just add a bit more finish to thin it
> mount on lathe to wipe off. Use low pressure air nozzle to blow off the surface, blow finish out of cracks, etc, greatly reduces bleed out. I. Rotate the HS 90 deg to the bed, and I have a plastic sheet with a long piece of wood stapled to it with magnets embedded that attaches to the lathe to block finish.
> sometimes I wet sand with finish on the lathe, plastic sheet keeps finish off the lathe.
> in warm months set the piece outside in the sun to speed drying and curing. Have yet to observe unequal heating of the piece to be a problem, though if it is windy pieces can get blown around. In cold months pieces go in the “warm box”. Adding some heat “airs out” the finish and reduces the smell much more quickly, a good indicator of faster cure.

I’ve done this same routine with of the shelf DO, various oils, diy DO, poly thinned 1:1 with paint thinner. Favorite is spar varnish thinned 1:1.
 
Joined
Feb 6, 2010
Messages
2,987
Likes
1,969
Location
Brandon, MS
Forty years? That's a good track record for use. You'd think they might have changed the formula over that period of time to keep up with the various laws of chemical manufacture? I would hope that they would put the best use instructions on the can so it will be around for another 40 years. I doubt I will be though.
Yes formula has changed. Now there are two. Original and a new low VOC.
 
Joined
Apr 18, 2009
Messages
145
Likes
65
Be careful exposing fresh Cherry to direct sunlight, especially after oil application. It will only take a few hours and you can sell it as Walnut.
 
Back
Top