• We just finished moving the forums to a new hosting server. It looks like everything is functioning correctly but if you find a problem please report it in the Forum Technical Support Forum (click here) or email us at forum_moderator AT aawforum.org. Thanks!
  • Beware of Counterfeit Woodturning Tools (click here for details)
  • Johnathan Silwones is starting a new AAW chapter, Southern Alleghenies Woodturners, in Johnstown, PA. (click here for details)
  • Congratulations to Dave Roberts for "2 Hats" being selected as Turning of the Week for April 22, 2024 (click here for details)
  • Welcome new registering member. Your username must be your real First and Last name (for example: John Doe). "Screen names" and "handles" are not allowed and your registration will be deleted if you don't use your real name. Also, do not use all caps nor all lower case.

Steady Rest - Metal Construction vs Plywood, Opinions Please

Joined
Aug 10, 2021
Messages
179
Likes
119
Location
Benton, AR
I have some experience with steady rests constructed with plywood (there was noticeable flexing). It seems reasonable to conclude that a metal fabricated steady rest would be more rigid (but I'm not certain). Opinions if you PLEASE: are the metal rests more rigid? if so, is the added expense of metal worth the investment?
THANKS
 
Joined
Jan 10, 2024
Messages
256
Likes
139
Location
Bournemouth, UK
I have no experience of using a steady rest, but may I say, so many folks seem to strive to fabricate perfectly circular rests when this doesn’t seem necessary. A friend recently made a square plywood steady and he says it works perfectly well. Good luck with your project Daniel, whatever material you choose. ;)
 

john lucas

AAW Forum Expert
Joined
Apr 26, 2004
Messages
8,337
Likes
3,595
Location
Cookeville, TN
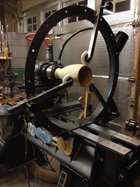
I have played with the Carter rest. It's pretty rigid. Didn't get to drive itca really goid test. My plywood rest flexes a lot. I have a steel steady that was made out of 3/4" thick by 3" wide steel. The adjustable arms are made from 2 3/4" square pieces. It does not move. However with all 8 arms it weighs 87lbs. I plan to cut it in half so you can I stall it without removing the tailstock or banjo. Putting it on 1/2 at a time will.obviously reduce the weight.
 

Attachments

  • 20240308_114318.jpg
    20240308_114318.jpg
    471.1 KB · Views: 49
Joined
Jun 25, 2020
Messages
53
Likes
50
Location
Easley, SC
The point where the circle (or square) meets the base and the base size that clamps to the bed are the critical points. Whether metal or wood, these have to be made very rigid. Doubled up 3/4 Baltic Birch ply braced to the base should work. Lots of examples on the web.
 
Joined
Aug 6, 2009
Messages
709
Likes
508
Location
Lummi Island, WA
I built a metal one to the excellent J McCombs (sp?) plans available online several years ago. The build was simple enough if you have rudimentary welding skills or can borrow some and didn’t require tools I didn’t already have, except the mig welding rig I borrowed from a friend. The result is very rigid and well worth the time. It was also significantly less expensive than buying ready-made.
Photo is build in progress, tacked together from nearly 15 years ago…
 

Attachments

  • IMG_0235.jpeg
    IMG_0235.jpeg
    389.3 KB · Views: 49
Joined
Apr 11, 2014
Messages
426
Likes
424
Location
Dallas, TX
Like all tools, a steady-rest is worthless unless you need it. And if you need it, what do you need it for?
If for finials and chair legs/spindles, I would think a well-designed baltic birch would serve well. Richard Findley's steady is clearly optimum for the task.
If for small pieces, plywood might still be adequate - never used a small steady-rest and never do small work requiring one
For larger works, steel is probably best. Problem with rolling your own is that you have to live with the results, even if not that good, and the cost can easily approach a commercial "known quantity"
If you're focus is large works, take a look at Clark I have used and recommended the Clark steady-rest for years now. We put a lot of emphasis on heavy lathes - shouldn't the steady-rest be compatible with the lathe?
 

Attachments

  • Planet Mesquite Steady Rest.jpg
    Planet Mesquite Steady Rest.jpg
    421.1 KB · Views: 57
Joined
Aug 14, 2009
Messages
2,054
Likes
1,145
Location
Peoria, Illinois
My big spindle steady rest is 3 layers of 3/4" plywood laminated together. It more that rigid enough to hand huge work. All the load is taken through a radial/vertical direction, no horizontal flexing from front to back. Plywood is super strong in tension and compression.
 
Joined
Jun 10, 2023
Messages
80
Likes
65
Location
Sydney, Nova Scotia
View attachment 61337
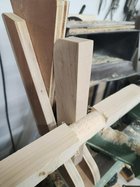
My spindle steady is hardwood with a ply insert. Might not be what you’re after, I guess you’re thinking for hollow forms?
Yeah, I like that. I'm mostly a spindleturner, and I've made a couple of the round ones, but I wasn't really happy. When I ran a college shop, I had the Oneway one; not really happy. I made this one, based on one in Ernie Conover's book..... happy .As you reduce the spindle diameter, just takes a tap on the wedge to tighten it all up again. I remember watching a stevethewoodturner video on Instagram this week, and his steady was along the same lines as ours.
1710018014383.jpeg
1710018046791.jpeg

All depends on the type of work you want to do. Being able to turn right past the steady is important to me. I have little expereince with bowls and none with hollow forms.
 
Joined
Jun 10, 2023
Messages
80
Likes
65
Location
Sydney, Nova Scotia
Adrian-
It might be overkill, but I wonder if adding a strip of UHMW plastic to the face of that wedge would help it run smoother.
The wedge or the piece that bears on the wood? That's an option in reserve. So is adding a piece of melamine tape, but neither seem to be very necessary so far. Seems to be lots of old ones out there that are all but they didn't have the fancy upgrade options. Work in progress.
 
Joined
Jan 30, 2024
Messages
14
Likes
23
Location
North Bend, OR
IMO, if you have any out of balance with your piece such as a natural edge deep vase a piece with a void in it or maybe a piece that went out of round, a wooden rest will shake and move too much. I went to the Clark steady rest also and have had no issues at all.
 
Joined
Jun 18, 2023
Messages
19
Likes
4
Location
Cincinnati, OH
After making a round steady rest using a double layer of plywood I quickly became very frustrated having to move from one side of the banjo to the other, and back. When I needed one a few months ago I build the "hook" steady rest presented in a recent issue of the AAW magazine and was very satisfied.
 
Joined
Aug 14, 2009
Messages
2,054
Likes
1,145
Location
Peoria, Illinois
IMO, if you have any out of balance with your piece such as a natural edge deep vase a piece with a void in it or maybe a piece that went out of round, a wooden rest will shake and move too much. I went to the Clark steady rest also and have had no issues at all.
I turn all my deep hollow vessels between centers first, so they are never that far out of balance. As I said, mine is constructed from 3 layers of 3/4" plywood. There is nothing flexible about mine.
 
Joined
Jan 12, 2014
Messages
45
Likes
53
Location
Crossville, TN
Like all tools, a steady-rest is worthless unless you need it. And if you need it, what do you need it for?
If for finials and chair legs/spindles, I would think a well-designed baltic birch would serve well. Richard Findley's steady is clearly optimum for the task.
If for small pieces, plywood might still be adequate - never used a small steady-rest and never do small work requiring one
For larger works, steel is probably best. Problem with rolling your own is that you have to live with the results, even if not that good, and the cost can easily approach a commercial "known quantity"
If you're focus is large works, take a look at Clark I have used and recommended the Clark steady-rest for years now. We put a lot of emphasis on heavy lathes - shouldn't the steady-rest be compatible with the lathe?
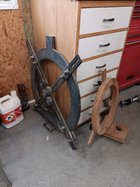
Love my Clark!
 
Joined
Aug 6, 2009
Messages
709
Likes
508
Location
Lummi Island, WA
If you’ve decided to try a metal option, note that several options available on the market use a commonly available duct flange as a base. I believe the Clark, the newer design from Robust, and the old Nichols version all started as a duct flange. It’s sturdy angle steel design takes care of most of the hard work. McMaster Carr sells them in sizes up to at least 28”. Other than that, a trip to your local metal supplier, possibly a metal cutting bandsaw blade or a trip to HF for some cut off wheels for the angle grinder and you’re in business.

I’ve attached the excellent plans and tutorial that J. D. Combs put together and shared on another forum back in 2010. I have no other information on Mr Combs, but I did make an attempt to contact the originator, but the email domain in the tutorial is no longer active. These plans were freely shared virtually everywhere at the time, so I doubt there’s a problem. If you do a Google search for steadyrest by jdc it comes up in several places. Thank you Mr Combs.

I had everything cut in about an hour (full disclosure - I took an afternoon to prep everything, but then I hadn’t done metal work for several decades and went slowly, measured twice and read the instructions…) and ready to weld - I took the opportunity to borrow the equipment and refresh languishing skills, but a friend who welds or a local welding shop could do what needs doing in about another hour…splurge on new wheels and bearings ordered cheaply on line and you’ve got a strong, sturdy steady rest. Mine is still going strong after 12 years…
 

Attachments

  • Steadyrest by JDC.pdf.pdf
    1.2 MB · Views: 54
Last edited:
Joined
Aug 25, 2023
Messages
11
Likes
10
Location
Hendersonville NC
Website
www.zargon.com

I’ve attached the excellent plans and tutorial that J. D. Combs put together and shared on another forum back in 2010. I have no other information on Mr Combs, but I did make an attempt to contact the originator, but the email domain in the tutorial is no longer active. These plans were freely shared virtually everywhere at the time, so I doubt there’s a problem. If you do a Google search for steadyrest by jdc it comes up in several places. Thank you Mr Combs.

Thanks so much for sharing those great plans!!! I’ll be making one of those soon..hopefully. 😏👍
 
Joined
Mar 19, 2016
Messages
1,187
Likes
1,282
Location
Haubstadt, Indiana
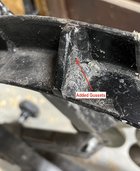
I made my steady rest from the JD Combs plans (Jeff Nichol design). The plans are great, but the 5/16” base is too thin. I ended up doubling mine. I would strongly suggest using 1/2” steel for the base. Also I added gussets around the flange for additional stiffness. I made an extra arm that could be installed into any hole of the flange. I normally install this arm at the 9 o’clock position and the arm at the 10 o’clock position is not used. When I made mine it was for a 18” swing for my previous lathe. When I got my Robust lathe I just raised it to the center of the Robust lathe.

Edit: This steady rest is heavy, maybe 50lbs, but I have a hoist over my lathe. I have never used a wood steady rest, but even if there is a little flex I am not sure if that really makes a big difference.


IMG_3435.jpeg


IMG_3436.jpeg
 
Last edited:
Joined
Nov 18, 2012
Messages
660
Likes
1,867
Location
Torrance, CA
Remember you have to lift it to get it on the lathe and to move it around for cleaning, etc. That downside does not make having a metal one not worth having. I love my metal steady rest. I had a home made plywood one that worked well in an earlier version; got lazy when my new lathe was ordered. I think William’s comment sums it up!
 
Joined
Jul 19, 2018
Messages
1,713
Likes
2,246
Location
Ponsford, MN
IMG_0658.jpgIMG_0659.jpg
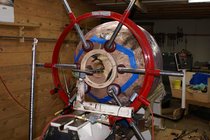
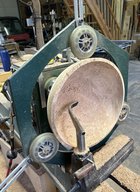
The upper one "shown in use" was made about 10 years ago of 1/2" steel plate that was laying around: 1st step was to mark out the hexagon and the circle and take it to a local guy that has a plasma ark system to get it cut out. 2nd step make a base to mount it and attach the ring to it. 3rd step make the arms to hold the wheels and attach the wheels. 4th step machine the 3 dado like groves for the wheel arms and tap for the clamp screws. 5th step paint it and use it.
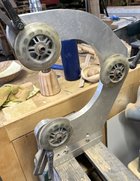
The lower one was made about 25 years ago of 3/4" aluminum plate purchased at a salvage dealer in north Minneapolis: 1st step cut out the c shaped frame using my wood cutting bandsaw. 2nd step make the base and attach the frame. 3rd step assemble the frame and base. 4th step drill and tap 3 holes in each wheel position. 5th step make the arms and attach the wheels. 6th step use it.
 

Dennis J Gooding

Beta Tester
Beta Tester
Joined
Apr 10, 2010
Messages
827
Likes
747
Location
Grants Pass, Oregon
I have some experience with steady rests constructed with plywood (there was noticeable flexing). It seems reasonable to conclude that a metal fabricated steady rest would be more rigid (but I'm not certain). Opinions if you PLEASE: are the metal rests more rigid? if so, is the added expense of metal worth the investment?
THANKS
I made a steady rest out of plywood several years go and it has worked satisfactorily. However, if I were to make another, I would rotate the position of the three wheels so that none is at the very top. A wheel and support arm at the top interferes with a laser or camera wall thickness system in many cases.
 
Last edited:
Back
Top