In the course of developing a purely graphic aid to turning spheroids, it occurred to me that the Berger Sphere Calipers might be applied to the same purpose. I have since worked out the details and can confirm that, indeed, they can be used to mark up the work piece for both 8-sided and 16-sided approximations to oblate and prolate spheroids. Furthermore, consistent with the original intent of the device, no calibrated measuring capability and no computation is required.
Here is the procedure. First, turn the usual cylinder with desired diameter D and define the desired length L of the spheroid by parting in a bit at the ends. If L is less than D, you will get an oblate (compressed) spheroid; if L is greater than D you will get a prolate (stretched) spheroid. Next, set the calipers to the diameter of the cylinder and save the measurement for later use by marking the positions of the two ends of the calipers on a piece of paper. Repeat this procedure to record the length L. Then, set the calipers to measure the diagonal of the cylinder. That is, set one leg at top center of one end of the cylinder and the other leg at the bottom of the other end. Again, save this measurement on the piece of paper for later use. I will denote this quantity as H (short for “hypotenuse” of the two right triangles that form the rectangular outline of the cylinder).
To begin Stage 1, set the Sphere Calipers to the length L and, using the beak of the calipers, mark horizontally from the corners to establish two of the cut lines. Now reset the Sphere Calipers to the diameter D. At this point, there are two options—one can measure radially inward from the corners and mark directly, or one can determine the diameter of the face of the target 8-sided figure and part down to this diameter a each end of the cylinder. To determine the required diameter, reset the Sphere Calipers to the saved line segment of length D and using the beak value, shorten the saved line D on each end by that amount. The line segment that is left is the required diameter. Make straight cuts between pairs of lines to remove the original corners to complete Stage 1, an appropriate stopping point for some applications. Figure 2 shows the results of Stage 1.
Stage 2 is carried out in a similar fashion except that the offsets that must be marked from existing “corners” are of three kinds: horizontal, radial and slanted, and each requires a different setting of the main jaws of the Sphere Caliper. The “ears” of the calipers are used for these markings. Here are the rules: For offsets in a horizontal direction, the main jaws of the Sphere Caliper are set to L. For offsets in a radial direction, the main jaws of the Sphere Caliper are set to D. For offsets in a slanted direction, the jaws of the Sphere Caliper are set to B, which is obtained as follows.
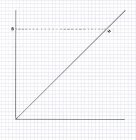
Prepare a simple graph as shown below using quadrille or lined paper. It consists merely of a horizontal and a vertical axis and a line at 45 degree. Once drawn, it can be used indefinitely, or it can be easily drawn as the need arises. Its purpose to take the measured length H and convert it to a desired quantity B = 0.707 H without the need for calibrated measuring devices or calculators. To use it, set calipers to the saved length H and measure out along the diagonal and place a mark. Now measure either leftward or downward from that point to an axis and reset the calipers to that value, which is B.

