I have turned four vase/hollow forms and two of them have had a problem where the rims would crack severely during turning before closing after they sat around and were done for some time. It has happened with Willow and Yellow cedar, one wet and the other dry respectively. Why would they do this and how do I stop it or avoid it? The wood is not dripping wet, or hot. Is there something about the thin rim at high speeds causing cracking? If so, why did the other two vases out of cottonwood not crack? It is quite upsetting, especially when the rest of the piece is not cracked and suddenly 6-8 cracks are spreading and growing so quickly you can hear it. Maybe the vibrations? On a slightly different topic, I have had a couple of pieces of almost dry wood crack immediately upon a finish/glue being applied, has anyone else had this happen or know a way to avoid it?
-
Beware of Counterfeit Woodturning Tools (click here for details) -
Johnathan Silwones is starting a new AAW chapter, Southern Alleghenies Woodturners, in Johnstown, PA. (click here for details) -
Congratulations to Peter Jacobson for "Red Winged Burl Bowl" being selected as Turning of the Week for April 29, 2024 (click here for details) -
Welcome new registering member. Your username must be your real First and Last name (for example: John Doe). "Screen names" and "handles" are not allowed and your registration will be deleted if you don't use your real name. Also, do not use all caps nor all lower case.
You are using an out of date browser. It may not display this or other websites correctly.
You should upgrade or use an alternative browser.
You should upgrade or use an alternative browser.
Vase Rim Cracking
- Thread starter Isaac Litster
- Start date
Isaac turning wood is somewhat of a crap shoot as you don't really know what internal forces lie inside that hunk of wood. Being dry or keeping it cool while sanding are great things to do but cannot insure that the wood is not going to move. Sometime that movement leaves you with cracks. Here where I live I have a problem with Beech, most generally I would lose 3 out of 4. My fix is to not turn Beech. Where you live I'm fairly certain you are limited to a few species. I guess your best bet is to rough turn and wait and see if cracks develop before finish. Maybe someone else here may have ideas that may help.
Cracking comes from some parts of the turning drying out faster than the rest. A big factor in pieces turned once from green is even wall thickness. Another is slowing down the initial moisture loss. I have seen it suggested (by Hockenberry?) to put the piece in a closed cardboard box for a day or two, then open one flap for a day or two before fully opening the box. Robohippy has described wrapping the rims of his bowls with plastic twine or somesuch.
The worst thing is exposing the new piece to hot dry moving air right away (such as you might find in winter in Alaska with a forced hot air furnace). Maybe you have a garage or cellar that will keep your pieces above freezing with a reasonable humidity level. As you work with the locally available woods you will get a feel for how fast you can safely dry them. As Bill suggested you can twice-turn your pieces but that requires even more moderate drying.
The worst thing is exposing the new piece to hot dry moving air right away (such as you might find in winter in Alaska with a forced hot air furnace). Maybe you have a garage or cellar that will keep your pieces above freezing with a reasonable humidity level. As you work with the locally available woods you will get a feel for how fast you can safely dry them. As Bill suggested you can twice-turn your pieces but that requires even more moderate drying.
- Joined
- Apr 27, 2004
- Messages
- 8,647
- Likes
- 4,994
- Location
- Lakeland, Florida
- Website
- www.hockenberywoodturning.com
There are many things that might cause it.Why would they do this and how do I stop it or avoid it?
I use a spray bottle to mist larger hollow forms that are drying on the lathe. I turn the walls to thickness rim to bottom.
The top 1/3 of the form can get very dry and want to warp. It can’t move because the thick bottom 2/3 can’t move.
Misting keeps the top wet and reduces the wood Wanting to move. When I blow out chips I spritz the surface with water.
Hollowing can put a lot of stress on the wood. If it is a more open type vase I hollow first the turn the outside. This also lets me use a light for thickness.
When I first started and was hand hollowing I cracked a few by letting the tool shaft hit the edge of the rim or even gently pressing on the rim
Shape - some shapes are harder to dry than others. Smooth curves dry nicely. Angles dry less well.
A common cause is pre-existing cracks. They can be hard to see. They open up as the form dries.
I don’ sand on the lathe. Creates heat and dries the wood too fast.
After coming off the lathe I often rinse the piece in the sink just to wet the surface.
Then I put the form in a cardboard box to slow the drying. The box acts as a humidity chamber slowing the drying.
Close flaps day one, close on flap day 2 so 1/2 the box top is open, open all flaps day 3, day 4 put on a shelf, day 5 sand the form
Last edited:
Another factor is the grain orientation of the wood. If you are turning with an end grain orientation (grain running parallel to the bed ways), the piece is less likely to crack. When I do HFs in the face grain orientation (grain running perpendicular to the ways), I always expect them to crack. The cracked areas then become an avenue for some form of surface embellishment (e.g. carving; fill with metal powder; or anything else you wish to experiment with).
As mentioned, equal wall thickness (including base) is critical.
Ah, a spray bottle seems like a good idea, and I noticed the tool grabbing and pushing the shaft against the rim, although whether that created the cracks or merely exacerbated the cracks I am unsure. I prefer smooth curves, but I will not abstain from experimentation in the future. I don't think there were pre-existing cracks, because the rim is the only place that cracks, and does so badly. Also, I don't think it is the heat, because while I have had heat checking from sanding, I haven't on the rim.There are many things that might cause it.
I use a spray bottle to mist larger hollow forms that are drying on the lathe. I turn the walls to thickness rim to bottom.
The top 1/3 of the form can get very dry and want to warp. It can’t move because the thick bottom 2/3 can’t move.
Misting keeps the top wet and reduces the wood Wanting to move. When I blow out chips I spritz the surface with water.
Hollowing can put a lot of stress on the wood. If it is a more open type vase I hollow first the turn the outside. This also lets me use a light for thickness.
When I first started and was hand hollowing I cracked a few by letting the tool shaft hit the edge of the rim or even gently pressing on the rim
Shape - some shapes are harder to dry than others. Smooth curves dry nicely. Angles dry less well.
A common cause is pre-existing cracks. They can be hard to see. They open up as the form dries.
I don’ sand on the lathe. Creates heat and dries the wood too fast.
After coming off the lathe I often rinse the piece in the sink just to wet the surface.
Then I put the form in a cardboard box to slow the drying. The box acts as a humidity chamber slowing the drying.
Close flaps day one, close on flap day 2 so 1/2 the box top is open, open all flaps day 3, day 4 put on a shelf, day 5 sand the form
I try to do this, but at the moment I don't have any way to measure the wall thickness more than as far as my two fingers can reach, I need to make a wire thickness gauge.As mentioned, equal wall thickness (including base) is critical.
All of mine so far have been end grain, and there seems to still be the issue of the rim cracking and expanding rapidly.Another factor is the grain orientation of the wood. If you are turning with an end grain orientation (grain running parallel to the bed ways), the piece is less likely to crack. When I do HFs in the face grain orientation (grain running perpendicular to the ways), I always expect them to crack. The cracked areas then become an avenue for some form of surface embellishment (e.g. carving; fill with metal powder; or anything else you wish to experiment with).
I don't have a great variety, however, I am just beginning, so I'm not sure if any wood is particularly bad at cracking or if this problem is a result of another culprit such as the tool hitting the rim, the rim drying too fast, etc. I hope that no species is as bad of a problem as your Beech, considering the availability, I would be devastated if I lost a possible species to work with. I may rough turn in the future, although my current process is to turn it wet and dry it in the microwave for a couple of days (my sister complains that our microwave and the kitchen smell like "pisswood" AKA wet cottonwood) before sanding it. That works well, aside from the rims cracking during turning before sanding.Isaac turning wood is somewhat of a crap shoot as you don't really know what internal forces lie inside that hunk of wood. Being dry or keeping it cool while sanding are great things to do but cannot insure that the wood is not going to move. Sometime that movement leaves you with cracks. Here where I live I have a problem with Beech, most generally I would lose 3 out of 4. My fix is to not turn Beech. Where you live I'm fairly certain you are limited to a few species. I guess your best bet is to rough turn and wait and see if cracks develop before finish. Maybe someone else here may have ideas that may help.
- Joined
- Apr 27, 2004
- Messages
- 8,647
- Likes
- 4,994
- Location
- Lakeland, Florida
- Website
- www.hockenberywoodturning.com
Pre-existing cracks are often only on one end or one side of a blank.don't think there were pre-existing cracks, because the rim is the only place that cracks, and does so badly. Also
I measure wall thickness in every hollow form. I’m using video now but use calipers a lot.try to do this, but at the moment I don't have any way to measure the wall thickness more than as far as my two fingers can reach,
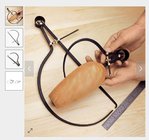
I have the veritas calipers from Lee valley. They are great! You can bend wire that holds its shape to look like them.
The two ends bent to point at each other. Wire is tricky. Really easy to put slight pressure on the wire inside which opens the gap.
Also need to orient the straight ends perpendicular to the vessel wall.
One addition I use on wire caliper is to tape a plastic broom straw to the outside tip so that the gap between the straw is my desired thickness ( usually 3/16). When the straw is bent- cut more. When the straw just touches or there is a slight gap to the wood stop cutting on this part.

Do you know what a good source of wire to make a cheap thickness gauge with minimal bending? I used to do figure sculpture and have armature wire, however it is fairly thin and flexible. Because of that, I don't think it would work well. Would a wire coat hanger work?
- Joined
- Apr 27, 2004
- Messages
- 8,647
- Likes
- 4,994
- Location
- Lakeland, Florida
- Website
- www.hockenberywoodturning.com
A coat hanger should work. A test is to hold the straight leg and look to see if the looped leg end drops off center from the straight leg end. Also be sure to use sandpaper or other abrasive tools to round each end point. You don’t want scratches on the outside and you want the inside point to float over the inside wall and not catch.Do you know what a good source of wire to make a cheap thickness gauge with minimal bending? I used to do figure sculpture and have armature wire, however it is fairly thin and flexible. Because of that, I don't think it would work well. Would a wire coat hanger work?
I have made most of mine from thick gauge soft wire. The wire is about 3/16 thick. Holds its shape, can be cut with the vice grips that have a wire cutter. I use two pliers to bend the tips after I round the cut edges
Thanks!A coat hanger should work. A test is to hold the straight leg and look to see if the looped leg end drops off center from the straight leg end. Also be sure to use sandpaper or other abrasive tools to round each end point. You don’t want scratches on the outside and you want the inside point to float over the inside wall and not catch.
I have made most of mine from thick gauge soft wire. The wire is about 3/16 thick. Holds its shape, can be cut with the vice grips that have a wire cutter. I use two pliers to bend the tips after I round the cut edges
I would think the wire they use to hold chain link fence to the posts would be an ok choice.Do you know what a good source of wire to make a cheap thickness gauge with minimal bending? I used to do figure sculpture and have armature wire, however it is fairly thin and flexible. Because of that, I don't think it would work well. Would a wire coat hanger work?
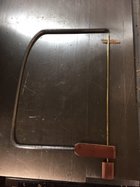
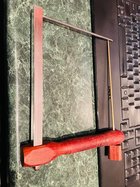
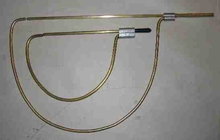
12 gauge electrical wire works . Note any use of wire gives you approximate and is not meant to be caliper like accuracy. The idea here is to get that even thickness thru out and the wire will do that very close. Here are a couple you can easily make.


These mainly for bottom thickness but will work on some straight sides.


These mainly for bottom thickness but will work on some straight sides.
I have the Lee Valley callipers, but made a couple from thick coat hangers and they can work if used carefully.I would think the wire they use to hold chain link fence to the posts would be an ok choice.
I used the crimping pieces to hold the pieces together and the one opened so the wire can slide back and forth.

