Have you tried rotating your inserts, they may be dull? Before I mount a new round insert I take a Sharpie and draw a line from the bottom of the screw hole, up the bevel and accross the top to the top of the screw hole. This becomes "North". I then mount the insert with North at 12 O'clock, so as I feel the need to rotate I can keep track of how far the insert has been turned. Since I regularly use so much of the the round insert's surface I make only four rotations (North, South, East and West) before I toss the insert. I mark the squarea and diamone inserts in a similar fashion. The ink on the top of the insert can be rubbed off in use, hence the ink on the unexposed underside.I always felt the EWT tools weren't cutting as well.

-
We just finished moving the forums to a new hosting server. It looks like everything is functioning correctly but if you find a problem please report it in the Forum Technical Support Forum (click here) or email us at forum_moderator AT aawforum.org. Thanks! -
Beware of Counterfeit Woodturning Tools (click here for details) -
Johnathan Silwones is starting a new AAW chapter, Southern Alleghenies Woodturners, in Johnstown, PA. (click here for details) -
Congratulations to Peter Jacobson for "Red Winged Burl Bowl" being selected as Turning of the Week for April 29, 2024 (click here for details) -
Welcome new registering member. Your username must be your real First and Last name (for example: John Doe). "Screen names" and "handles" are not allowed and your registration will be deleted if you don't use your real name. Also, do not use all caps nor all lower case.
You are using an out of date browser. It may not display this or other websites correctly.
You should upgrade or use an alternative browser.
You should upgrade or use an alternative browser.
Not entierly sure what I'm being asked to comment on, but here goes.
First a caveat or two. I do a lot of hollowing, but I don't make hollow forms like you're thinking of (@GRJensen might have more direct experience using the SHS in that regard). Also I don't generally turn green wood, but rather as dry as I can find. This is a WIP, but an example of the kind of form I'm usually after:
View attachment 40274
So for me the contour is everything. If I have to start sanding at p60 or p80 I'm OK with that, indeed I use these "tools" to perfect the contour. So I want to say that without question carbide scrapers leave a much rougher surface than do HSS gouges. That is just a price I am willing to pay (though I tell you, there are some days I would be willing to pay someone else to do it). What carbide scrapers bring to the table, particularly when used withe SHS, is the ability to create these contours. As to how carbide scrapers compare to HSS scrapers I can't really say.
For the sake of complete clarity let me say carbide like HSS is a material, not a tool per se, although we often use the term that way. Carbide is used to make cutters of various shape, square, round, diamond, etc. But more important is the different edge profiles. The most common is the scraper insert with a single bevel on the bottom and a flat top. Related are the new negative rake (top and bottom bevels) scraper inserts from EWT. And then there is another animal all together, the Hunter style cutters with a cupped or pie pan profile. These are not scrapers at all, but shear cutters.
The scrapers leave the roughest surface. The negative rake scrapers leave a much better surface, but you are still going to sand. The shear cutters can leave a very smooth surface. These require some skill to use correctly and I can't say that I have developed mastery. The shear cutters are also a very directionally sensitive tool. Where I will engage a round scraper or NRS anywhere from 8 to 12 and 12 to 4 O'clock, the shear cutters seem to work best between 11 and 1. So the two scrapers are the best tools for me use when creating contours. Where I have found the cupped cutters useful is in removing the bulk material. As I need start worrying a contour line I switch to a flat top scraper, and then when I'm in striking distance of the final contour line I switch to the more expensive NRS insert and a very light touch to get the least rough surface.
As GRJensen mentioned the SHS with the Simple Hollowing tool kit will work best at less than 9 inches depth (I would say 6 to 8). Indeed I think the tools only extend 9 1/2 inches out of the receiver. With the shapes I pursue I am able to introduce the tool rest deeper into the work piece than you would be able to with a narrow necked vessel, so I seldom have to reach farther than 6".
The SHS is sold with a 1/2" receiver, but if you're considering buying one I suggest purchasing the optional 5/8" reciever (and a set of Trent Bosch's reducers). You are not limited to using the Simple Hollowing tools with the SHS and the larger reciever creates some opportunities to use other tools. For example I have a Jackofsky hollower (with a cupped cutter) that I often use, as well as Thompson and D-way NR scrapers. You just have more options.
As far as tools for the SHS, EWT sells handleless versions of its tools, but these are only available directly from the company. If not the whole set, consider buying at least the 16 mm round tool as you can then get their NR inserts. The Simple Hollowing round tool mounts a 15 mm insert and so these are not interchangeable. The EWT tools are an inch shorter than the SH, though.
I don't think the SHS is the ideal solution for every hollowing task. If you're looking to hollow out an 18" vase, the SHS might work, but wouldn't be the best choice. But bed length can be another limitation. With the 15 24 laguna 12 inches might be the max. Figure 12 inches for the form plus 2 inches of waste wood and 4 inches for the chuck and you're already at 18 inches and looking for a place to mount the hollowing rig and the banjo. But I do encourage people to look at articulated arm systems when considering a hollowing rig (and I would definetly look at the new Elbow that Gerald Lawrence mentioned), because they are capable and very versatile. In fact for the peice pictured above I did the entire thing, top bottom, inside outside, all with the SHS. And we haven't even touched on how I've used it for other non-hollowing tasks.
View attachment 40278View attachment 40277
(The tool reads the template and the laser drops a dot. Mark with a pencil and the contour line is transfered).
Thanks for the reply, Mark. You understood what I was asking well.
") Your experience with scrapers and how they differ from an HSS cutter was what I was looking for. The bit about edge profiles is particularly useful. I am familiar with your normal "flat" scrapers, as well as negative rake scrapers (I have both round nose types, as well as both EWT types). The term I'm not familiar with is "cupped"...is that short for "sheer cup cutter"? I'm assuming that means their edge is angled up, opposite that of a negative rake cutter, which I guess might be something like a positive rake? I've wondered if such a thing existed. Sometimes I wondered if such a cutter would help hollow faster than just a normal flat (zero rake) scraper (which is all I've really used so far.)
Your experience with scrapers and how they differ from an HSS cutter was what I was looking for. The bit about edge profiles is particularly useful. I am familiar with your normal "flat" scrapers, as well as negative rake scrapers (I have both round nose types, as well as both EWT types). The term I'm not familiar with is "cupped"...is that short for "sheer cup cutter"? I'm assuming that means their edge is angled up, opposite that of a negative rake cutter, which I guess might be something like a positive rake? I've wondered if such a thing existed. Sometimes I wondered if such a cutter would help hollow faster than just a normal flat (zero rake) scraper (which is all I've really used so far.)Regarding sanding...I've been learning this year that sanding is just as essential as cutting. I forget who said it, but someone I watched called sandpaper just another cutting tool, which makes sense. I've used 60 and 80 grit to do some reshaping at times myself. I used to have a heavy hand with sandpaper, but I'm also learning that you can let it do its job with a lighter touch, and you can avoid leaving those deep scratches in your pieces.
Regarding bed length. The Laguna has a 20" extension, which would give me a total of a 44" bed, which should suffice for handling longer vases. I don't know how long I'll end up going...he thing that actually made me buy a lathe in the first place, was watching people on youtube turn segmented vases. That is where I really hope to end up at some point, doing segmented pieces of all sorts. I've always thought it would be interesting to turn a larger/longer floor-standing vase, so 18" or maybe longer isn't out of the picture down the road a ways.
The last bit there...about using the tool with a template...is brilliant! Would you use a router to carve out that curve on the square form there? I have to say, I am intrigued by your forms!! That interesting hollow form you are working on now is beautiful. Threw me a bit at first, but I think I see how you did it. Maybe someday I'll try something like that...for now, I just want to see if I can get reliably good at hollowing basic vases.
Still, quite inspiring.Have you tried rotating your inserts, they may be dull? Before I mount a new round insert I take a Sharpie and draw a line from the bottom of the screw hole, up the bevel and accross the top to the top of the screw hole. This becomes "North". I then mount the insert with North at 12 O'clock, so as I feel the need to rotate I can keep track of how far the insert has been turned. Since I regularly use so much of the the round insert's surface I make only four rotations (North, South, East and West) before I toss the insert. I mark the squarea and diamone inserts in a similar fashion. The ink on the top of the insert can be rubbed off in use, hence the ink on the unexposed underside.
Yeah, I do rotate them, and I've been using a marker to mark my rotations. I was marking the left side "corner" with a sharpie where the tip meets the tool. I would then rotate an arc about the width of the tool bar itself, and mark again. That helps make it easy to determine when you've used every part of the edge. I guess I'm making more than 4 turns, but it would be easy enough to remedy that. I also use a honing plate to sharpen them once I've gone through a full rotation. Even so, I have trouble on the insides of these little 4x4xN vases. I did learn something from Ellsworth's book, though. The specific approach he takes to hollowing top center, then top middle, then top to the wall, then back to middle center, middle middle, middle wall, etc. I haven't been doing that so far, and I think I may be trying to hollow too much (too deep) at once? Anyway, something I was going to try with this new vase was that hollowing technique of Ellsworth's. It may also be that I'm not turning the tip enough, I probably get 5-6 turns, to your 4, so maybe turning the tip a bit more each time will help keep me cutting on a good edge.
G

Got this picture from Tim . He said will not be on website for a few weeks yet.A bed mount is definitely preferable to a tailstock mount, IMO. @Gerald Lawrence , since it's not on the website can you describe the improvements?
I will try to answer "Cupped" . There is only one cupped cutter on the market that I know of and that is Mike Hunter Tools. These are cupped and cannot be sharpened. They are cutters vs other carbide cutters which are scrapers (for the most part) . Hunter cutters can be used to get a surface which needs little if any sanding , once you know how. I turn mine maybe 10 degrees at a time. It can chip if not used properly or if used on bark. They are not cheap at about 20 plus each but the cutting experience is worth the cost. I have 6 Hunter tools plus 3 for my hollowing tools.Thanks for the reply, Mark. You understood what I was asking well.
To give you a mental picture of what a cupped cutter looks like, imagine a pie pan say 1" deep, only the bottom is extra thick say 7/8" thick. That 1/8" part of the rim that's sticking up equates to the cutting edge on the cutter.
I believe that Gerald is right that Mike Hunter invented these critters, and they are often called Hunter cutters. Other makers now sell tools using this style.
By the way AZ Carbide has good prices on replacement inserts.
Yeah, so, "positive rake" and "zero rake", ahh neither of those is a thing. Maybe they should be .
Good news, if you want to make a segmented vase you don't build the whole thing and then hollow it. You build it ring by ring and shape the inside as you go. You should join segmentedwoodturners.org, it's a great place to learn more.
I believe that Gerald is right that Mike Hunter invented these critters, and they are often called Hunter cutters. Other makers now sell tools using this style.
By the way AZ Carbide has good prices on replacement inserts.
Yeah, so, "positive rake" and "zero rake", ahh neither of those is a thing. Maybe they should be
. Good news, if you want to make a segmented vase you don't build the whole thing and then hollow it. You build it ring by ring and shape the inside as you go. You should join segmentedwoodturners.org, it's a great place to learn more.
Thank you! (I have to admit I thought it was clever, too). I used a rotary shaft tool with grinding bit, then a sanding drum and sandpaper. I suppose you could try to free hand on a router table.The last bit there...about using the tool with a template...is brilliant! Would you use a router to carve out that curve on the square form there?
I am curious, how does wood movement affect a vessel?
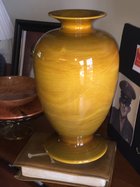
I have done both 1 and 2 turn hf’s to gain experience. I mostly do 1 turn anymore. If I wanted a “straight” hf such as the yellow vase below, I would 2 turn.
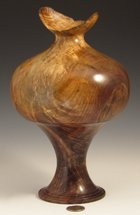
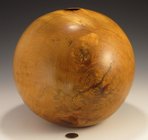
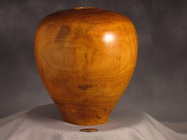
1 turn vessels warp, and may crack, as they dry, depending on the wood, grain, etc. It adds to the character IMO. I remount a 1 turn to hold the piece for sanding and buffing, so I may put it between centers to straighten the tenon, just a judgement on each piece. The other pics are 1 turn.
Attachments
Yeah, I would think a router table would make pretty short work of carving out those curves... I don't have one myself, but I've seen a number of videos lately of people doing interesting things with router tables. I tell ya, I have numerous "itises" now!To give you a mental picture of what a cupped cutter looks like, imagine a pie pan say 1" deep, only the bottom is extra thick say 7/8" thick. That 1/8" part of the rim that's sticking up equates to the cutting edge on the cutter.
I believe that Gerald is right that Mike Hunter invented these critters, and they are often called Hunter cutters. Other makers now sell tools using this style.
By the way AZ Carbide has good prices on replacement inserts.
Yeah, so, "positive rake" and "zero rake", ahh neither of those is a thing. Maybe they should be
Good news, if you want to make a segmented vase you don't build the whole thing and then hollow it. You build it ring by ring and shape the inside as you go. You should join segmentedwoodturners.org, it's a great place to learn more.
Thank you! (I have to admit I thought it was clever, too). I used a rotary shaft tool with grinding bit, then a sanding drum and sandpaper. I suppose you could try to free hand on a router table.
I am getting heavily into pens as my first actual business with woodworking, and I've definitely developed "blankitis"... Recently, I found the beauty of rollerball pens and fountain pens, and I think I'm developing "penkititis" as well... But, the longer standing -itis...is definitely "Toolitis!!" I keep buying these big tools... I have two lathes, a drill press, a miter saw, a largish Jet free-standing drill press. I also picked up a Jet ceiling fan and a Fein shop vac. I've been really trigger-happy on a SawStop or Laguna table saw...almost bought one of either twice each now (SawStop really appeals to me, as I am sometimes more clumsy than I'd like to admit, and I fear for my fingers...but, the Laguna table saws also seem really nice... Can never decide!) Also almost dropped some dough on a planer, as well as a router...and then I learned about router tables!! Lately, due to the extreme amount of dust that seems to be settle everywhere despite the shop vac (and a bunch of 2.5" tubing I've set up to allow me to capture as much as I can at the point of creation) and air filter, a proper dust collector has moved to the top of the list. The only thing that has kept me from developing full-on multi-itis disease is the simple fact I don't have room for everything!
Anyway, I understand the cup cutters. So, technically, even though the actual bits themselves may not be called positive or zero rake, I think conceptually/theoretically, the rake is just the angle of the cutter. A zero or null rake is a flat cutter with the edge neither turned up nor down. Negative is with the edge turned down, while positive is with the edge turned up. Early on in my exploration of scrapers, I came across....ok, let me see if I still have it bookmarked:
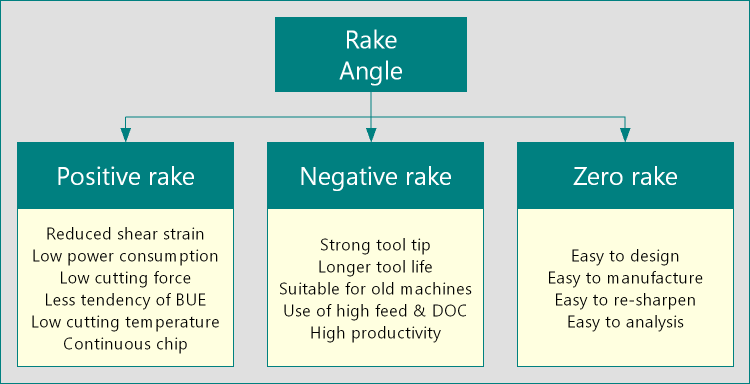
Concept of Positive Rake, Negative Rake and Zero Rake Angle
Concept of positive rake angle, negative rake angle and zero rake angle of a cutting tool is discussed here. It explains classification of rake angles with diagram and their examples, advantages, disadvantages and applications.
 www.minaprem.com
Haha! I love bookmarks! This was from a machining site, but the concept still generally applies. This lead into a discussion of rake angle with my father who is a professional engineer, and it was interesting how rake angle is applied to machining. I just had never thought about it in terms of a round carbide cutter before...
I also found this one bookmarked:

Rake Angle: Definition, Importance, and Types (Positive, Negative, Zero) [Notes with PDF] - Design | Engineering
What is a Rake Angle? The rake angle (γ) is the angle between the rake surface and the reference plane
So, regarding cutting with a cup cutter... I have watched a number of Jimmey Clewes' videos. He has some excellent tidbits about what sheer scraping really is. When I first started, I thought it just meant mostly closing the gouge, which at least the way I was doing that early on, is basically just "scraping", not "sheer scraping." It was only after I saw Jimmey Clewes actually demonstrate the differences that I fully understood sheer scraping. A sheer scrape, when done properly, is actually still a cut. The angle of the gouge is usually up, mostly closed but slightly open. This gives a high angle of the cutting edge of the tool (the wing in this case) against the wood, and since it is slightly open, as the wood moves downward onto that edge, it cuts. I'm still learning the proper amount of pressure since watching those videos (maybe a bit over a month ago, it wasn't that long ago), but according to Jimmey, you should get an exceptionally clean cut if you sheer scrape properly.
I imagine using a cup cutter would have to be done similarly? To put the "positive rake" edge ( ;D ) at an angle to the wood, rather than just strait on to the wood, to ensure you cut, rather than actually scrape? I imagine that would be fairly challenging.... Boy, its going to be interesting using one of these hollowing systems... So much more to learn! This whole thing, hobby turning business, is a huge journey.
I have done both 1 and 2 turn hf’s to gain experience. I mostly do 1 turn anymore. If I wanted a “straight” hf such as the yellow vase below, I would 2 turn.
1 turn vessels warp, and may crack, as they dry, depending on the wood, grain, etc. It adds to the character IMO. I remount a 1 turn to hold the piece for sanding and buffing, so I may put it between centers to straighten the tenon, just a judgement on each piece. The other pics are 1 turn.
Beautiful pieces, Doug! Love the second and third...the third, almost perfectly round. What is the wood for the second piece? Incredible grain!
Your pith position in the third reminds me of some of Ellsworths pieces. I have another book on turning green wood, and in there (I think it was that book) the author talked about pith placement as well. It was interesting seeing how pith placement affects wood movement...but yeah, I think all of the vessels I've seen that moved, develop cracks.
I think you are right, its a matter of character...and I need to just get used to that.
Interesting - I started with segmented turning, and moved to wet wood turning, doing very little with segmenting after that.That is where I really hope to end up at some point, doing segmented pieces of all sorts.
I did learn something from Ellsworth's book, though. The specific approach he takes to hollowing top center, then top middle, then top to the wall, then back to middle center, middle middle, middle wall, etc.
That’s a pretty standard approach for hollowing, I’ve seen similar diagrams from several turners and have no idea who might have originated it. Sequence the approach with the OD, to avoid the situation you got into with the piece you started the thread with. The main thing is don’t turn the OD down very far before having hollowed the ID above it.
These are links to some Lyle Jamieson videos
boring bars and reach
Cupped carbide assembly
Carbide assembly
Appreciate the compliments! That is walnut, dark heartwood in the bottom half, transitioning to blond sapwood toward the top.What is the wood for the second piece? Incredible grain!
When I first saw this, for a moment I thought it was a miniature scene due to the big photo in the back.G
Got this picture from Tim . He said will not be on website for a few weeks yet.View attachment 40279
So this is a photo of a new articulating rest for this hollowing system? Very interesting...
Thanks for the info, Gerald. That price is about as expensive as EWT cutters...which are also not cheap (but, really, should be cheaper than they are, at least for the flat ones.)I will try to answer "Cupped" . There is only one cupped cutter on the market that I know of and that is Mike Hunter Tools. These are cupped and cannot be sharpened. They are cutters vs other carbide cutters which are scrapers (for the most part) . Hunter cutters can be used to get a surface which needs little if any sanding , once you know how. I turn mine maybe 10 degrees at a time. It can chip if not used properly or if used on bark. They are not cheap at about 20 plus each but the cutting experience is worth the cost. I have 6 Hunter tools plus 3 for my hollowing tools.
Is it safe to assume these cutters are best used at an angle to the wood, rather than strait in to the wood? With the right angle, do they actually sheer cut?
As someone mentioned earlier, AZ Carbide has. The 6mm cutter for $14. I dont know if all the talk of nano carbide etc is of real benefit or not.Thanks for the info, Gerald. That price is about as expensive as EWT cutters...which are also not cheap (but, really, should be cheaper than they are, at least for the flat ones.)
Is it safe to assume these cutters are best used at an angle to the wood, rather than strait in to the wood? With the right angle, do they actually sheer cut?
Yes the cupped cutters are designed to cut at a shear angle at ~8-9 o’clock. It will scrape at the 6 o’clock position. Lyle’s video shows the perfect shear scrape position of the cutter. John Lucas has vids on utube of some of the hunter tools with cupped cutters.
- Joined
- Jan 27, 2005
- Messages
- 12,899
- Likes
- 5,188
- Location
- Dalworthington Gardens, TX
- Website
- pbase.com
There is only one cupped cutter on the market that I know of and that is Mike Hunter Tools.
Rolly Munro hollowing tools also use a cupped carbide insert. Additionally, the Rolly Munro tools use a guard that limits the depth of the cut.
Doug basically answered this but to add a little. Hunter carbides on newer tools are mounted at an angle , There are still several with a flat orientation and for these you start the cut at about a 40 degree angle and then can bring it up. If you do not do that there will be a gigantic catch.Thanks for the info, Gerald. That price is about as expensive as EWT cutters...which are also not cheap (but, really, should be cheaper than they are, at least for the flat ones.)
Is it safe to assume these cutters are best used at an angle to the wood, rather than strait in to the wood? With the right angle, do they actually sheer cut?
Look at john60lucas on YouTube as he has several videos on using Hunter tools .