
-
Beware of Counterfeit Woodturning Tools (click here for details) -
Johnathan Silwones is starting a new AAW chapter, Southern Alleghenies Woodturners, in Johnstown, PA. (click here for details) -
Congratulations to Peter Jacobson for "Red Winged Burl Bowl" being selected as Turning of the Week for April 29, 2024 (click here for details) -
Welcome new registering member. Your username must be your real First and Last name (for example: John Doe). "Screen names" and "handles" are not allowed and your registration will be deleted if you don't use your real name. Also, do not use all caps nor all lower case.
You are using an out of date browser. It may not display this or other websites correctly.
You should upgrade or use an alternative browser.
You should upgrade or use an alternative browser.
What’s on your lathe?
- Thread starter Rusty Nesmith
- Start date
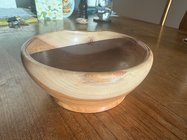
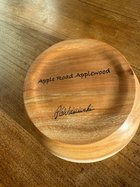
We live on Apple Rd, two streets away from Orchard Rd, thus named as it led to the apple orchard on the original Furman Family Farm. The farm became two developments, along with this scattering of homes where we live.
The wife of our nextdoor neighbor in the end-stages of cancer is planning to move out of state to be nearer to her children once he dies.
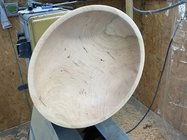
She has been an avid gardener and appreciator of the trees in and around their place. They had one of the last apple trees from the Furman orchard in their backyard until a storm toppled it. I cut it up and removed it for them.
This bowl will go with her as a remembrance of her garden growing and her time here.
The wife of our nextdoor neighbor in the end-stages of cancer is planning to move out of state to be nearer to her children once he dies.
She has been an avid gardener and appreciator of the trees in and around their place. They had one of the last apple trees from the Furman orchard in their backyard until a storm toppled it. I cut it up and removed it for them.
This bowl will go with her as a remembrance of her garden growing and her time here.
Attachments
4 or 5 thin coats applied with a small soft lint-free cloth. Rubbed with superfine steel wool in between coats. Then Beall buffed.Beautiful urn and finish, Kevin! I might have to try the wipe-on poly, as I have struggled with trying to spray finishes in the past.
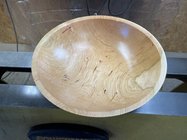
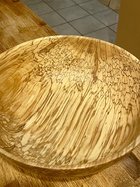
Simple hard maple bowl, 5". I sanded to 320 then used Yorkshire grit. Next, a base layer of shellac and then Tried and True Original. I found I can get a fairly glossy finish with that combination.


Next up, another piece of spalted sugarberry. Only half-spalted as it turns out.


Another chunk of maple…
Working on frig magnets. I have a good supply of Spalted wood to start. 


The with the JaHo ornamental jig working a learning curve can be observed. It is rather time consuming vs other embellishment tool but I think it is going to be worthwhile.
The with the JaHo ornamental jig working a learning curve can be observed. It is rather time consuming vs other embellishment tool but I think it is going to be worthwhile.
odie
TOTW Team
- Joined
- Dec 22, 2006
- Messages
- 7,121
- Likes
- 9,877
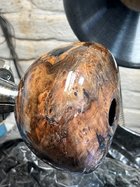
Maple burl last evening:
-o-


-o-
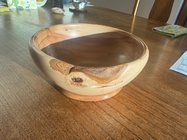
Here is another one I pulled off the shelf and finish turned, it is ambrosia Maple. Most of the time I turn natural edge bowls to finish size, but this is one that is twice turned. I had to fill in some bug holes before I could use a vacuum chuck to finish the foot. It is wet with a coat of Danish oil. I used a glue brush to liberally apply it to the bark.

I like how the bottom pattern mirrors the top edge. Pretty sweet James.....Here is another one I pulled off the shelf and finish turned, it is ambrosia Maple. Most of the time I turn natural edge bowls to finish size, but this is one that is twice turned. I had to fill in some bug holes before I could use a vacuum chuck to finish the foot. It is wet with a coat of Danish oil. I used a glue brush to liberally apply it to the bark.
View attachment 62379
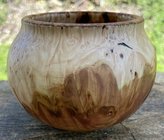
My last piece of an olive wood plank that I acquired years ago. One coat of Doctor’s Woodshop finish - walnut oil, shellac, and carnuba wax.

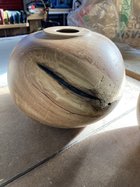
The requested update! The top of the whatchamacallit shows very little distortion, the bottom with the tenon does not show any checks, the walls and the rim do not have any checks and per the drying schedule pictured (The piece was not put back in the bag on 4/5/2024) the turning has lost almost 100 grams. So who says you have to get rid of the pith?View attachment 62167View attachment 62168View attachment 62169
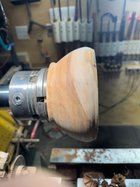
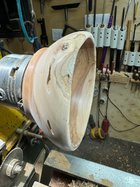
This is an experiment to see if I can make a lidded vessel from a green northern red oak as a once turned piece with the pith. There are no knots or wild grain to cause distortion and it shouldn't go oval because the walls follow the annual rings making the majority of the shrinkage is tangential as you can see in the photo. The wall is 1/4" thick green with a maximum diameter of 6" and a height of 11". The tenon is 2" diameter with the pith almost on center. Note: There was a current thread about the use of ROS on turnings and that method was used on this piece however I first used burred shear scrapers to remove tool marks and blend in the high and low spots.


Not on the lathe but in the finishing room. The finish is about 4 heavy of coats Watco Brushing lacquer applied with a HF spray gun. The rotators allow me to put it on thick and not worry about runs. The lid has a 3" 8TPI male thread and the urn has the matching female thread extra tolerance to limit future binding. The pieces are held in the lathe or the rotator by threaded ?chucks? 
I like how the bottom pattern mirrors the top edge. Pretty sweet James.....
Thanks Paul. I got the wood in Muskegon from a house close to the shore of Lake Michigan. I think that the harsh weather that it gets sometimes, adds stress to the tree aiding the Ambrosia beetle in decorating the wood.
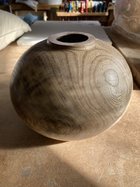
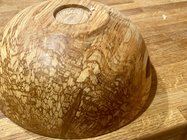
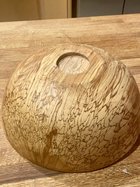
Had a little chunk of Norway maple burl that I couldn’t bring myself to toss, so I turned this mini hollow form. Had to get creative with removing the tenon, as the piece was too small to use with my standard chucks. It was a fun exercise!

Beautiful work. What finish did you use?
Thanks, Jay 🙏🏻. Wanted a subtle shine, so applied just two coats of shellac and then hit it with Yorkshire grit.Beautiful work. What finish did you use?

Can’t believe it didn’t fly apart! Another smaller split on other side. 9.5” by 6” cherry
Chines Elm live-edge "emerging" bowl with sort of a pedestal, trophy base (which I want to work on refining in my class with Matt Monaco in June at Arrowmont). It came from some beautiful logs my tree-man neighbor brought me. He will literally text me pics of great wood from job sites: "You want this?" The answer is usually yes. Anyway, sanded to 320, and am burnishing in multiple light coats of Tried and True Danish oil on this dry, breezy sunny spring weekend-perfect weather for hand-rubbed oil finishes!
I don't think I'm happy with the red mahogany stain I put on the bark to restore some color after I turned it white sanding it even with the wood. It seems every live edge turn offers unique challenges to hold on to the bark if possible. I even epoxied an entire bark rim on my first big live edge in ambrosia maple. It looks great, though very hard and glossy, obviously. I'm open to general suggestions with bark.
I signed the bottom in India ink because my cheap Chinese electric brand died on me on a Chinese elm piece! Those Etsy brands are junk, y'all. Trying to figure out a plan C on signing bottoms. My handwriting is not good for this if we're honest.
Anyway, the elm will practically glow under about 8 or 9 coats of hard-burnished, super-light coats of Tried and True Danish Oil. I really love this stuff, and I have always loved the smell of linseed oil.
That is beautiful, and you are either very brave, or crazy. I document my own bad experience with cherry in another thread. Such bewitching wood!View attachment 62415
Can’t believe it didn’t fly apart! Another smaller split on other side. 9.5” by 6” cherry
Whoa! Is that split the whole way down??View attachment 62415
Can’t believe it didn’t fly apart! Another smaller split on other side. 9.5” by 6” cherry
Yes and about a 1/4” across the bottom.Whoa! Is that split the whole way down??
You're going to love Matt's class! I took his platter class and he is a true professional at teaching. Smooth, witty, and very knowledgeable....Chines Elm live-edge "emerging" bowl with sort of a pedestal, trophy base (which I want to work on refining in my class with Matt Monaco in June at Arrowmont). It came from some beautiful logs my tree-man neighbor brought me. He will literally text me pics of great wood from job sites: "You want this?" The answer is usually yes. Anyway, sanded to 320, and am burnishing in multiple light coats of Tried and True Danish oil on this dry, breezy sunny spring weekend-perfect weather for hand-rubbed oil finishes!
I don't think I'm happy with the red mahogany stain I put on the bark to restore some color after I turned it white sanding it even with the wood. It seems every live edge turn offers unique challenges to hold on to the bark if possible. I even epoxied an entire bark rim on my first big live edge in ambrosia maple. It looks great, though very hard and glossy, obviously. I'm open to general suggestions with bark.
I signed the bottom in India ink because my cheap Chinese electric brand died on me on a Chinese elm piece! Those Etsy brands are junk, y'all. Trying to figure out a plan C on signing bottoms. My handwriting is not good for this if we're honest.
Anyway, the elm will practically glow under about 8 or 9 coats of hard-burnished, super-light coats of Tried and True Danish Oil. I really love this stuff, and I have always loved the smell of linseed oil.
View attachment 62416View attachment 62417
Number one rule- Use only fresh , healthy live wood. # 2 Do not use wood that the sap has started to run (now is not the time to harvest for Natural edge). #3 Do not let it begin to dry, the bark is the first to start degrading. #4 I think it helps to go thin as the bark can dry faster and not begin to degrade.I don't think I'm happy with the red mahogany stain I put on the bark to restore some color after I turned it white sanding it even with the wood. It seems every live edge turn offers unique challenges to hold on to the bark if possible. I even epoxied an entire bark rim on my first big live edge in ambrosia maple. It looks great, though very hard and glossy, obviously. I'm open to general suggestions with bark.
Rule #4 also helps to keep the sap wood on walnut that nice creamy white, where as thicker takes more time to dry and allows the natural transition to heart wood to start to take place. Thin can also work to allow the pith as part of the piece. The use of CA to hold the bark on is something I tried a couple of times and decided it wasn't worth the time. The 2 items below do not have anything added to hold the bark on
There are some woods where the outer bark is just too crumbly no matter what you do so I just avoid Bark NA with them.


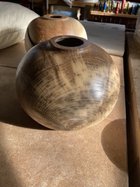
Made two more of the shorter goblets. They all match in dimension's.

Had a little chunk of Norway maple burl that I couldn’t bring myself to toss, so I turned this mini hollow form. Had to get creative with removing the tenon, as the piece was too small to use with my standard chucks. It was a fun exercise!
I haven't done many hollowforms, but the ones I made I used a jam chuck to remove the tenon. I turned a cylinder just slightly smaller than the opening. Although it doesn't have much surface area, it still held fine.
I like to use a jam chuck, too, though I like to pull the tail stock away for the last couple of passes to get a clean cut along the base. A little bit of gaffers tape usually holds things in place for those cuts, but this piece was too small for that, so I ended up making a custom solution by stuffing a rubber chucky cone inside a 3” vacuum chuck. The cone centered the front of the piece and prevented it from being pushed inside the vacuum chuck when I tightened tail stock. I used a parting tool to remove most of the tenon, then I taped the piece to the outside of the vacuum chuck and pulled the tail stock away, which held well enough to do a couple of finishing cuts. Probably would’ve been easier to just turn a small custom jam chuck, but it was fun to make it work with the equipment I already had available.I haven't done many hollowforms, but the ones I made I used a jam chuck to remove the tenon. I turned a cylinder just slightly smaller than the opening. Although it doesn't have much surface area, it still held fine.
Been working on hollowing process these past few days. Finished these two scrap pieces of hackberry and an old sycamore piece to see how they would turn out. One was turned using side grain and one end grain. Still trying to discover how the grain patterns will look in various pieces of wood. Finished with Watco Danish Oil. Once turned, dried, hand sanded and oiled.
Attachments
odie
TOTW Team
- Joined
- Dec 22, 2006
- Messages
- 7,121
- Likes
- 9,877
The fate of this curly claro walnut bowl is very questionable, because of two very large voids created by big chunks that fell out during the second turn. The chunks were re-inserted and much of the void was filled in using epoxy mixed with RIT brown dye. This represents two of the largest voids I've ever attempted to epoxy fill, and at this point, it looks like the final result might turn out ok. We'll see about that, because after the foot and buffing stages, the final result may, or may not be acceptable.....
-o-


-o-
I agree, Gabriel-I took a 1-day skew class last November with him, and knew then I wanted to do my summer study this year with him. Last summer I really needed to step up all aspects of my game with more advanced cuts and that elusive "perfect curve." David Ellsworth's 3 day class was perfect for that. This summer's grail quest is more fine tool control, which I have learned really means fine body control if the tool has become the extension of our bodies they should be. Every video I watch of him doing just that leaves me slack-jawed in wonder. His fine tool control seems so effortless and graceful, and leaves finishes almost better than I can get with sanding! As I'm really learning platters this year, I would like to take a platter class with him (or else Tom Wirsing when he comes to our CMW this fall!). The learning never stops!You're going to love Matt's class! I took his platter class and he is a true professional at teaching. Smooth, witty, and very knowledgeable....
Spalted Maple These are finally dry enough to finish turn, I have 12 rough outs from this tree, and the wood is beautiful if difficult to cut cleanly.
Attachments
Thanks for the tips, Don-I am working on the thin part. It's one of my goals for this year along with the finer tool control that makes it possible.Number one rule- Use only fresh , healthy live wood. # 2 Do not use wood that the sap has started to run (now is not the time to harvest for Natural edge). #3 Do not let it begin to dry, the bark is the first to start degrading. #4 I think it helps to go thin as the bark can dry faster and not begin to degrade.
Rule #4 also helps to keep the sap wood on walnut that nice creamy white, where as thicker takes more time to dry and allows the natural transition to heart wood to start to take place. Thin can also work to allow the pith as part of the piece. The use of CA to hold the bark on is something I tried a couple of times and decided it wasn't worth the time. The 2 items below do not have anything added to hold the bark on
There are some woods where the outer bark is just too crumbly no matter what you do so I just avoid Bark NA with them.
View attachment 62422View attachment 62423
Maple, ash, hickory and padauk bowls by BFAB method 


Last edited:


13” shallow walnut bfab bowl from a glue up of sapwood and heartwood:


Jim McLain
Artist
First of the walnut Burl I tried with the epoxy casting. Worked out pretty well putting it in the vacuum chamber for about a minute. Will probably let it go a little longer next time. It has Starbond built up on it in this pic. I want to thank Steve Nix for his help with this project.
Attachments
Turning pecan for the first time. Wow, this stuff is hard. Not the most fun I’ve had at the lathe. Was going to make a hollow form, but I might just drill a hole, drop in a test tube, and make it a stem vase.