Here’s a quick time lapse of how I rough the outside of a bowl. What do y’all do differently?

-
Beware of Counterfeit Woodturning Tools (click here for details) -
Johnathan Silwones is starting a new AAW chapter, Southern Alleghenies Woodturners, in Johnstown, PA. (click here for details) -
Congratulations to Peter Jacobson for "Red Winged Burl Bowl" being selected as Turning of the Week for April 29, 2024 (click here for details) -
Welcome new registering member. Your username must be your real First and Last name (for example: John Doe). "Screen names" and "handles" are not allowed and your registration will be deleted if you don't use your real name. Also, do not use all caps nor all lower case.
You are using an out of date browser. It may not display this or other websites correctly.
You should upgrade or use an alternative browser.
You should upgrade or use an alternative browser.
What would you do differently?
- Thread starter Brandon Sloan
- Start date
-
- Tags
- bowl turning
That's how I go about it, but lately i have been putting my worm screw in the bark side. I read in a forum from a old timer that to get the prettiest grain orientate the center of the tree to the bottom of the bowl.
john lucas
AAW Forum Expert
I mount the blank between centers because I often make fine adjustments to its position as I start turning and see what's there.
Sort of the same, I establish my parameters early on. I can usually tell what part of the lower 1/3 will not be in the finished bowl so I take that off first. Then, since I'm a tenon guy on bowls and a mortice on platers, I rough in a tenon, then, establish the rim and the height. Now I can work on proportions within the blank, such as, height and width to shape. Nothing worse then getting the perfect shape, then remembering the tenon. Of course for glue block or mortice folks that's a moot point. Last thing is to refine the tenon, then chuck up and turn out the inside...
I didn't see how you mounted it, but I use a forstner bit to drill a recess, then expand the chuck into that. I also would have done more prep work on the blank before mounting it. Having a 16 inch high resaw capacity on my big bandsaw, I would have stood the block on end (square cut the end first), then cut the blank top and bottoms parallel. Next cut the circle, then mount and turn. I do all of my roughing with a scraper. I do have a bunch of videos up on You Tube.
robo hippy
robo hippy
- Joined
- Apr 27, 2004
- Messages
- 8,650
- Likes
- 5,008
- Location
- Lakeland, Florida
- Website
- www.hockenberywoodturning.com
I mount between centers, fine tune the grain alignment, and turn a tenon for hollowing.
A screw center locks me into the grain pattern I create with sawing the blank. Between centers let’s me get the grain pattern I want centered in the bottom of the bowl.
Natural edge bowls are done bark to rim.
The bark edge bowls get concentric circle or oval grain pattern.
The bark bottom bowls get hyperbolic grain patterns.
Both are attractive. The largest bowls per log come from bark toward the bottom bowls.
A screw center locks me into the grain pattern I create with sawing the blank. Between centers let’s me get the grain pattern I want centered in the bottom of the bowl.
.lately i have been putting my worm screw in the bark side. I read in a forum from a old timer that to get the prettiest grain orientate the center of the tree to the bottom of the bowl.
Natural edge bowls are done bark to rim.
The bark edge bowls get concentric circle or oval grain pattern.
The bark bottom bowls get hyperbolic grain patterns.
Both are attractive. The largest bowls per log come from bark toward the bottom bowls.
Last edited:
I see no reason to refine or shear scrape the outside profile until you chuck it from the bottom. It always moves a bit and changes center.
I see no reason to refine or shear scrape the outside profile until you chuck it from the bottom. It always moves a bit and changes center.
I usually refine and scrape, I don’t get much movement when I reverse it. Another reason I do this is because I have better access for doing my push cut. Do you use a screw chuck?
A quick video of roughing out the inside.
I don't get much movement either, but that's still too much. After I reverse the bowl, I usually make a few shear scraping cuts, foot to rim.
Or an actual cut if need be. At time 29ish in the first vid it looks like you are scraping with the gauge parallel to the floor, this is just a scraping cut, and while the surface might look ok there will still be minute tear out in the two opposing grain areas. A shear scraping cut leads to less tear out and less sanding. In shear scraping, the handle is lowered, resulting in a more refined cut and better finish off the tool.
Or an actual cut if need be. At time 29ish in the first vid it looks like you are scraping with the gauge parallel to the floor, this is just a scraping cut, and while the surface might look ok there will still be minute tear out in the two opposing grain areas. A shear scraping cut leads to less tear out and less sanding. In shear scraping, the handle is lowered, resulting in a more refined cut and better finish off the tool.
I don't get much movement either, but that's still too much. After I reverse the bowl, I usually make a few shear scraping cuts, foot to rim.
Or an actual cut if need be. At time 29ish in the first vid it looks like you are scraping with the gauge parallel to the floor, this is just a scraping cut, and while the surface might look ok there will still be minute tear out in the two opposing grain areas. A shear scraping cut leads to less tear out and less sanding. In shear scraping, the handle is lowered, resulting in a more refined cut and better finish off the tool.
Thanks for the tip, I’ve tried shear scraping with this 5/8” gouge but it takes off to much material. I know that’s a technique issue. My 1/2” gouge has much better control when making a shearing cut.
Which part of the tool do you scrape with when shear scraping? I’m still learning and appreciate any and all advice.
- Joined
- Apr 27, 2004
- Messages
- 8,650
- Likes
- 5,008
- Location
- Lakeland, Florida
- Website
- www.hockenberywoodturning.com
A quick video of roughing out the inside.
your method is effective.
I don’t use the tailstock on cut rim bowls. It slows things down more than it helps me. ( I do Use the tail center on NE bowl for a little while)
another quick video- this bowl was started on a screw center and hollowed as part of a demo on gouges
Fast forward to 52 second if you just want to see the turning
Haha, @hockenbery I'll have to be more mindful of my death grip next time. Do you always make a complete pass when hollowing the inside? Sure did look smooth compared to my step method.
I do not use a screw center. Looks to me like you are getting dangerously close to a catch on the inside work. When cutting down the side, it almost looks like the chip is coming from the left side of the gouge. Hard to tell from the fast video speed. You are blocking the safe cutting angle with your tail stock. I usually have the flute at a 45 degree angle, not rotated up like have there. You can get away with a flat flute position with a Hannes grind, but not a full bevel like you have.
I do not use a screw center. Looks to me like you are getting dangerously close to a catch on the inside work. When cutting down the side, it almost looks like the chip is coming from the left side of the gouge. Hard to tell from the fast video speed. You are blocking the safe cutting angle with your tail stock. I usually have the flute at a 45 degree angle, not rotated up like have there. You can get away with a flat flute position with a Hannes grind, but not a full bevel like you have.
Thanks for taking the time to look and critique, I appreciate it. I’ll have to pay closer attention next time and make sure I’m not being flat fluted. I am going to try to replicate Al’s method from the video above.
@robo hippy I watched your scary scraper video on YouTube. Very cool, I have some cheap Chinese scrapers that I’m always messing with. I grind them to different shapes but I never get a very clean cut. My big scraper from carter and sons is a different story. Those scrapers you make are pretty cool.
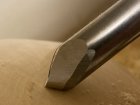
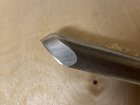
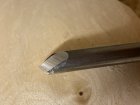
Brandon, just some quick pics, pencil lines on piece are for another step, nothing to do with shear scraping.

Somewhere in this area, but only about a 16th or less is actually touching the wood when the handle is dropped. Oriented for the following pics, cutting from headstock to tailstock.

Cutting near the base, handle really low, tip of tool well above center, flute toward wood.

You can see the tool angle, tip above center.

This shows the top edge almost touching. If it does touch, no big deal, as in no catch, you just don't want to.

Looking over the top at the bottom (shear scraping) edge.
Sorry about the bad pics, I'm hopping someone will direct you to a vid...
Somewhere in this area, but only about a 16th or less is actually touching the wood when the handle is dropped. Oriented for the following pics, cutting from headstock to tailstock.
Cutting near the base, handle really low, tip of tool well above center, flute toward wood.
You can see the tool angle, tip above center.
This shows the top edge almost touching. If it does touch, no big deal, as in no catch, you just don't want to.
Looking over the top at the bottom (shear scraping) edge.
Sorry about the bad pics, I'm hopping someone will direct you to a vid...
Outside - trim the corners with band or chainsaw. Mount between centers to allow moving the blank around for grain or balance. Once the bark is off and its round, I start working on the tenon to find good wood for it - starts to give me an idea of the shape. Dont shear scrape much on green wood, I practice my tool control with bevel cuts - it all comes off after its dry.
Inside - dont use tailstock, and I rotate the headstock for outboard turning, no reaching over the bed rails for me (Nova Galaxi lathe). Nothing wrong with step cuts, it seems faster to me vs continuous when just hogging wood out.
As for shear scraping with a gouge, long wings and a lite touch. Practice with your 5/8 gouge on the green wood. Lyle Jamieson has a good utube vid on it.
- Joined
- Apr 27, 2004
- Messages
- 8,650
- Likes
- 5,008
- Location
- Lakeland, Florida
- Website
- www.hockenberywoodturning.com
On rough outs with a thick wall I make a complete pass with a modification as I turn into the bottom - I pull the tool back to take a half cut. That is I’m cutting off a 1/2” of wood then take two 1/4” cuts on the bottom. The wood is moving less rapidly across the cutting edge and more endgrain makes it easier to take in two passes.Haha, @hockenbery I'll have to be more mindful of my death grip next time. Do you always make a complete pass when hollowing the inside? Sure did look smooth compared to my step method.
the final cuts even on rough outs i take smaller cuts rim to bottom.
when turning a thin wall bowl I finish the wall in steps of several inches which leaves the bottom wall thick to support the cuts coming from the rim.
@Clifton C thank you tremendously for taking the time to take pictures and explain. I hoped on the lathe and looked at the pictures as I made a few passes. It was much better.
My problem is very embarrassing, it’s the grind on my gouges. I’m sure you have heard of it, I don’t know what I’m doing grind.
I’m using the wolverine system with the original vari grind. I have a 180 grit CBN wheel. I’ve tried different settings on the jig, I just can’t figure out why this grind isn’t right.
Look past the uneven bevel, it’s the results of trying to get a proper edge that is flat.
Any help is greatly appreciated.
Attachments
The dips in the wings of your gouge are from spending too much time on the wheel in that location. When you approach the wheel with your gouge start with a wing then stop at the nose, repeat on the other side. You need to lighten up your pressure as you swing.
It also appears you’ve ground the tip of your gouge pretty flat.
Fortunately this is all fixable with practice. I am still guilty of this from time to time.
It also appears you’ve ground the tip of your gouge pretty flat.
Fortunately this is all fixable with practice. I am still guilty of this from time to time.
Yea concave wings will not allow shear scraping. Want the wings flat to convex. Shoot for a slight arch or convex shape from the nose to the end of the wing. It needs to be a continuously rising line from the nose to the end of the wing, no dips as Dan said. No wonder you have been struggling with shear scraping.
I also have a shear scraping video. When you are turning out the inside of the bowl, you are using a push cut down the wall, and a scraping cut for removing the bulk in the center, which is with gouge level, and bevel pointed to the center of the bowl. This is not a shear scrape. Gouges are fine for shear scraping the outside of a bowl, but impossible to get a shear cut on the inside of a bowl. I have seen a number of people who have the gouge level, and do a gentle scrape up the sides of the bowl, but it is a scrape, and in no way is there any shear or slicing going on. In order to be a shear or slicing cut, the cutting edge has to be at an angle to the spin of the bowl, and not 90 degrees to it.
I do talk about that little dip near the nose of your gouge that you can get when sharpening. That edge is 'workable' but can be better. I wouldn't bother sharpening it again until it is dull, then try to make it better. The more V shaped the flute is, the bigger of a problem it is. Mostly you do a quick flip when going from the nose to the wings. Also, I grind at least half of the bevel off of the gouge. While it doesn't make any difference on a convex surface, it makes a huge difference on the concave surfaces on the inside of the bowls. Mostly it keeps the bevel rub spot closer to the cutting edge for better tool control. Some people grind almost all of the bevel off.
From my martial arts instructors: Teacher, am I doing this right? 10,000 more times! But Teacher, that is what you said last time.... Well, then 10,000 more times!
robo hippy
John Jordan
In Memorium
- Joined
- Jun 24, 2008
- Messages
- 506
- Likes
- 965
- Location
- Cane Ridge (Nashville), TN
- Website
- www.johnjordanwoodturning.com
Brandon, you are very close with what you are showing in the pictures. The geometry is right, as is the shape. You just need to be careful to avoid the low spots and get the edge profile all in one plane. As I said, the shape is right, you just have some minor dips, and an odd little bevel on the rear of the right side. That won't hurt much, it will be gone after a couple of sharpenings. This is a perfect "side grind" shape. That's the only grind I use, but there are certainly others that people like, You won't find a grind that's more versatile.
Take a look at this video, it addresses all your questions.
View: https://vimeo.com/111139564
John
Take a look at this video, it addresses all your questions.
John
Interesting discussion. One thing I do differently when roughing the outside is to turn left handed (hold gouge handle in your left hand, put downward pressure on the tool rest with your right hand). This changes your body position so you stay out of the line of fire and are not hit by shavings, sap, chunks of bark, blanks that get launched from the lathe, etc.
I first saw this demo'd by Glenn Lucas. If you're as good as him, turning left handed also lets you send the shavings directly into a waste container and reduces clean up time.
Dave
I first saw this demo'd by Glenn Lucas. If you're as good as him, turning left handed also lets you send the shavings directly into a waste container and reduces clean up time.
Dave
Brandon, you are very close with what you are showing in the pictures. The geometry is right, as is the shape. You just need to be careful to avoid the low spots and get the edge profile all in one plane. As I said, the shape is right, you just have some minor dips, and an odd little bevel on the rear of the right side. That won't hurt much, it will be gone after a couple of sharpenings. This is a perfect "side grind" shape. That's the only grind I use, but there are certainly others that people like, You won't find a grind that's more versatile.
Take a look at this video, it addresses all your questions.View: https://vimeo.com/111139564
John
Thank you for the vote of confidence and the video. I was looking at the shear scraping tool that you sell on your website, in the pictures it looks like the shearing is happening at the lower portion of the tool. If the upper portion was to come into contact with the wood, would you get a catch similar to a skew?
Interesting discussion. One thing I do differently when roughing the outside is to turn left handed (hold gouge handle in your left hand, put downward pressure on the tool rest with your right hand). This changes your body position so you stay out of the line of fire and are not hit by shavings, sap, chunks of bark, blanks that get launched from the lathe, etc.
I first saw this demo'd by Glenn Lucas. If you're as good as him, turning left handed also lets you send the shavings directly into a waste container and reduces clean up time.
Dave
I write and eat with my left hand and I use my right hand for everything else. It’s always been easy to do things with both hands. So o guess you could say somewhat ambidextrous. It really helps when I need to make cuts on the outside of a bowl that has been chucked up. I’ve never tried using my left hand like you mention, but I’ll give it a try next time I’m roughing a bowl.
I also have a shear scraping video. When you are turning out the inside of the bowl, you are using a push cut down the wall, and a scraping cut for removing the bulk in the center, which is with gouge level, and bevel pointed to the center of the bowl. This is not a shear scrape. Gouges are fine for shear scraping the outside of a bowl, but impossible to get a shear cut on the inside of a bowl. I have seen a number of people who have the gouge level, and do a gentle scrape up the sides of the bowl, but it is a scrape, and in no way is there any shear or slicing going on. In order to be a shear or slicing cut, the cutting edge has to be at an angle to the spin of the bowl, and not 90 degrees to it.
I do talk about that little dip near the nose of your gouge that you can get when sharpening. That edge is 'workable' but can be better. I wouldn't bother sharpening it again until it is dull, then try to make it better. The more V shaped the flute is, the bigger of a problem it is. Mostly you do a quick flip when going from the nose to the wings. Also, I grind at least half of the bevel off of the gouge. While it doesn't make any difference on a convex surface, it makes a huge difference on the concave surfaces on the inside of the bowls. Mostly it keeps the bevel rub spot closer to the cutting edge for better tool control. Some people grind almost all of the bevel off.
From my martial arts instructors: Teacher, am I doing this right? 10,000 more times! But Teacher, that is what you said last time.... Well, then 10,000 more times!
robo hippy
After watching your video on shear scraping, I’ve been practicing shear scraping with my bowl scraper and spear point scraper. The difference is night and day, much easier to control. I know that only a small portion of the cutting edge should be in contact with the wood, with the amount of cutting surface you have on a scraper, it gives a lot more flexibility. It might not be the end all to shear scraping, but I’m definitely glad to have added it to my bag of tricks.
John Jordan
In Memorium
- Joined
- Jun 24, 2008
- Messages
- 506
- Likes
- 965
- Location
- Cane Ridge (Nashville), TN
- Website
- www.johnjordanwoodturning.com
Thank you for the vote of confidence and the video. I was looking at the shear scraping tool that you sell on your website, in the pictures it looks like the shearing is happening at the lower portion of the tool. If the upper portion was to come into contact with the wood, would you get a catch similar to a skew?
No, it works just like the gouge, just a little more effective. The edge is being pulled along, unlike a skew, so the edge is being pushed away from the wood. The entire edge is used, starting at the tip and rocking it along to the bottom tip while moving the tool along the toolrest. There are some videos on my instagram @johnjordanwoodturning
John
- Joined
- Apr 27, 2004
- Messages
- 8,650
- Likes
- 5,008
- Location
- Lakeland, Florida
- Website
- www.hockenberywoodturning.com
After watching your video on shear scraping, I’ve been practicing shear scraping with my bowl scraper and spear point scraper. The difference is night and day, much easier to control. I know that only a small portion of the cutting edge should be in contact with the wood, with the amount of cutting surface you have on a scraper, it gives a lot more flexibility. It might not be the end all to shear scraping, but I’m definitely glad to have added it to my bag of tricks.
AAW just sent a strengthen your skills email that included a link to a Mike Mahoney article on shear scraping
If you did not recieve the email here is the link
http://aawcontentsource.org/aaw_cs1_pdf/AW3203p22-24.pdf