• Beware of Counterfeit Woodturning Tools (click here for details)
  • Johnathan Silwones is starting a new AAW chapter, Southern Alleghenies Woodturners, in Johnstown, PA. (click here for details)
  • Congratulations to Peter Jacobson for "Red Winged Burl Bowl" being selected as Turning of the Week for April 29, 2024 (click here for details)
  • Welcome new registering member. Your username must be your real First and Last name (for example: John Doe). "Screen names" and "handles" are not allowed and your registration will be deleted if you don't use your real name. Also, do not use all caps nor all lower case.

WWYD?

Joined
May 30, 2022
Messages
244
Likes
249
Location
Belchertown, MA
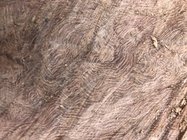
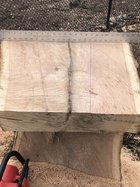
I have this crotch slab. I’d love to make a large once turned platter. It would have the pith in 4 places and some very nice grain. Most of the bark inclusion would get turned away.

I’m concerned about the inclusion, I’d need to keep speed way down ~300 rpm? Im also concerned that the pith areas would split badly instead of just warping.

What would you do?
 

Attachments

  • 15B49F80-009A-46B7-968D-07DA95E48D17.jpeg
    15B49F80-009A-46B7-968D-07DA95E48D17.jpeg
    574.1 KB · Views: 86
  • E166E38F-84D5-4E74-AF73-EFD52DA943B5.jpeg
    E166E38F-84D5-4E74-AF73-EFD52DA943B5.jpeg
    811.8 KB · Views: 88

Randy Anderson

Beta Tester
Beta Tester
Joined
May 25, 2019
Messages
848
Likes
1,273
Location
Eads, TN
Website
www.etsy.com
Apart from the safety issue I wouldn't turn it as a single piece since there's very little solid material under the inclusion to stabilize it while working with it and you would need all of what is there for the platter which means no working material on that face for a tenon, mortise or foot. Even if you did manage to get it done it's almost certain to warp or split after done. The old saying - do you want to make a big piece or a beautiful piece. I often sacrifice size for shape and appeal.
 

hockenbery

Forum MVP
Beta Tester
TOTW Team
Joined
Apr 27, 2004
Messages
8,653
Likes
5,016
Location
Lakeland, Florida
Website
www.hockenberywoodturning.com
I’m number three - too dangerous to turn

The structural strength of Bark is about the same as and air gap.
IMG_0123.jpeg

Before turning you would need join the two halves with biscuits or pewas that you would not cut through when turning
I should think a minimum of 2 inch spacing between them
 
Last edited:
Joined
Aug 6, 2009
Messages
713
Likes
517
Location
Lummi Island, WA
Well, I would spend about a day and a half pouring 50 bucks worth of West System epoxy (tinted black or Brown or even using a little ground up bark as filler) into the inclusion until it would accept no more. Then, make a custom template for some good sized, extra deep dutchmen as insurance on the inclusion - span the crack by at least an inch both sides. Cherry is nice for the dutchmen. another couple of days down. Then its on the lathe to produce an obviously flawed piece that will probably live on my "why did I do that" shelf for a few years.

My opinion? save the time and bucks and cut into two pieces and get something smaller but useful...I've done the former, recommend the latter
 
Joined
Aug 16, 2022
Messages
280
Likes
638
Location
Butler, PA
I agree this is a iffy project for a large platter. If you have to do it I would put a large glue block like 10 to 12 inches on the bottom side and mount that to a faceplate in addition to the suggestions above. 300 would be a maximum rpm. Definitely stay out of the line of fire. I would probably cut it in half and make two plates from it.
 
Joined
Oct 13, 2016
Messages
1,074
Likes
1,575
Location
Rainy River District Ontario Canada
You could hammer a steel staple in the ends to keep the parts from separating, place the first one in the lower half, then turn the top halve first to half the thickness, and remove the staple to the other half you just turned.

A faceplate screwed on or a glued on piece that will be used to hold the faceplate.

However that is not the end to the problems of your blank, you do have at least one pith totally in the wood, even if you can turn most of it away, the wood will shrink this piece of wood into a wavy plate.

Anyway I do agree with the advice given above, split it and make two pieces from it and use it to turn some special pieces out of this, but, it can be turned.
 
Joined
Dec 16, 2022
Messages
120
Likes
190
Location
Mesa, AZ
Well, I would spend about a day and a half pouring 50 bucks worth of West System epoxy (tinted black or Brown or even using a little ground up bark as filler) into the inclusion until it would accept no more. Then, make a custom template for some good sized, extra deep dutchmen as insurance on the inclusion - span the crack by at least an inch both sides. Cherry is nice for the dutchmen. another couple of days down. Then its on the lathe to produce an obviously flawed piece that will probably live on my "why did I do that" shelf for a few years.

My opinion? save the time and bucks and cut into two pieces and get something smaller but useful...I've done the former, recommend the latter
I would go a very similar route, but I would use 2P-10 thin ca glue and flood the bark and the occlusion. Backing it with parchment paper to keep from bonding it to the work surface. Give it a week to really cure in and then have fun.
 
Joined
Feb 28, 2021
Messages
1,231
Likes
1,091
Location
Roulette, PA
Website
www.reallyruralwoodworks.com
I would go a very similar route, but I would use 2P-10 thin ca glue and flood the bark and the occlusion. Backing it with parchment paper to keep from bonding it to the work surface. Give it a week to really cure in and then have fun.
Heh.. way higher risk tolerance than mine... I'd never trust CA glue that much and especially across that much thickness. I'd as soon try to turn a piece of glass - I'd expect similar results.
 

hockenbery

Forum MVP
Beta Tester
TOTW Team
Joined
Apr 27, 2004
Messages
8,653
Likes
5,016
Location
Lakeland, Florida
Website
www.hockenberywoodturning.com
I would go a very similar route, but I would use 2P-10 thin ca glue and flood the bark and the occlusion. Backing it with parchment paper to keep from bonding it to the work surface. Give it a week to really cure in and then have fun.
I would not trust CA for this. Too risky for me.
Over time our risk tolerances change with both our skill level and experiences.

When I use CA to attach a glue block - I remove the glue block with a flat chisel in the glue line- the glue fractures leaving both pieces of would intact.
Gluing the pieces with CA - A catch could easily launch half of the blank

CA has a lot of tensile strength and very little shear strength.
 
Last edited:
Joined
Dec 16, 2022
Messages
120
Likes
190
Location
Mesa, AZ
I would not trust CA for this. Too risky for me.
Over time our risk tolerances change with both our skill level and experiences.

When I use CA to attach a glue block - I remove the glue block with a flat chisel in the glue line- the glue fractures leaving both pieces of would intact.
Gluing the pieces with CA - A catch could easily launch half of the blank

CA has a lot of tensile strength and very little shear strength.
I can definitely appreciate this concern. With the older gorilla glue and crazy glue brands, I can completely agree.
I have had such a starkly different experience with the 2P-10 mix and specifically the thin blend. I have allowed this to absorb into the fibers, but not rely on void filling, and have experienced essentially turning nearly ironwood hard. I have never had a piece of wood which I use the thin CA 2P-10 to fracture or release, it has always scraped and shaved.
 
Joined
Jan 20, 2011
Messages
404
Likes
486
Location
Traverse City, MI
Don't give up too quickly. If it were me, I'd be tempted to set up a router or dado blades to pass thru and glue some hardwood cross pieces. You might have to strap it across the ends and turn it enough to establish your axis so the cuts are all same depth/plane.

Years ago I turned a hollow form that was destined for an unplanned rapid disassembly. I made a sort of "chute" to fit my trim router that attached to a vertical pipe in my banjo. I made 3 passes on each side with a 1/4" straight bit and glued in strips of ipe. After letting the glue cure overnight, I finished the outside cut, then hollowed the piece to 1/4" thickness. Each void now has 3 curved 1/4" square bars holding it together. Still to this day, nearly 20 years later, that gift has to be my finest piece of work.
 
Joined
Aug 14, 2007
Messages
5,497
Likes
2,848
Location
Eugene, OR
If I wanted to turn a solid platter out of that piece, I would use a sled on the table saw to rip out the bark inclusion, then glue the two halves back together again. Probably not worth the effort. Also, the pith on the right side is a problem area that will crack eventually. The left side, not so much.

robo hippy
 
Joined
May 4, 2010
Messages
2,451
Likes
1,880
Location
Bozeman, MT
I'm generally in agreement with everyone else, but will point out one different way of looking at it. The end of the blank that we can see is the very deepest part of the inclusion in the whole piece. This is where the branches were at their farthest apart. The other end of the blank would be where there is a single trunk and single pith. It's possible the part of the blank we can't see is adequately sound.
 
Joined
Mar 14, 2023
Messages
20
Likes
18
Location
Victoria, BC

hockenbery

Forum MVP
Beta Tester
TOTW Team
Joined
Apr 27, 2004
Messages
8,653
Likes
5,016
Location
Lakeland, Florida
Website
www.hockenberywoodturning.com
The end of the blank that we can see is the very deepest part of the inclusion in the whole piece. This is where the branches were at their farthest apart. The other end of the blank would be where there is a single trunk and single pith. I

You may be right.
Photos can deceive. A look on the other side would confirm your look.

I see it the other way - the pencil lines go further apart - assuming the pencil lines are on the piths.
 
Joined
Oct 13, 2016
Messages
1,074
Likes
1,575
Location
Rainy River District Ontario Canada
You may be right.
Photos can deceive. A look on the other side would confirm your look.

I see it the other way - the pencil lines go further apart - assuming the pencil lines are on the piths.
You are absolutely right, the bottom of the picture is the closest to the log and it is opening up from there, I would say, going by the grain, it is even more so than what the pencil lines indicate.

Problem to turn.jpg
 
Joined
May 30, 2022
Messages
244
Likes
249
Location
Belchertown, MA
Don't give up too quickly. If it were me, I'd be tempted to set up a router or dado blades to pass thru and glue some hardwood cross pieces. You might have to strap it across the ends and turn it enough to establish your axis so the cuts are all same depth/plane.

Years ago I turned a hollow form that was destined for an unplanned rapid disassembly. I made a sort of "chute" to fit my trim router that attached to a vertical pipe in my banjo. I made 3 passes on each side with a 1/4" straight bit and glued in strips of ipe. After letting the glue cure overnight, I finished the outside cut, then hollowed the piece to 1/4" thickness. Each void now has 3 curved 1/4" square bars holding it together. Still to this day, nearly 20 years later, that gift has to be my finest piece of work.

I’m not understanding. Do you have a picture?
 
Joined
May 4, 2010
Messages
2,451
Likes
1,880
Location
Bozeman, MT
You may be right.
Photos can deceive. A look on the other side would confirm your look.

I see it the other way - the pencil lines go further apart - assuming the pencil lines are on the piths.
OOPS! I looked at the two piths and assumed I was looking at the Top of the "Y", and you are correct--we see the bottom of the Y and this piece is definitely not safe. In my defense, I'm seeing the ophthalmologist next week and I think my cataracts have progressed. Or maybe my glasses are dirty.
 
Joined
Aug 16, 2022
Messages
280
Likes
638
Location
Butler, PA
If you want a large platter and a safe way to do it use a router or a planer wheel for an angle grinder. That's how I make dough bowl platters for the girls.
 
Back
Top