• October 2025 Turning Challenge: Natural Edge Bowl! (click here for details)
  • Congratulations to Pat Miller for "Heart Shaped Box" being selected as Turning of the Week for October 13, 2025 (click here for details)
  • Welcome new registering member. Your username must be your real First and Last name (for example: John Doe). "Screen names" and "handles" are not allowed and your registration will be deleted if you don't use your real name. Also, do not use all caps nor all lower case.

1st attempt at a lampshade. FAILURE. But I was close to success, and learned a LOT!!

Joined
Aug 13, 2025
Messages
20
Likes
28
Location
Loveland, CO
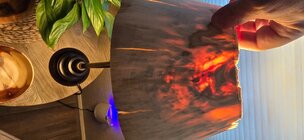
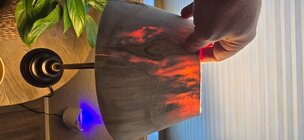
I've been thinking about making a lampshade for a while. I am still a rookie on the lathe, been turning about 9 months. But being in Colorado I have plenty of access to aspen and that is one of the best woods for lampshades so I really want to learn how to do it. I felt ready for a challenge, and jumped in.

Screwed a faceplate to log. Mount log to Jet 1640. Add tailstock support. Attach it with bowl gauge, rough out, start fine tuning with roughing spindle gauge. In my pea-brained mind (and having never done this before), I was going to make the lampshade with the right side of the log, and part it off the rest of the log attached to the headstock when it was done.

I think that was mistake #1. In the future I will chainsaw-rough out a "cone" that will be the rough shape of the lampshade, and...... I don't know. Waste block? Open to suggestions.

Shaped the outside, removed as much wood as I could. Started on the inside. Mistake #2! Looking back I am embarrassed, but I just planned on the end of the log being the bottom, wide end of the shade. Hey, cracks and all! SMH. Should have sliced off cookies with the chainsaw until I hit clean wood. The cracks kept me from really getting the bottom 1/3rd as thin as the rest.

Mistake #3. I do not own a pair of calipers. I will own a pair of calipers by suppertime today via Amazon. Pretty much REQUIRED for this project. There is no way to comprehend a 16th of an inch 8 inches down a shade by pointing 2 fingers at eachother from inside and outside. LOL.

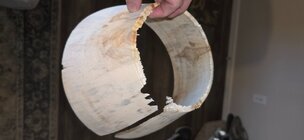
So, sand the outside to 240. Screw the inside. At this point I knew this was a prototype. Call the wife out catch the shade as I parted it off. We both fail. Equally. And spectacularly. Project over, hahaha.

So next time: Cut off ends of logs and get to clean wood. Prep a blemish free "cone". Own and use calipers. Still contemplating how to part off the top of the shade.

Suggestions welcome, and don't be like me.
 

Attachments

  • fail1.jpg
    fail1.jpg
    239.4 KB · Views: 39
  • fail2.jpg
    fail2.jpg
    209.3 KB · Views: 39
  • fail3.jpg
    fail3.jpg
    110.3 KB · Views: 39
Hard to learn without some failures! And that’s not a trivial project.

One thing about a lack of calipers: you can measure the wall thickness of almost anything the “old” way.

Cur a piece of wire, stiff enough to hold a shape but soft enough to bend. A piece of bare solid 12ga copper should work. Make it long enough to reach from the inside bottom to the outside bottom..

Bend the wire into sort of a “C” or “D” shape so the middle of the wire will clear the rim, the long “legs” clear the wood, then bend the tips so short straight sections on each end are pointing towards each other. Separate the tips enough so the gap between them is a little wider than the thickness of the wood where you want to measure.

Touch the inside tip to the wood inside and hold the wire steady. Measure the gap on the outside between the wood and the other tip. Remove the wire without bending it more and measure the gap between the two tips. Subtract the first measurement from the second to get the wall thickness.

By bending the wire into the right shape you can measure the wall thickness of almost anything, even deep inside.

Yes, no cracks allowed. Some will mist the wood with water to keep it from drying out while turning.

I see you are using light. In message #18 in the thread below Chris Ramesy is using light to help visualize the evenness if the wall thickness when turning a cowboy hat.

JKJ
 
Yes! Now I recall seeing misting on other shade projects. THANK YOU for that reminder.

I need calipers anyway so those have been purchased. I learned a lot in 3 hours today. Could have just "made another bowl in my wheel house" but this failure was actually somehow a little rewarding.
 
Here's a demo by recently retired full-time lampshade turner Peter Bloch. The sound is funky in places but you can hum along.

I recently took a workshop from someone who learned from Peter and actually worked on one today. I went too thin and got a longitudinal crack from flexing but it was a good learning experience. It's quite amazing how thin you can go without blowing up the form, but 1/10" is about right for strength and light transmission. I plan to make a set of sconces for the main room of my house.

You do need to start with sound wood, checks at the pith are ok as they will be turned away but not in the body of the shade. Roughing out with a chainsaw will reveal any defects you can't see in the bark before you get it on the lathe, but won't save a great deal of time. I start between centers to true up a cone and square the ends. You don't have to center on the pith but that will give symmetrical level growth rings in the finished shade. A 6" faceplate works, with the screw pattern filled with stout screws. I used 12 # 12 x 1 1/2" sheet metal screws and bored proper pilot holes. You should leave a 6" diam. neck between the screw points and the top of the shade until most of the inside is hollowed out, for stability. You need to keep solid material at the faceplate end as long as possible. It's a good idea to keep the tailstock engaged until the outside is done as well.

The outside needs to be shaped as true and smooth as possible before hollowing as the translucence depends on even thickness. Any lumps will show as dark bands. Bloch shapes the outside in stages- I did all but the final shaping at the top first. I did use a Oneway bowl steady- Bloch uses one for sanding but not when hollowing. I used a Bosch hollowing rig with a ProForme shielded hook tool to get down to just over 1/8" thick with a video camera for gauging the thickness. A wire gauge as John describes will work too. At that point the wood starts to pass light and you can throw away the gauges and switch to shear scraping with a teardrop scraper. I was using an armbrace but at 12"+ deep I found it hard on my shoulder- next time I will use the scraper in my captured hollower. I roughed out the inside 2-3" at a time, cleaned up with the scraper and went to the next step. The thickness is gauged by the light color, and as I found it takes a bit of experience to judge that correctly. The stronger the light the better- I used a led worklight on a stand.

I waited to thin down the neck until I had excavated most of the interior. Table lamps typically get a 3" hole at the top with a rabbet to accept a plywood hanging disk. You may want to draw the section before you get to that stage. The shade can be parted off most of the way and finished with a handsaw- careful measurement helps here. Best to start with a shallow shade, as with hollow forms deep ones are exponentially more difficult.

Aspen and balsam poplar are weed trees around here. I took down a balsam poplar leaning over the driveway a year ago and it has developed some nice brown spalted streaks without turning to mush yet. The stuff cuts like butter with sharp tools, but for some reason it dulls edges fast so frequent sharpening is essential. Peter Bloch mentions in the video that he uses powdered metal gouges and tantung scrapers.
 
Last edited:
The shades that I have done have always been fresh cut green wood with the shade centered on the pith.
The method I use is to turn the inside first with even ripple free contours which you can easily feel running your fingers over the inside surface.
The outside is finished using a light inside such that the thick areas are readily evident by the amount of light showing through. The outside needs to be done in steps including final sanding due to the fact that it will distort making it next to impossible the sand after it dries.
The pendent lamp is made of white oak turned to about .03" wall thickness.
22052PendentL4.JPG
 
Cool idea. Never thought of turning a big lampshade. Thinking grain orientation makes it the biggest challenge, I would approach it the way a lampshade is made and this is how I would attempt to make one.

Cut a template from poster board of the cone you want to make. Then cut a long vernier piece on the bandsaw. Due to cutting height, you may have to cut more than one slice and glue together. Lay the template on your vernier, trace and cut. Sand a bevel where the seam overlaps of each side. Soak the vernier in a hot bath water till it is pliable and curl it into a cone, clamp and let dry. Remember grain orientation is important to prevent cracking when bending. Once dry, glue and you have a cone.

Turn 2 jam chucks that till fit on the top and bottom of the cone. You can then turn the cone on the lathe to sand the outside since you can support with the tailstock. Once you’re happy with it, cut a ring off each jam chuck and glue in place.

Repurpose the wire mount from an old shade that sits on a lamp’s harp and you’re in business.
I assume when you say vernier you really mean veneer.
I tried making lampshades out of purchased raw veneer, which didn't look the greatest but it did work. The top and bottom of the shade had inner and outer rings with the veneer sandwiched between and vertical battens over the seams.LampPlumVeneerShade.jpg
 
Back
Top