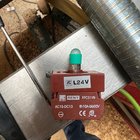
The red-green on-off switch on my 3520C, purchased in June 2018, started going bad after only a month or 2. After stopping lathe, pressing green button would not work. Tapping switch box or letting it snap back with the magnet would usually "fix" it. It got progressively worse over a month or 2 until Powermatic sent a replacement switch and I swapped it out in November 2018. It worked fine until 4 weeks ago, when it failed fairly quickly. The replacement switch sent this time looks to be a different brand and the orientation of terminals 1-4 are a little different. Terminals X1 and X2 aren't marked on the old switch. Powermatic tech support hasn't been super responsive and I would like to just replace it again myself, but I cannot tell for sure whether the brown jump wire between terminals 1 & 3 on the "old" switch should remain with the new one. A picture they sent of the new switch wired up does not appear to show it. Anyone else have similar issues with their 3520C?

-
We just finished moving the forums to a new hosting server. It looks like everything is functioning correctly but if you find a problem please report it in the Forum Technical Support Forum (click here) or email us at forum_moderator AT aawforum.org. Thanks! -
Beware of Counterfeit Woodturning Tools (click here for details) -
Johnathan Silwones is starting a new AAW chapter, Southern Alleghenies Woodturners, in Johnstown, PA. (click here for details) -
Congratulations to Dave Roberts for "2 Hats" being selected as Turning of the Week for April 22, 2024 (click here for details) -
Welcome new registering member. Your username must be your real First and Last name (for example: John Doe). "Screen names" and "handles" are not allowed and your registration will be deleted if you don't use your real name. Also, do not use all caps nor all lower case.
You are using an out of date browser. It may not display this or other websites correctly.
You should upgrade or use an alternative browser.
You should upgrade or use an alternative browser.
3520C On-Off Switch Problem
- Thread starter Jeff Struewing
- Start date
I had a problem with the switch On my C as well. The lathe would all of a sudden switch into reverse while In the middle of turning. It was scary when you are doing a hollow form and all of a sudden the lathe would come to an abrupt stop and start going in reverse fast with the tool inside a hollow form.
Powermatic sent a contract technician to evaluate and replaced the switch as the cause of the problem. The new switch is different than the one that came with it, but so far no problems.
Powermatic sent a contract technician to evaluate and replaced the switch as the cause of the problem. The new switch is different than the one that came with it, but so far no problems.
Good to hear. Hopefully I can get someone to come replace mine soon - been down for over 2 weeks.
The red-green on-off switch on my 3520C, purchased in June 2018, started going bad after only a month or 2. After stopping lathe, pressing green button would not work. Tapping switch box or letting it snap back with the magnet would usually "fix" it. It got progressively worse over a month or 2 until Powermatic sent a replacement switch and I swapped it out in November 2018. It worked fine until 4 weeks ago, when it failed fairly quickly. The replacement switch sent this time looks to be a different brand and the orientation of terminals 1-4 are a little different. Terminals X1 and X2 aren't marked on the old switch. Powermatic tech support hasn't been super responsive and I would like to just replace it again myself, but I cannot tell for sure whether the brown jump wire between terminals 1 & 3 on the "old" switch should remain with the new one. A picture they sent of the new switch wired up does not appear to show it. Anyone else have similar issues with their 3520C?
I had the same issue with mine about a year ago. A shot of compressed air into the switch would get it going for a while. Called Powermatic ... tech was very responsive, and sent a new switch (sounds like the 2nd switch they sent you). I recall that the terminals were different, but to be honest I cannot remember how it relates to the wiring diagram in the manual. They should be able to work through it with you on the phone.
Turns out the jump wire is still needed, so I installed the new one and up and running again.
john lucas
AAW Forum Expert
Must be a different style switch than my 3520A. Mine just has 2 wires and is an off the shelf micro switch mounted in the larger mechanical button.
I’ve had that problem twice. The switch is not bad, it’s full of dust. The first time they sent me a new switch, no problem. Changed it out and it worked perfect for about six months. I call Powermatic and the guy told me it was full of dust and to just take it out and gently tap it on the lathe bed to remove the dust. I’m thinking he’s an idiot and said ok I’ll try it. I still had the old switch and was shocked at how much dust came out of it. Now I feel like the idiot, LOL. I just unhooked the switch from the box and gently tapped the switch till the dust quit coming out and it worked fine. They did send me this cover to keep the dust out and I’ve not had anymore trouble with it. 

Interesting. When my second one stopped working, I took the cover off the back and blew it out with compressed air. I did not see any sawdust whatsoever in the box, and nothing seemed to get blown out. But I did not remove the switch from the box itself (until I went to replace it) and blow air on it. I threw the first one away but kept the second, so maybe I have a backup?
Great to know. My 3520C is due to be delivered within the hour. I hope I made a good choice going with this lathe for my first one.
Probably so - beyond the switch it has been treat to use!
The way the switch connects to the push button assembly keeps any dust from getting into the box, but unfortunately funnels it inside the switch assembly instead.Interesting. When my second one stopped working, I took the cover off the back and blew it out with compressed air. I did not see any sawdust whatsoever in the box, and nothing seemed to get blown out. But I did not remove the switch from the box itself (until I went to replace it) and blow air on it. I threw the first one away but kept the second, so maybe I have a backup?
I've had my 3520C for about 3 weeks now and haven't had any problems with the run/stop switches (so far), but the forward/reverse switch stopped working a couple nights ago. I tried blowing it out, but that didn't help. I finally opened the control box and when I wiggled the wire connectors on the back of the switch it started working again and has been fine since. Don't know if it was the connectors or if moving them caused enough wiggle inside the switch to get debris loose. I guess time will tell. I know the crimp connectors make production and repair easier, but they can cause reliability problems sometimes.
They do make sealed switch contacts for the better quality switches manufactured by a number of different companies that will eliminate this concern. Would not be too difficult to seal up one of these cheaper type contact blocks with some CA glue or quality silicone on the housing of the contact assembly. Any of the cheaper made components that are rivetted or have crimped fingers holding the cover over the switch contacts will over time draw dust into these enclosures. All of these electrical devices get warm while running and as they cool they create a small vacuum pulling small amounts of dust particles into the enclosure after every run cycle. You also have electrical and static charges that attract dust particles to these components. A good yearly (5-year) cleaning in these electrical component housings will reduce these problematic issues from turning into a bad situation.
This is an interesting discussion and I’ll store it away for future reference. I took delivery of my 3520 C about two weeks ago. I was very disappointed that it came on a rough shippers pallet but not fully enclosed. It had clearly suffered damage in transit. This included the on/off switch being broken to the point that the green button was gone. I dealt with the vendor who got Powermatic to replace the entire control head including the cable. I had a hell of a time figuring out how to disconnect the cable from the VFD drive end and replace with a new one. I finally got it done and the lathe is working fine. After having spent the past seven years on a lower end Grizzly lathe, I feel like I’ve moved from a Chevy to a Mercedes-Benz!
I wonder if anybody else has replaced this cable at the VFD end, or is it intended to be replaced only from the remote control box end?
I wonder if anybody else has replaced this cable at the VFD end, or is it intended to be replaced only from the remote control box end?

Lou I'm not sure about replacing the cable but your post made me go out and inspect mine more closely.
It was delivered a while back but my shop isn't ready for it
My lathe had slid off the inner pallet breaking the cardboard box when it was delivered. It seemed to be ok but Powermatic seems to have a problem with their packaging, shipping company or both.
It was delivered a while back but my shop isn't ready for it
My lathe had slid off the inner pallet breaking the cardboard box when it was delivered. It seemed to be ok but Powermatic seems to have a problem with their packaging, shipping company or both.
Paul, check carefully for any damage. Even just scrapes to the finish. Powermatic sent me a can of touch-up paint as well as a new spindle lock and lock guard, both of which were smashed, as well as the control unit. It’s a wonderful lathe, but I figured my experience was an anomaly. Curious to hear that your packaging was also lacking. Hopefully you found everything ok with the machine.
I wonder if anybody else has replaced this cable at the VFD end, or is it intended to be replaced only from the remote control box end?
From what I've seen exploring the wiring (I just installed a stop bar on my 3520C), the end at the VFD is definitely the easier end to work with. At least you have some spare parts should you ever need them, assuming that Powermatic didn't want the damaged parts back.
The only damage I found on mine were a lot of paint chips and scuffs, enough that I was a little disappointed, but Powermatic sent my a spray can of touchup paint too.
Ric, yes, I kept the damaged unit for just that purpose. My problem was that the ends of the modular snap on connectors (I’m sure there’s a technical name for them, which I’m drawing a blank on), were just too big to fit through the hole in the VFD box where the cable enters. After scratching my head for half an hour, and manipulating them every way I could, I carved an extra quarter inch slot in the cable box hole that allowed me to snake them out. I’ve made a patch to close that gap and keep dust out, but I’m sure there’s got to be a better way.
Well, after 3 years with no problems after my second switch replacement, it started acting up again about 6 months ago - intermittently failing to start when I press the green start button, then the reverse switch stopped working for about 5 weeks. Reverse switch started working again and the on/off was an issue only rarely, but in the last month, reverse hasn't worked and the on button rarely works. I have opened the back and used compressed air several times over the last couple of weeks, yesterday I removed the on/off switch from the box to blow it out further, reconnected all the wires (which I have never found to be loose), but every time I hit the stop button, the first press of the on button doesn't work. Usually after a few snap-backs with the magnet into the slot, it will start again, but sometimes not. I can get an exact replacement of the on/off switch, but especially with the reverse button no longer working, I wonder if there is more to it than the switch. A neighbor of mine with the same machine has had similar problems, anyone else?