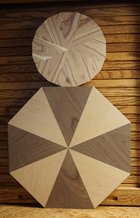
The photo above shows my first and third attempts at making a starting piece that does not require a center plug. The top one is 6.5" (165MM) diameter made up of 2 laminated layers of 8 segments each by about 7/16" (11MM) thick made of lilac wood. The lower one is 10.5" (267MM) diameter made up of 4 walnut and 4 birch segments by about 13/16" (20.5MM) thick in one layer.
- The process starts with boards long enough to get the 8 segments.
- The material for one unit should be processed together so that there are no variations in size between the pieces.
- The saws, planer, drum sander, and jointer used to cut the material should be tuned such that all cuts are square and parallel.
- The material is planed, edge jointed, ripped to width, and sanded in the drum sander.
- The segments are cut using a miter saw set as accurately as possible to 22.5 degrees which will be used for both cuts.
- The miter saw is equipped with an auxiliary wood table with its own fence and a toggle clamp.
- The first cut is on the end of the board with one edge against the fence to the right of the blade.
- The second cut is made with the first cut edge against the fence to the left of the blade so that the corner is lined up with the left side of the saw cut through the fence. The positive stop should be added to the outer edge (toward the operator) of the wood table at this time to improve accuracy for subsequent segments, then make the cut.
- The stop position to cut the next segment can be determined by placing the first segment long point left against the fence to the left of the blade, then line up the right corner with the left side of the saw cut through the fence, clamp it in place and add a stop to the left end at the fence.
- The remaining segments can be cut accurately just be sure there isn't any sawdust between the fence and the workpiece.
- The glue-up is one joint at a time using clamp blocks so the force is across the joint.
- The first step is to glue up 4 sets of 2 then check them for square.
- The next step is to glue up 2 halves then check for straight.
- The final step is to glue the 2 halves together.
- It is obvious that I left out many details but if there is enough interest I can post photos of the various steps that should clear up any questions that arise.
