• July 2025 Turning Challenge: Turn a Multi-axis Weed Pot! (click here for details)
  • Congratulations to James Seyfried for "NE Red Oak II" being selected as Turning of the Week for July 21, 2025 (click here for details)
  • Welcome new registering member. Your username must be your real First and Last name (for example: John Doe). "Screen names" and "handles" are not allowed and your registration will be deleted if you don't use your real name. Also, do not use all caps nor all lower case.

A Tale of Punky Wood

Joined
Sep 19, 2023
Messages
1,466
Likes
2,963
Location
Columbia, TN
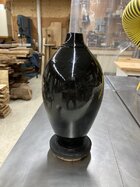
I have been tripping over this piece of sugarberry for a year. I decided to turn it, knowing some of it might be punky. First step, get it trued up.

IMG_20240825_084327.jpgIMG_20240825_085326.jpgIMG_20240825_091222.jpg

Lots of tearout in the pith.

IMG_20240825_092823.jpg
 
I soaked it with a 1# cut of shellac, sharpened my gouge, and tried to get rid of the tearout. It worked as well as I could have hoped. I had to do this twice, because I broke the rim and had to reduce the overall size to fix it.

IMG_20240825_092827.jpgIMG_20240825_100734.jpg

Unfortunately, when I turned the inside, a big crack developed from the pith to the rim. Not surprising. So I glued it up and applied the Hillbilly Web Clamp.

IMG_20240826_075743.jpg

I took the tie-down strap off today and it looks pretty good. However, getting this bowl true after the gluing is going to be dicey. I think it'll just blow apart. I'll tinker with it today and see if I can save it.
 
I'll be right over here in the corner with the popcorn. Did you resist the urge to turn it on with that strap still on it just to see what it would do?
 
I'll be right over here in the corner with the popcorn. Did you resist the urge to turn it on with that strap still on it just to see what it would do?

I thought about that for about 250 milliseconds, but dismissed the thought immediately due to the weight of the ratchet. I also thought about putting a big rubber band around it when I go to finish the inside. It was flexing pretty dramatically.
 
I thought about that for about 250 milliseconds, but dismissed the thought immediately due to the weight of the ratchet. I also thought about putting a big rubber band around it when I go to finish the inside. It was flexing pretty dramatically.
If you really can't resist risking it... try strapping tape - that's the packing tape with strings in it.
 
I thought about that for about 250 milliseconds, but dismissed the thought immediately due to the weight of the ratchet. I also thought about putting a big rubber band around it when I go to finish the inside. It was flexing pretty dramatically.

Wonder where they get those big rubber bands that are used on ceramic molds? They seem pretty massive. Or maybe a lawnmower tire tube with the inside cut out so it would "cup" the bowl?
 
I would stop and apply some minwax wood hardener, or soak in some cactus juice and heat for a couple hours. Minwax is easier but I let it sit a few days before hitting it again.
 
I would stop and apply some minwax wood hardener, or soak in some cactus juice and heat for a couple hours. Minwax is easier but I let it sit a few days before hitting it again.

Good suggestion. I don't have any of that on hand and I'm an impatient type, so I'll soldier on with what I have.
 
I think it will live. When that crack formed, it threw everything out of whack. I wasn't aware of it for the first few seconds. Continuing to turn with that crack and all the flexing left a lot of tearout and unevenness with the interior walls. I cleaned it up the best I could. I was tempted to use a scraper to smooth things up a bit more, but experience has taught me that on woods like this, it just makes things worse. So, I have some sanding ahead.

IMG_20240826_132652 (1).jpg
 
I think it will live. When that crack formed, it threw everything out of whack. I wasn't aware of it for the first few seconds. Continuing to turn with that crack and all the flexing left a lot of tearout and unevenness with the interior walls. I cleaned it up the best I could. I was tempted to use a scraper to smooth things up a bit more, but experience has taught me that on woods like this, it just makes things worse. So, I have some sanding ahead.

View attachment 66125
Those type of projects are a lot of work but look nice when done.
 
Kent-
Thanks for posting this. I have been fighting with Flaming Box Elder which, similar to your wood, is past it's prime. End tear out has been horrible and nothing I have done with sharpness of tools, lathe speed, or different grinds has eliminated it. Other turning friends have advised that it is a good candidate for the firepit, but it is so beautiful and unusual for our part of the country, I just can't let it go.

I am going to try your sanding sealer method on bowls I have turned rough and dried. Any idea how much or how many coats of SS you applied? I was going to immerse the rough turned bowls in SS and let them there for a week or so, but some of these are 15" or more in diameter and it will take gallons and $$$ to do that. Your method is cheaper and quicker and the results (thanks for the pics) speak for themselves.

Wally

Wally, I mix my own shellac to a 1# cut. That's a pound of shellac flakes for a gallon of alcohol. I only mix a pint at a time, though (2 oz. shellac for a pint). The advantage to this thin cut is A) it's thin as water so it soaks in well and B) it dries quickly. I just brush on a single coat of shellac for the most part, but on the really punk stuff, I pretty well soak it.

You could immerse the blank, but I don't think there is any advantage over a liberal application of a 1# cut shellac.
 
Thanks Kent. I have been using the Zinzer product and shellac is my go to finish. I am going to try your method and again I appreciate your post and especially the pics of the results you got.
 
It's been too hot to turn this week, so the bowl is sitting there chucked up on the lathe just as it was in my last photo. I hope to get back to it by Friday.
 
It's about the size of my thumb.
That is consistent with the way wood warps around the pith as it dries.
Each growth ring wants to shrink more than the growth ring inside it.
With a curve and a thin wall the wood pushes out the inside rings to let the outer ring shrink.
So you get a bump on one side and a depression on the other side
 
Punk can be challenging.
If you were at the AAW you might have seen this one

2Black.jpg

This is how it startedPunk.jpg

Sharp tools required. along with 2 rattle cans of black lacquer and 2 weeks of patiently applying then sanding back the finish. All done on the lathe and a waste block.
 
It wound up as a lacquer/wood "composite" as the lacquer had migrated through the walls in the lower half of the form.
Of course, John Jordan would opine that we (you and me) have too much time on our hands.
This is the piece still on the waste block showing the surface defects.


Picture made about half way through the process
 

Attachments

  • Early Black.jpg
    Early Black.jpg
    121.3 KB · Views: 20
Last edited:
Back
Top