I like to make tools, I picked this up on the internet, and thought it might be worth sharing.
I bought a set of the cheapest combination wrenches that HF had to sell, 1/4" to 3/4", 9 pieces for less than $12.
You can use them as is as a fixed caliper for cutting a dowel or pin on the end of a spindle, which makes a very accurate, tight joint.
You can modify them into cutting tools by grinding of one side of the jaw of the open end wrench to around 38 degrees. (first picture).
The jaw sides are parallel, so if you have a square table on a disk or belt sander, just hold the wrench flat on the table and grind to the angle. I did not measure the angle, just tried to eyeball it to that of a skew. It is important to have the cutting edge at 90 degrees to the center of the wrench. I did not hone mine, they cut well with just the grind.
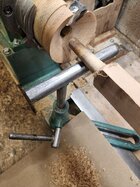
To use them, rough cut the space you want the to be the dowel, about 1/16" to 3/32" larger than finish, then set the tool rest with enough clearance for the open end of the wrench to clear the tool rest, with the height set so that the upper jaw, (cutting edge) is in line with the top of the cut. Apply slight downward pressure to the back of the wrench, so the longer jaw is rubbing the bottom of the dowel, (2nd picture) then feed the tool into the cut. If the pin is longer than the width of cut, reset and push in again. ( I have not had any luck moving the tool from side to side.)
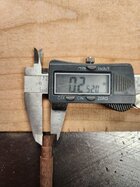
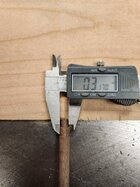
I took a 3/8" walnut dowel as a sample, used a parting tool to set the shoulder, then used the 5/16" wrench to size 5/8" of the end of the dowel , then parted a shoulder and used the 1/4" wrench to size the end. In picture 3, it shows the pin is 2 thousands of an inch larger than 1/4", and picture 4 shows the 5/16" pin is also .002 larger. both should fit nicely into its respective hole.
The cut is not glass smooth, so the glue will have small spaces to accumulate.
WH
I bought a set of the cheapest combination wrenches that HF had to sell, 1/4" to 3/4", 9 pieces for less than $12.
You can use them as is as a fixed caliper for cutting a dowel or pin on the end of a spindle, which makes a very accurate, tight joint.
You can modify them into cutting tools by grinding of one side of the jaw of the open end wrench to around 38 degrees. (first picture).
The jaw sides are parallel, so if you have a square table on a disk or belt sander, just hold the wrench flat on the table and grind to the angle. I did not measure the angle, just tried to eyeball it to that of a skew. It is important to have the cutting edge at 90 degrees to the center of the wrench. I did not hone mine, they cut well with just the grind.
To use them, rough cut the space you want the to be the dowel, about 1/16" to 3/32" larger than finish, then set the tool rest with enough clearance for the open end of the wrench to clear the tool rest, with the height set so that the upper jaw, (cutting edge) is in line with the top of the cut. Apply slight downward pressure to the back of the wrench, so the longer jaw is rubbing the bottom of the dowel, (2nd picture) then feed the tool into the cut. If the pin is longer than the width of cut, reset and push in again. ( I have not had any luck moving the tool from side to side.)
I took a 3/8" walnut dowel as a sample, used a parting tool to set the shoulder, then used the 5/16" wrench to size 5/8" of the end of the dowel , then parted a shoulder and used the 1/4" wrench to size the end. In picture 3, it shows the pin is 2 thousands of an inch larger than 1/4", and picture 4 shows the 5/16" pin is also .002 larger. both should fit nicely into its respective hole.
The cut is not glass smooth, so the glue will have small spaces to accumulate.
WH